NSD SHELL DAY04
1 案例1:使用正则表达式
1.1 问题
本案例要求熟悉正则表达式的编写,完成以下任务:
- 利用egrep工具练习正则表达式的基本用法
1.2 方案
表-1 基本正则列表
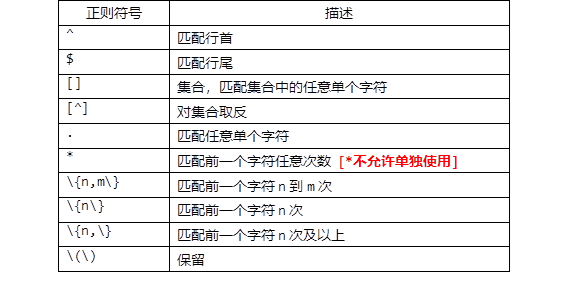
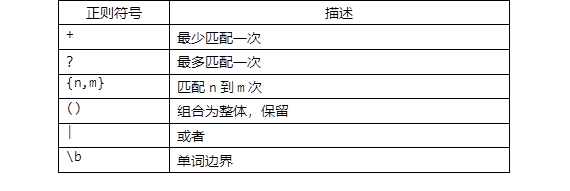
表-1 扩展正则列表
1.3 步骤
实现此案例需要按照如下步骤进行。
步骤一:正则表达式匹配练习
1)典型的应用场合:grep、egrep检索文本行
grep命令不带-E选项时,支持基本正则匹配模式。比如“word”关键词检索、“^word”匹配以word开头的行、“word$”匹配以word结尾的行……等等。
输出以“r”开头的用户记录:
[root@svr5 ~]# grep '^r' /etc/passwd
root:x:0:0:root:/root:/bin/bash
rpc:x:32:32:Portmapper RPC user:/:/sbin/nologin
rpcuser:x:29:29:RPC Service User:/var/lib/nfs:/sbin/nologin
输出以“localhost”结尾的行:
[root@svr5 ~]# grep 'localhost$' /etc/hosts
127.0.0.1               localhost.localdomain localhost
若希望在grep检索式同时组合多个条件,比如输出以“root”或者以“daemon”开头的行:
[root@svr5 ~]# grep '^root|^daemon' /etc/passwd  		//搜索无结果
[root@svr5 ~]#
而若若使用grep -E或egrep命令,可支持扩展正则匹配模式,能够自动识别 |、{} 等扩展正则表达式中的特殊字符,用起来更加方便,比如:
[root@svr5 ~]# grep -E '^(root|daemon)' /etc/passwd
root:x:0:0:root:/root:/bin/bash
daemon:x:2:2:daemon:/sbin:/sbin/nologin
或者
[root@svr5 ~]# egrep '^(root|daemon)' /etc/passwd
root:x:0:0:root:/root:/bin/bash
daemon:x:2:2:daemon:/sbin:/sbin/nologin
使用grep -E 与 使用egrep命令完全等效,推荐使用后者,特别是涉及到复杂的正则表达式的时候。
2)grep、egrep命令的-q选项
选项 -q 表示 quiet(静默)的意思,结合此选项可以只做检索而并不输出,通常在脚本内用来识别查找的目标是否存在,通过返回状态 $? 来判断,这样可以忽略无关的文本信息,简化脚本输出。
比如,检查/etc/hosts文件内是否存在192.168.4.4的映射记录,如果存在则显示“YES”,否则输出“NO”,一般会执行:
[root@svr5 ~]# grep '^192.168.4.4' /etc/hosts && echo "YES" || echo "NO"
192.168.4.4     svr5.tarena.com svr5
YES
这样grep的输出信息和脚本判断后的提示混杂在一起,用户不易辨别,所以可以改成以下操作:
[root@svr5 ~]# grep -q '^192.168.4.4' /etc/hosts && echo "YES" || echo "NO"
YES
是不是清爽多了,从上述结果也可以看到,使用 -q 选项的效果与使用 &> /dev/null的效果类似。
3)基本元字符 ^、$ —— 匹配行首、行尾
输出注释的配置行(以#开头的行):
[root@svr5 ~]# egrep '^#' /etc/inittab
统计本地用户中登录Shell为“/sbin/nologin”的用户个数:
提示:-m10仅在文件中过滤前10次,后面的行不再过滤。
[root@svr5 ~]# egrep -m10 '/sbin/nologin$' /etc/passwd  //先确认匹配正确
bin:x:1:1:bin:/bin:/sbin/nologin
daemon:x:2:2:daemon:/sbin:/sbin/nologin
adm:x:3:4:adm:/var/adm:/sbin/nologin
lp:x:4:7:lp:/var/spool/lpd:/sbin/nologin
mail:x:8:12:mail:/var/spool/mail:/sbin/nologin
uucp:x:10:14:uucp:/var/spool/uucp:/sbin/nologin
operator:x:11:0:operator:/root:/sbin/nologin
games:x:12:100:games:/usr/games:/sbin/nologin
gopher:x:13:30:gopher:/var/gopher:/sbin/nologin
ftp:x:14:50:FTP User:/var/ftp:/sbin/nologin
[root@svr5 ~]# egrep -c '/sbin/nologin$' /etc/passwd
32  									//结合 -c 选项输出匹配的行数
使用 -c 选项可输出匹配行数,这与通过管道再 wc -l的效果是相同的,但是写法更简便。比如,统计使用“/bin/bash”作为登录Shell的正常用户个数,可执行:
[root@svr5 ~]# egrep -c '/bin/bash$' /etc/passwd
26
或者
[root@svr5 ~]# egrep '/bin/bash$' /etc/passwd | wc -l
26
4)基本元字符 . —— 匹配任意单个字符
以/etc/rc.local文件为例,确认文本内容:
[root@svr5 ~]# cat /etc/rc.local
#!/bin/sh
#
# This script will be executed *after* all the other init scripts.
# You can put your own initialization stuff in here if you don't
# want to do the full Sys V style init stuff.

touch /var/lock/subsys/local
输出/etc/rc.local文件内至少包括一个字符(\n换行符除外)的行,即非空行:
[root@svr5 ~]# egrep '.' /etc/rc.local
#!/bin/sh
#
# This script will be executed *after* all the other init scripts.
# You can put your own initialization stuff in here if you don't
# want to do the full Sys V style init stuff.
touch /var/lock/subsys/local
输出/etc/rc.local文件内的空行(用 –v 选项将条件取反):
[root@svr5 ~]# egrep -v '.' /etc/rc.local

[root@svr5 ~]#
上述取空行的操作与下列操作效果相同:
[root@svr5 ~]# egrep '^$' /etc/rc.local

[root@svr5 ~]#
5)基本元字符 +、?、* —— 目标出现的次数
还以/etc/rc.local文件为例:
[root@svr5 ~]# cat /etc/rc.local
#!/bin/sh
#
# This script will be executed *after* all the other init scripts.
# You can put your own initialization stuff in here if you don't
# want to do the full Sys V style init stuff.

touch /var/lock/subsys/local
输出包括 f、ff、ff、……的行,即“f”至少出现一次:
[root@svr5 ~]# egrep 'f+' /etc/rc.local
# This script will be executed *after* all the other init scripts.
# You can put your own initialization stuff in here if you don't
# want to do the full Sys V style init stuff.
输出包括init、initial的行,即末尾的“ial”最多出现一次(可能没有):
[root@svr5 ~]# egrep 'init(ial)?' /etc/rc.local
# This script will be executed *after* all the other init scripts.
# You can put your own initialization stuff in here if you don't
# want to do the full Sys V style init stuff.
输出包括stu、stuf、stuff、stufff、……的行,即末尾的“f”可出现任意多次,也可以没有。重复目标只有一个字符时,可以不使用括号:
[root@svr5 ~]# egrep 'stuf*' /etc/rc.local
# You can put your own initialization stuff in here if you don't
# want to do the full Sys V style init stuff.
输出所有行,单独的“.*”可匹配任意行(包括空行):
[root@svr5 ~]# egrep '.*' /etc/rc.local
#!/bin/sh
#
# This script will be executed *after* all the other init scripts.
# You can put your own initialization stuff in here if you don't
# want to do the full Sys V style init stuff.

touch /var/lock/subsys/local
输出/etc/passwd文件内“r”开头且以“nologin”结尾的用户记录,即中间可以是任意字符:
[root@svr5 ~]# egrep '^r.*nologin$' /etc/passwd
rpc:x:32:32:Portmapper RPC user:/:/sbin/nologin
rpcuser:x:29:29:RPC Service User:/var/lib/nfs:/sbin/nologin
6)元字符 {} —— 限定出现的次数范围
创建一个练习用的测试文件:
[root@svr5 ~]# vim brace.txt
ab def ghi abdr
dedef abab ghighi
abcab CD-ROM
TARENA IT GROUP
cdcd ababab
Hello abababab World
输出包括ababab的行,即“ab”连续出现3次:
[root@svr5 ~]# egrep '(ab){3}' brace.txt
cdcd ababab
Hello abababab World
输出包括abab、ababab、abababab的行,即“ab”连续出现2~4次:
[root@svr5 ~]# egrep '(ab){2,4}' brace.txt
dedef abab ghighi
cdcd ababab
Hello abababab World
输出包括ababab、abababab、……的行,即“ab”最少连续出现3次:
[root@svr5 ~]# egrep '(ab){3,}' brace.txt
cdcd ababab
Hello abababab World
7)元字符 [] —— 匹配范围内的单个字符
还以前面的测试文件bracet.txt为例:
[root@svr5 ~]# cat brace.txt
ab def ghi abdr
dedef abab ghighi
abcab CD-ROM
TARENA IT GROUP
cdcd ababab
Hello abababab World
输出包括abc、abd的行,即前两个字符为“ab”,第三个字符只要是c、d中的一个就符合条件:
[root@svr5 ~]# egrep 'ab[cd]' brace.txt
ab def ghi abdr
abcab CD-ROM
输出包括大写字母的行,使用[A-Z]匹配连续范围:
[root@svr5 ~]# egrep '[A-Z]' brace.txt
abcab CD-ROM
TARENA IT GROUP
Hello abababab World
过滤“非小写字母”的其他字符:
[root@svr5 ~]# egrep '[^a-z]' brace.txt
8)单词边界匹配
以文件/etc/rc.local为例:
[root@svr5 ~]# cat /etc/rc.local
#!/bin/sh
#
# This script will be executed *after* all the other init scripts.
# You can put your own initialization stuff in here if you don't
# want to do the full Sys V style init stuff.

touch /var/lock/subsys/local
输出包括单词“init”的行,文件中“initialization”不合要求:
[root@svr5 ~]# egrep '\binit\b' /etc/rc.local
# This script will be executed *after* all the other init scripts.
# want to do the full Sys V style init stuff.
或者:
[root@svr5 ~]# egrep '\<init\>' /etc/rc.local
# This script will be executed *after* all the other init scripts.
# want to do the full Sys V style init stuff.
输出包括以“ll”结尾的单词的行,使用 \> 匹配单词右边界:
[root@svr5 ~]# egrep 'll\>' /etc/rc.local
# This script will be executed *after* all the other init scripts.
# want to do the full Sys V style init stuff.
或者:
[root@svr5 ~]# egrep 'll\b' /etc/rc.local
# This script will be executed *after* all the other init scripts.
# want to do the full Sys V style init stuff.
9)多个条件的组合
通过dmesg启动日志查看蓝牙设备、网卡设备相关的信息:
[root@svr5 ~]# egrep -i 'eth|network|bluetooth' /var/log/dmesg
Initalizing network drop monitor service
Bluetooth: Core ver 2.10
Bluetooth: HCI device and connection manager initialized
Bluetooth: HCI socket layer initialized
Bluetooth: HCI USB driver ver 2.9
Intel(R) PRO/1000 Network Driver - version 7.3.21-k4-3-NAPI
e1000: eth0: e1000_probe: Intel(R) PRO/1000 Network Connection
2 案例2:sed基本用法
2.1 问题
本案例要求熟悉sed命令的p、d、s等常见操作
2.2 方案
sed文本处理工具的用法:
用法1:前置命令 | sed  [选项]  '条件指令'
用法2:sed  [选项]  '条件指令'  文件.. ..
相关说明如下:
- 条件可以是行号或者/正则/
- 没有条件时,默认为所有条件
- 指令可以是增、删、改、查等指令
- 默认sed会将所有输出的内容都打印出来,可以使用-n屏蔽默认输出
- 选项中可以使用-r选项,让sed支持扩展正则
2.3 步骤
实现此案例需要按照如下步骤进行。
步骤一:认识sed工具的基本选项
sed命令的常用选项如下:
-n(屏蔽默认输出,默认sed会输出读取文档的全部内容)
-r(让sed支持扩展正则)
-i(sed直接修改源文件,默认sed只是通过内存临时修改文件,源文件无影响)
1)sed命令的 -n 选项
执行p打印等过滤操作时,希望看到的是符合条件的文本。但不使用任何选项时,默认会将原始文本一并输出,从而干扰过滤效果。比如,尝试用sed输出/etc/hosts的第1行:
[root@svr5 ~]# sed '1p' /etc/hosts
127.0.0.1   localhost localhost.localdomain localhost4 localhost4.localdomain4
127.0.0.1   localhost localhost.localdomain localhost4 localhost4.localdomain4
::1         localhost localhost.localdomain localhost6 localhost6.localdomain6
可以发现所有的行都被显示出来了(第1行重复2次)。—— 正确的用法应该添加 -n 选项,这样就可以只显示第1行了:
[root@svr5 ~]# sed -n '1p' /etc/hosts
127.0.0.1   localhost localhost.localdomain localhost4 localhost4.localdomain4
行号可以是连续的行号,如打印passwd第3到第6行账户的信息:
[root@svr5 ~]# sed  -n '3,6p' /etc/passwd
bin:x:1:1:bin:/bin:/sbin/nologin
daemon:x:2:2:daemon:/sbin:/sbin/nologin
adm:x:3:4:adm:/var/adm:/sbin/nologin
lp:x:4:7:lp:/var/spool/lpd:/sbin/nologin
2)sed命令的 -i 选项
正常情况下,sed命令所做的处理只是把操作结果(包括打印、删除等)输出到当前终端屏幕,而并不会对原始文件做任何更改:
[root@svr5 ~]# sed 'd' /etc/passwd  					//删除所有行
[root@svr5 ~]# cat /etc/passwd  						//查看原始文本,并未改动
若希望直接修改文件内容,应添加选项 -i 。
比如,直接删除test.txt(自行创建一个任意内容的文件)的第1~4行:
[root@svr5 ~]# sed -i '1,4d' test.txt    		//删除操作
[root@svr5 ~]# cat test.txt  					//确认删除结果
下文中关于使用sed修改文件的示例中,为了避免大家在练习过程中因误操作导致系统故障,命令省略 –i 选项,不再逐一说明。需要时,大家可自行加上此选项。
3)多个指令可以使用分号隔离
用分号来隔离多个操作,比如:
[root@svr5 ~]# sed -n '1p;4p' /etc/passwd
root:x:0:0:root:/root:/bin/bash
adm:x:3:4:adm:/var/adm:/sbin/nologin
步骤二:认识sed工具的条件
# sed [选项] '条件指令' 文件.. ..
sed命令可以使用行号或正则做为条件匹配:
1)行号案例
打印第3行:
[root@svr5 ~]# sed -n '3p' /etc/passwd
打印第3到5行:
[root@svr5 ~]# sed -n '3,5p' /etc/passwd
打印第3和5行:
[root@svr5 ~]# sed -n '3p;5p' /etc/passwd
打印奇数行:
[root@svr5 ~]# sed -n '1~2p' /etc/passwd
打印偶数行:
[root@svr5 ~]# sed -n '2~2p' /etc/passwd
2)正则案例
打印包含root的行:
[root@svr5 ~]# sed -n '/root/p' /etc/passwd
打印bash结尾的行:
[root@svr5 ~]# sed -n '/bash$/p' /etc/passwd
3)没有条件,则表示匹配所有行
[root@svr5 ~]# sed -n 'p' /etc/passwd
步骤三:sed工具的p、d、s操作指令案例集合
1)下面看看sed工具的p指令案例集锦(自己提前生成一个a.txt文件)
[root@svr5 ~]# sed  -n 'p' a.txt			//输出所有行,等同于cat a.txt
[root@svr5 ~]# sed  -n '4p' a.txt			//输出第4行
[root@svr5 ~]# sed  -n '4,7p' a.txt		//输出第4~7行
 [root@svr5 ~]# sed  -n '/^bin/p' a.txt		//输出以bin开头的行
[root@svr5 ~]# sed  -n '$=' a.txt			//输出文件的行数
2)下面看看sed工具的d指令案例集锦(自己提前生成一个a.txt文件)
[root@svr5 ~]# sed  '3,5d' a.txt 			//删除第3~5行
[root@svr5 ~]# sed  '/xml/d' a.txt			//删除所有包含xml的行
[root@svr5 ~]# sed  '/xml/!d' a.txt 		//删除不包含xml的行,!符号表示取反
[root@svr5 ~]# sed  '/^install/d' a.txt	//删除以install开头的行
[root@svr5 ~]# sed  '$d' a.txt				//删除文件的最后一行
[root@svr5 ~]# sed  '/^$/d' a.txt 			//删除所有空行
3)sed命令的s替换基本功能(s/旧内容/新内容/选项):
[root@svr5 ~]# vim  test.txt    			//新建素材
2017 2011 2018
2017 2017 2024
2017 2017 2017

[root@svr5 ~]# sed 's/2017/xxxx/'           test.txt
[root@svr5 ~]# sed 's/2017/xxxx/g'          test.txt
[root@svr5 ~]# sed 's/2017/xxxx/2'          test.txt
[root@svr5 ~]# sed 's/2017//2'              test.txt
[root@svr5 ~]# sed -n 's/2017/xxxx/p'      test.txt
4)下面看看sed工具的s指令案例集锦(自己提前生成一个a.txt文件)
注意:替换操作的分隔“/”可改用其他字符,如#、&等,便于修改文件路径
[root@svr5 ~]# sed 's/xml/XML/'  a.txt		//将每行中第一个xml替换为XML
[root@svr5 ~]# sed 's/xml/XML/3' a.txt 	//将每行中的第3个xml替换为XML
[root@svr5 ~]# sed 's/xml/XML/g' a.txt 	//将所有的xml都替换为XML
[root@svr5 ~]# sed 's/xml//g'     a.txt 	//将所有的xml都删除(替换为空串)
[root@svr5 ~]# sed 's#/bin/bash#/sbin/sh#' a.txt  //将/bin/bash替换为/sbin/sh
[root@svr5 ~]# sed '4,7s/^/#/'   a.txt 		//将第4~7行注释掉(行首加#号)
[root@svr5 ~]# sed 's/^#an/an/'  a.txt 		//解除以#an开头的行的注释(去除行首的#号)
3 案例3:使用sed修改系统配置
3.1 问题
本案例要求熟悉课上的sed应用案例,并编写脚本anonftp.sh,实现以下功能:
- 通过yum安装vsftpd软件包
- 修改vsftpd服务配置,开启匿名上传
- 调整/var/ftp/pub目录权限,允许写入
- 启动vsftpd服务,并设置开机自运行
3.2 步骤
实现此案例需要按照如下步骤进行。
步骤一:编写anonftp.sh脚本,用来装配匿名FTP服务
1)任务需求及思路分析
vsftpd服务的安装、改目录权限、起服务等操作可以直接写在脚本中。
修改vsftpd.conf配置的工作可以使用sed命令,根据默认配置,只需要定位到以#anon开头的行,去掉开头的注释即可。
2)根据实现思路编写脚本文件
[root@svr5 ~]# vim anonftp.sh
#!/bin/bash
yum -y install vsftpd 							//安装vsftpd软件
cp /etc/vsftpd/vsftpd.conf{,.bak}  				//备份默认的配置文件
sed -i "s/^#anon/anon/" /etc/vsftpd/vsftpd.conf  	//修改服务配置
chmod 777 /var/ftp/pub  							//调整目录权限
systemctl start vsftpd	  						//启动服务
systemctl enable vsftpd							//设为自动运行

[root@svr5 ~]# chmod +x anonftp.sh
[root@svr5 ~]# anonftp.sh
4 案例4:sed多行文本处理
4.1 问题
本案例要求使用sed工具来完成下列任务操作:
- 修改主机名配置文件
- 修改hosts文件,添加两条映射记录:192.168.4.5 与 svr5.tarena.com、svr5,还有119.75.217.56与www.baidu.com
4.2 方案
# sed [选项] '条件指令' 文件..
sed工具的多行文本处理操作:
- i: 在指定的行之前插入文本
- a:在指定的行之后追加文本
- c:替换指定的行
4.3 步骤
基本语法格式案例:
注意:系统默认没有a.txt文件,需要自己创建一个测试文件!!!
[root@svr5 ~]# sed  '2a XX'   a.txt			//在第二行后面,追加XX
[root@svr5 ~]# sed  '2i XX'   a.txt			//在第二行前面,插入XX
[root@svr5 ~]# sed  '2c XX'   a.txt			//将第二行替换为XX
实现此案例需要按照如下步骤进行。
步骤一:修改主机名配置文件
1)确认修改前的配置
[root@svr5 ~]# cat /etc/hostname
svr5.tarena.com
2)使用sed修改主机名配置所在行的内容(c整行替换)
[root@svr5 ~]# sed '1c mysvr.tarena.com' /etc/hostname
步骤二:修改hosts文件,添加新的记录
1)确认修改前的配置
[root@svr5 ~]# cat /etc/hosts
127.0.0.1   localhost localhost.localdomain localhost4 localhost4.localdomain4
::1         localhost localhost.localdomain localhost6 localhost6.localdomain6
2)使用sed修改hosts文件,添加两行新纪录(a追加)
[root@svr5 ~]# sed  -i  '$a 192.168.4.5  svr5.tarena.com svr5'  /etc/hosts
127.0.0.1   localhost localhost.localdomain localhost4 localhost4.localdomain4
::1         localhost localhost.localdomain localhost6 localhost6.localdomain6
192.168.4.5  svr5.tarena.com svr5
5 案例5:sed综合脚本应用
5.1 问题
本案例要求编写脚本getupwd.sh,实现以下需求:
- 找到使用bash作登录Shell的本地用户
- 列出这些用户的shadow密码记录
- 按每行“用户名 --> 密码记录”保存到getupwd.log,如图-1所示

图-1
5.2 方案
基本思路如下:
- 先用sed工具取出登录Shell为/bin/bash的用户记录,保存为临时文件/tmp/urec.tmp,并计算记录数量
- 再结合while循环遍历取得的账号记录,逐行进行处理
- 针对每一行用户记录,采用掐头去尾的方式获得用户名、密码字串
- 按照指定格式追加到/tmp/getuupwd.log文件
- 结束循环后删除临时文件,报告分析结果
5.3 步骤
实现此案例需要按照如下步骤进行。
步骤一:编写getupwd.sh脚本
[root@svr5 ~]# vim getupwd.sh
#/bin/bash
A=$(grep "bash$" /etc/passwd | sed 's/:.*//') ## 提取符合条件的账号记录
for i in $A ##遍历账号记录
do
pass1=$(grep $i /etc/shadow)
pass2=${pass1#*:}
pass=${pass2%%:*}
echo "$i --> $pass"
done
[root@svr5 ~]# chmod +x getupwd.sh
步骤二:测试、验证执行结果
[root@svr5 ~]# getupwd.sh
用户分析完毕,请查阅文件 /tmp/getupwd.log
[root@svr5 ~]# less /tmp/getupwd.log
root --> $6$IWgMYmRACwdbfwBo$dr8Yn983nswiJVw0dTMjzbDvSLeCd1GMYjbvsDiFEkL8jnXOLcocBQypOCr4C6BRxNowIxjh6U2qeFU0u1LST/
zengye --> $6$Qb37LOdzRl5995PI$L0zTOgnhGz8ihWkW81J.5XhPp/l7x2Me2ag0S8tRndCBL9nIjHIKkUKulHxJ6TXyHYmffbVgUT6pbSwf8O71
clamav --> !!
mysql --> !!
abc --> !!
.. ..
总结知识点:
#sed [选项] '条件指令' 文件
选项:
-n 屏蔽默认输出
-r 支持扩展正则
-i 修改源文件
条件:
行号 4 4,5 4~2 4,+10
/正则/
指令:
p 打印
d 删除
s 替换s/旧/新/g
a 追加
i 插入
c 替换行