NSD ARCHITECTURE DAY03
1 案例1:部署Hadoop
1.1 问题
本案例要求安装单机模式Hadoop:
- 热词分析:
- 最低配置:2cpu,2G内存,10G硬盘
- 虚拟机IP:192.168.1.50 hadoop1
- 安装部署 hadoop
- 数据分析,查找出现次数最多的单词
1.2 步骤
实现此案例需要按照如下步骤进行。
步骤一:环境准备
1)配置主机名为hadoop1,ip为192.168.1.50,配置yum源(系统源)
备注:由于在之前的案例中这些都已经做过,这里不再重复,不会的学员可以参考之前的案例
2)安装java环境
- [root@hadoop1 ~]# yum -y install java-1.8.0-openjdk-devel
- [root@hadoop1 ~]# java -version
- openjdk version "1.8.0_131"
- OpenJDK Runtime Environment (build 1.8.0_131-b12)
- OpenJDK 64-Bit Server VM (build 25.131-b12, mixed mode)
- [root@hadoop1 ~]# jps
- 1235 Jps
3)安装hadoop
- [root@hadoop1 ~]# cd hadoop/
- [root@hadoop1 hadoop]# ls
- hadoop-2.7.7.tar.gz kafka_2.12-2.1.0.tgz zookeeper-3.4.13.tar.gz
- [root@hadoop1 hadoop]# tar -xf hadoop-2.7.7.tar.gz
- [root@hadoop1 hadoop]# mv hadoop-2.7.7 /usr/local/hadoop
- [root@hadoop1 hadoop]# cd /usr/local/hadoop
- [root@hadoop1 hadoop]# ls
- bin include libexec NOTICE.txt sbin
- etc lib LICENSE.txt README.txt share
- [root@hadoop1 hadoop]# ./bin/hadoop //报错,JAVA_HOME没有找到
- Error: JAVA_HOME is not set and could not be found.
- [root@hadoop1 hadoop]#
4)解决报错问题
- [root@hadoop1 hadoop]# rpm -ql java-1.8.0-openjdk
- [root@hadoop1 hadoop]# cd ./etc/hadoop/
- [root@hadoop1 hadoop]# vim hadoop-env.sh
- 25 export JAVA_HOME="/usr/lib/jvm/java-1.8.0-openjdk-1.8.0.161-2.b14.el7.x86_64 /jre"
- 33 export HADOOP_CONF_DIR="/usr/local/hadoop/etc/hadoop"
- [root@hadoop1 ~]# cd /usr/local/hadoop/
- [root@hadoop1 hadoop]# ./bin/hadoop
- Usage: hadoop [--config confdir] [COMMAND | CLASSNAME]
- CLASSNAME run the class named CLASSNAME
- or
- where COMMAND is one of:
- fs run a generic filesystem user client
- version print the version
- jar <jar> run a jar file
- note: please use "yarn jar" to launch
- YARN applications, not this command.
- checknative [-a|-h] check native hadoop and compression libraries availability
- distcp <srcurl> <desturl> copy file or directories recursively
- archive -archiveName NAME -p <parent path> <src>* <dest> create a hadoop archive
- classpath prints the class path needed to get the
- credential interact with credential providers
- Hadoop jar and the required libraries
- daemonlog get/set the log level for each daemon
- trace view and modify Hadoop tracing settings
- Most commands print help when invoked w/o parameters.
5)词频统计
- [root@hadoop1 hadoop]# mkdir /usr/local/hadoop/input
- [root@hadoop1 hadoop]# ls
- bin etc include lib libexec LICENSE.txt NOTICE.txt input README.txt sbin share
- [root@hadoop1 hadoop]# cp *.txt /usr/local/hadoop/input
- [root@hadoop1 hadoop]# ./bin/hadoop jar \
- share/hadoop/mapreduce/hadoop-mapreduce-examples-2.7.7.jar wordcount input output //wordcount为参数 统计input这个文件夹,存到output这个文件里面(这个文件不能存在,要是存在会报错,是为了防止数据覆盖)
- [root@hadoop1 hadoop]# cat output/part-r-00000 //查看
2 案例2:准备集群环境
2.1 问题
本案例要求:
- 准备集群环境
- 最低配置:2CPU,2G内存,10G硬盘
- 虚拟机IP:
- 192.168.1.50 hadoop1
- 192.168.1.51 node-0001
- 192.168.1.52 node-0002
- 192.168.1.53 node-0003
- 要求:禁用selinux、禁用firewalld (所有主机)
- 安装java-1.8.0-openjdk-devel,并配置 /etc/hosts(所有主机)
- 设置hadoop1 免密登录其他主机、并不用输入 yes
- 使所有节点能够ping通,配置SSH信任关系
- 节点验证
2.2 方案
准备四台虚拟机,由于之前已经准备过一台,所以只需再准备三台新的虚拟机即可,安装hadoop,使所有节点可以ping通,配置SSH信任关系,如图-1所示:
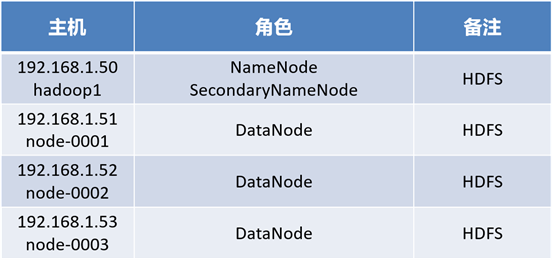
图-1
2.3 步骤
实现此案例需要按照如下步骤进行。
步骤一:环境准备
1)三台机器配置主机名为node-0001、node-0002、node-0003,配置ip地址(ip如图-1所示),yum源(系统源)
2)编辑/etc/hosts(四台主机同样操作,以hadoop1为例)
- [root@hadoop1 ~]# vim /etc/hosts
- 192.168.1.50 hadoop1
- 192.168.1.51 node-0001
- 192.168.1.52 node-0002
- 192.168.1.53 node-0003
3)安装java环境,在node-0001,node-0002,node-0003上面操作(以node-0001为例)
- [root@node-0001 ~]# yum -y install java-1.8.0-openjdk-devel
4)布置SSH信任关系
- [root@hadoop1 ~]# vim /etc/ssh/ssh_config //第一次登陆不需要输入yes
- Host *
- GSSAPIAuthentication yes
- StrictHostKeyChecking no
- [root@hadoop1 .ssh]# ssh-keygen
- Generating public/private rsa key pair.
- Enter file in which to save the key (/root/.ssh/id_rsa):
- Enter passphrase (empty for no passphrase):
- Enter same passphrase again:
- Your identification has been saved in /root/.ssh/id_rsa.
- Your public key has been saved in /root/.ssh/id_rsa.pub.
- The key fingerprint is:
- SHA256:Ucl8OCezw92aArY5+zPtOrJ9ol1ojRE3EAZ1mgndYQM root@hadoop1
- The key's randomart image is:
- +---[RSA 2048]----+
- | o*E*=. |
- | +XB+. |
- | ..=Oo. |
- | o.+o... |
- | .S+.. o |
- | + .=o |
- | o+oo |
- | o+=.o |
- | o==O. |
- +----[SHA256]-----+
- [root@hadoop1 .ssh]# for i in 61 62 63 64 ; do ssh-copy-id 192.168.1.$i; done
- //部署公钥给hadoop1,node-0001,node-0002,node-0003
5)测试信任关系
- [root@hadoop1 .ssh]# ssh node-0001
- Last login: Fri Sep 7 16:52:00 2018 from 192.168.1.60
- [root@node-0001 ~]# exit
- logout
- Connection to node-0001 closed.
- [root@hadoop1 .ssh]# ssh node-0002
- Last login: Fri Sep 7 16:52:05 2018 from 192.168.1.60
- [root@node-0002 ~]# exit
- logout
- Connection to node-0002 closed.
- [root@hadoop1 .ssh]# ssh node-0003
步骤二:配置hadoop
1)修改slaves文件
- [root@hadoop1 ~]# cd /usr/local/hadoop/etc/hadoop
- [root@hadoop1 hadoop]# vim slaves
- node-0001
- node-0002
- node-0003
2)hadoop的核心配置文件core-site
- [root@hadoop1 hadoop]# vim core-site.xml
- <configuration>
- <property>
- <name>fs.defaultFS</name>
- <value>hdfs://hadoop1:9000</value>
- </property>
- <property>
- <name>hadoop.tmp.dir</name>
- <value>/var/hadoop</value>
- </property>
- </configuration>
- [root@hadoop1 hadoop]# mkdir /var/hadoop //hadoop的数据根目录
3)配置hdfs-site文件
- [root@hadoop1 hadoop]# vim hdfs-site.xml
- <configuration>
- <property>
- <name>dfs.namenode.http-address</name>
- <value>hadoop1:50070</value>
- </property>
- <property>
- <name>dfs.namenode.secondary.http-address</name>
- <value>hadoop1:50090</value>
- </property>
- <property>
- <name>dfs.replication</name>
- <value>2</value>
- </property>
- </configuration>
3 案例3:配置Hadoop集群
3.1 问题
本案例要求完成hadoop的同步配置:
- 完成所有Hadoop集群的配置,并同步给所有主机
- 环境配置文件:hadoop-env.sh
- 核心配置文件:core-site.xml
- HDFS配置文件:hdfs-site.xml
- 节点配置文件:slaves
3.2 步骤
实现此案例需要按照如下步骤进行。
步骤一:同步
1)同步配置到node-0001,node-0002,node-0003
- [root@hadoop1 hadoop]# for i in 52 53 54 ; do rsync -aSH --delete /usr/local/hadoop/
- \ 192.168.1.$i:/usr/local/hadoop/ -e 'ssh' & done
- [1] 23260
- [2] 23261
- [3] 23262
2)查看是否同步成功
- [root@hadoop1 hadoop]# ssh node-0001 ls /usr/local/hadoop/
- bin
- etc
- include
- lib
- libexec
- LICENSE.txt
- NOTICE.txt
- output
- README.txt
- sbin
- share
- input
- [root@hadoop1 hadoop]# ssh node-0002 ls /usr/local/hadoop/
- bin
- etc
- include
- lib
- libexec
- LICENSE.txt
- NOTICE.txt
- output
- README.txt
- sbin
- share
- input
- [root@hadoop1 hadoop]# ssh node-0003 ls /usr/local/hadoop/
- bin
- etc
- include
- lib
- libexec
- LICENSE.txt
- NOTICE.txt
- output
- README.txt
- sbin
- share
- input
4 案例4:初始化并验证集群
4.1 问题
本案例要求初始化并验证集群:
- hadoop1 部署 namenode,secondarynamenode
- node-000X 部署 datanode
4.2 步骤
实现此案例需要按照如下步骤进行。
步骤一:格式化
- [root@hadoop1 hadoop]# cd /usr/local/hadoop/
- [root@hadoop1 hadoop]# ./bin/hdfs namenode -format //格式化 namenode
- [root@hadoop1 hadoop]# ./sbin/start-dfs.sh //启动
- [root@hadoop1 hadoop]# jps //验证角色
- 23408 NameNode
- 23700 Jps
- 23591 SecondaryNameNode
- [root@hadoop1 hadoop]# ./bin/hdfs dfsadmin -report //查看集群是否组建成功
- Live datanodes (3): //有三个角色成功
步骤二:web 页面验证
- firefox http://hadoop1:50070 (namenode)
- firefox http://hadoop1:50090 (secondarynamenode)
- firefox http://node-0001:50075 (datanode)
5 案例5:mapreduce模板案例
5.1 问题
本案例要求在 hadoop1 上拷贝 mapreduce 模板案例:
- 配置使用 yarn 的资源管理类
- 把配置同步给所有主机
5.2 步骤
实现此案例需要按照如下步骤进行。
步骤一:部署mapred-site
1)配置mapred-site(hadoop1上面操作)
- [root@hadoop1 ~]# cd /usr/local/hadoop/etc/hadoop/
- [root@hadoop1 ~]# mv mapred-site.xml.template mapred-site.xml
- [root@hadoop1 ~]# vim mapred-site.xml
- <configuration>
- <property>
- <name>mapreduce.framework.name</name>
- <value>yarn</value>
- </property>
- </configuration>
6 案例6:部署Yarn
6.1 问题
本案例要求:
- 在之前创建的 4 台虚拟机上部署 Yarn
- 在虚拟机上安装部署 Yarn
- hadoop1 部署 resourcemanager
- node(1,2,3) 部署 nodemanager
6.2 方案
在之前创建的 4 台虚拟机上部署 Yarn,如图-1所示:
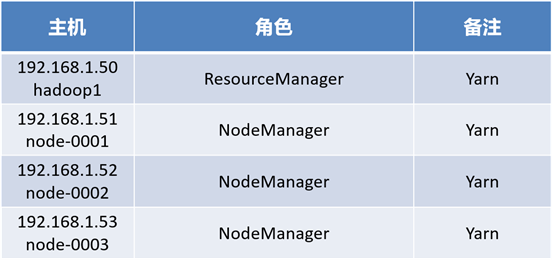
图-2
6.3 步骤
实现此案例需要按照如下步骤进行。
步骤一:安装与部署hadoop
1)配置yarn-site(hadoop1上面操作)
- [root@hadoop1 hadoop]# vim yarn-site.xml
- <configuration>
- <!-- Site specific YARN configuration properties -->
- <property>
- <name>yarn.resourcemanager.hostname</name>
- <value>hadoop1</value>
- </property>
- <property>
- <name>yarn.nodemanager.aux-services</name>
- <value>mapreduce_shuffle</value>
- </property>
- </configuration>
2)同步配置(hadoop1上面操作)
- [root@hadoop1 hadoop]# for i in {52..54}; do rsync -aSH --delete /usr/local/hadoop/ 192.168.1.$i:/usr/local/hadoop/ -e 'ssh' & done
- [1] 712
- [2] 713
- [3] 714
3)验证配置(hadoop1上面操作)
- [root@hadoop1 hadoop]# cd /usr/local/hadoop
- [root@hadoop1 hadoop]# ./sbin/start-dfs.sh
- Starting namenodes on [hadoop1]
- hadoop1: namenode running as process 23408. Stop it first.
- node-0001: datanode running as process 22409. Stop it first.
- node-0002: datanode running as process 22367. Stop it first.
- node-0003: datanode running as process 22356. Stop it first.
- Starting secondary namenodes [hadoop1]
- hadoop1: secondarynamenode running as process 23591. Stop it first.
- [root@hadoop1 hadoop]# ./sbin/start-yarn.sh
- starting yarn daemons
- starting resourcemanager, logging to /usr/local/hadoop/logs/yarn-root-resourcemanager-hadoop1.out
- node-0002: starting nodemanager, logging to /usr/local/hadoop/logs/yarn-root-nodemanager-node-0002.out
- node-0003: starting nodemanager, logging to /usr/local/hadoop/logs/yarn-root-nodemanager-node-0003.out
- node-0001: starting nodemanager, logging to /usr/local/hadoop/logs/yarn-root-nodemanager-node-0001.out
- [root@hadoop1 hadoop]# jps //hadoop1查看有ResourceManager
- 23408 NameNode
- 1043 ResourceManager
- 1302 Jps
- 23591 SecondaryNameNode
- [root@hadoop1 hadoop]# ssh node-0001 jps //node-0001查看有NodeManager
- 25777 Jps
- 22409 DataNode
- 25673 NodeManager
- [root@hadoop1 hadoop]# ssh node-0002 jps //node-0001查看有NodeManager
- 25729 Jps
- 25625 NodeManager
- 22367 DataNode
- [root@hadoop1 hadoop]# ssh node-0003 jps //node-0001查看有NodeManager
- 22356 DataNode
- 25620 NodeManager
- 25724 Jps
4)web访问hadoop
- firefox http://hadoop1:8088 (resourcemanager)
- firefox http://node-0001:8042 (nodemanager)