NSD NETWORK DAY01
1 案例1:eNSP软件与交换机命令行
1.1 问题
- 熟悉eNSP软件的使用
- 熟悉交换机的命令行视图
- 熟悉交换机视图间的转换
1.2 方案
在eNSP程序主窗口中,添加一台s3700交换机,进入交换机,输入相关命令进行配置和查看交换机
1.3 步骤
实现此案例需要按照如下步骤进行
步骤一:改变命令行视图
- <Huawei>system-view //进入系统视图
- [Huawei]interface Ethernet0/0/1 //进入接口视图
- [Huawei-Ethernet0/0/1]quit //返回上一视图
- [Huawei]
- [Huawei]interface Ethernet0/0/1 //再次进入接口视图
- [Huawei-Ethernet0/0/1]return //返回用户视图
- <Huawei>
2 案例2:访问及配置交换机
2.1 问题
- 修改交换机主机名
- 查看交换机VRP版本
- 查看交换机配置
- 使用账户和密码登录终端
- 保存交换机的配置
- 恢复设备出厂默认值
2.2 方案
在eNSP程序主窗口中,添加一台s3700交换机,进入交换机,输入相关命令进行配置和查看交换机
2.3 步骤
实现此案例需要按照如下步骤进行
步骤一:修改交换机主机名
进入系统视图后,使用sysname指令可以为交换机设置主机名。例如,以下操作可以将主机名设置为SW1
- <Huawei>system-view
- [Huawei]sysname SW1
- [SW1]
步骤二:显示VRP版本
- [Huawei]display version
- Huawei Versatile Routing Platform Software
- VRP (R) software, Version 5.110 (S3700 V200R001C00)
- Copyright (c) 2000-2011 HUAWEI TECH CO., LTD
- Quidway S3700-26C-HI Routing Switch uptime is 0 week, 0 day, 0 hour, 17 minutes
步骤三:查看交换机配置
查看ios名称及版本信息
- [Huawei]display current-configuration
- #
- sysname Huawei
- #
- cluster enable
- ntdp enable
- ndp enable
- #
- drop illegal-mac alarm
- #
- diffserv domain default
- #
- drop-profile default
- #
步骤四:使用账户和密码登录终端
- <Huawei>system-view
- [Huawei]aaa //进入aaa认证
- [Huawei-aaa]local-user admin01 password cipher 123 //创建账户叫admin01,密码123
- [Huawei-aaa]quit
- [Huawei]user-interface console 0
- [Huawei-ui-console0]authentication-mode aaa //激活配置
步骤五:保存交换机的配置
- <Huawei>save
- The current configuration will be written to the device.
- Are you sure to continue?[Y/N]y //这里按y确认
- Info: Please input the file name ( *.cfg, *.zip ) [vrpcfg.zip]:
- Mar 12 2019 19:12:18-08:00 Huawei %%01CFM/4/SAVE(l)[0]:The user chose Y when dec
- iding whether to save the configuration to the device.
- Now saving the current configuration to the slot 0.
- Save the configuration successfully.
步骤六:恢复设备出厂默认值
- <Huawei>reset saved-configuration //重置配置文件
- Warning: The action will delete the saved configuration in the device.
- The configuration will be erased to reconfigure. Continue? [Y/N]:y //是否擦除,回答y
- Warning: Now clearing the configuration in the device.
- Mar 12 2019 19:13:50-08:00 Huawei %%01CFM/4/RST_CFG(l)[1]:The user chose Y when
- deciding whether to reset the saved configuration.
- Info: Succeeded in clearing the configuration in the device.
- <Huawei>reboot //重启设备
- Info: The system is now comparing the configuration, please wait.
- Warning: All the configuration will be saved to the configuration file for the n
- ext startup:, Continue?[Y/N]:n //提示是否再次保存,选择n
- Info: If want to reboot with saving diagnostic information, input 'N' and then e
- xecute 'reboot save diagnostic-information'.
- System will reboot! Continue?[Y/N]:y //是否重启,选择y
3 案例3:验证交换机工作原理
3.1 问题
通过2台交换机以及4台pc设备分析交换机工作原理
3.2 方案
实现此目的需要先搭建拓扑,如图-1所示
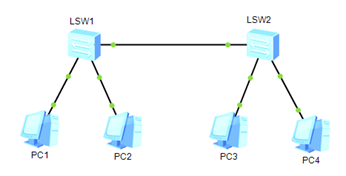
图-1
3.3 步骤
步骤一:pc设备配置
为不同pc设置ip地址与子网掩码,分别是192.168.0.1/24~192.168.0.4/24,配置完毕点击右下角应用,如图-2所示
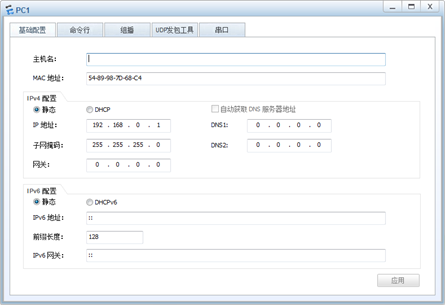
图-2
步骤二:通过pc设备的命令行界面使用ping命令对其他设备发起访问
如图-3所示

图-3
步骤三:在交换机中查看MAC地址表
- [Huawei]display mac-address
- MAC address table of slot 0:
- -------------------------------------------------------------------------------
- MAC Address VLAN/ PEVLAN CEVLAN Port Type LSP/LSR-ID
- VSI/SI MAC-Tunnel
- -------------------------------------------------------------------------------
- 5489-987d-68c4 1 - - Eth0/0/1 dynamic 0/-
- 5489-9806-61a2 1 - - Eth0/0/2 dynamic 0/-
- 5489-98d8-3d5d 1 - - Eth0/0/3 dynamic 0/-
- 5489-98d3-6953 1 - - Eth0/0/3 dynamic 0/-
- -------------------------------------------------------------------------------