NSD OPERATION DAY02
1 案例1:部署LNMP环境
1.1 问题
安装部署Nginx、MariaDB、PHP环境
- 安装部署Nginx、MariaDB、PHP、PHP-FPM;
- 启动Nginx、MariaDB、FPM服务;
- 并测试LNMP是否工作正常。
1.2 方案
目前的网站一般都会有动态和静态数据,默认nginx仅可以处理静态数据,用户访问任何数据都是直接返回对应的文件,如果如果访问的是一个脚本的话,就会导致直接返回一个脚本给用户,而用户没有脚本解释器,也看不懂脚本源代码!网站拓扑如图-1所示。
因此需要整合LNMP(Linux、Nginx、MySQL、PHP)实现动态网站效果。
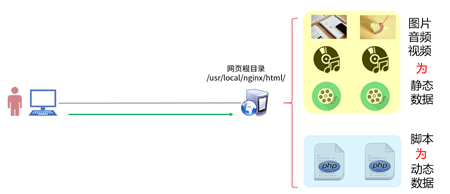
图1
LNMP在CentOS系统中,源码安装Nginx,使用RPM包安装MariaDB、PHP、PHP-FPM软件。
操作过程中需要安装的软件列表如下:
- nginx
- mariadb、mariadb-server、mariadb-devel
- php、php-fpm、php-mysql
备注:mariadb(数据库客户端软件)、mariadb-server(数据库服务器软件)、mariadb-devel(其他客户端软件的依赖包)、php(解释器)、php-fpm(进程管理器服务)、php-mysql(PHP的数据库扩展包)。
1.3 步骤
实现此案例需要按照如下步骤进行。
步骤一:安装软件
1)使用yum安装基础依赖包
- [root@proxy ~]# yum -y install gcc openssl-devel pcre-devel
2)源码安装Nginx(如果前面课程中已经安装Nginx,则忽略这一步)
- [root@proxy ~]# useradd -s /sbin/nologin nginx
- [root@proxy ~]# tar -xvf nginx-1.12.2.tar.gz
- [root@proxy ~]# cd nginx-1.12.2
- [root@proxy nginx-1.12.2]# ./configure \
- > --user=nginx --group=nginx \
- > --with-http_ssl_module
- [root@proxy ~]# make && make install
- .. ..
3)安装MariaDB
Mariadb在新版RHEL7光盘中包含有该软件,配置yum源后可以直接使用yum安装:
- [root@proxy ~]# yum -y install mariadb mariadb-server mariadb-devel
4)php和php-fpm
- [root@proxy ~]# yum -y install php php-mysql
- [root@proxy ~]# yum -y install php-fpm
步骤二:启动服务
1)启动Nginx服务(如果已经启动nginx,则可以忽略这一步)
这里需要注意的是,如果服务器上已经启动了其他监听80端口的服务软件(如httpd),则需要先关闭该服务,否则会出现冲突。
- [root@proxy ~]# systemctl stop httpd //如果该服务存在则关闭该服务
- [root@proxy ~]# /usr/local/nginx/sbin/nginx //启动Nginx服务
- [root@proxy ~]# netstat -utnlp | grep :80
- tcp 0 0 0.0.0.0:80 0.0.0.0:* LISTEN 32428/nginx
2)启动MySQL服务
- [root@proxy ~]# systemctl start mariadb //启动服务器
- [root@proxy ~]# systemctl status mariadb //查看服务状态
- [root@proxy ~]# systemctl enable mariadb //设置开机启动
3)启动PHP-FPM服务
- [root@proxy ~]# systemctl start php-fpm //启动服务
- [root@proxy ~]# systemctl status php-fpm //查看服务状态
- [root@proxy ~]# systemctl enable php-fpm //设置开机启动
2 案例2:构建LNMP平台
2.1 问题
沿用练习一,通过调整Nginx服务端配置,实现以下目标:
- 配置Fast-CGI支持PHP网页
- 创建PHP测试页面,测试使用PHP连接数据库的效果
2.2 方案
使用2台RHEL7虚拟机,其中一台作为LNMP服务器(192.168.4.5)、另外一台作为测试用的Linux客户机(192.168.4.10),如图-2所示。
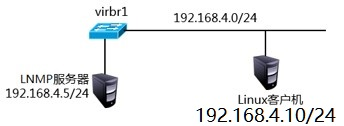
图-2
Nginx结合FastCGI技术即可支持PHP页面架构,如图-3所示。
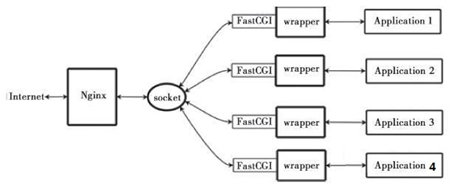
图-3
因此本案例,需要延续练习一的实验内容,通过修改Nginx及php-fpm配置文件实现对PHP页面的支持。
注意,FastCGI的内存消耗问题,一个PHP-FPM解释器将消耗约25M的内存。
2.3 步骤
实现此案例需要按照如下步骤进行。
步骤一: php-fpm配置文件
1)查看php-fpm配置文件(实验中不需要修改该文件)
- [root@proxy etc]# vim /etc/php-fpm.d/www.conf
- [www]
- listen = 127.0.0.1:9000 //PHP端口号
- pm.max_children = 32 //最大进程数量
- pm.start_servers = 15 //最小进程数量
步骤二:修改Nginx配置文件并启动服务
- [root@proxy ~]# vim /usr/local/nginx/conf/nginx.conf
- location / {
- root html;
- index index.php index.html index.htm;
- #设置默认首页为index.php,当用户在浏览器地址栏中只写域名或IP,不说访问什么页面时,服务器会把默认首页index.php返回给用户
- }
- location ~ \.php$ {
- root html;
- fastcgi_pass 127.0.0.1:9000; #将请求转发给本机9000端口,PHP解释器
- fastcgi_index index.php;
- #fastcgi_param SCRIPT_FILENAME $document_root$fastcgi_script_name;
- include fastcgi.conf; #加载其他配置文件
- }
- [root@proxy ~]# /usr/local/nginx/sbin/nginx -s reload
- #请先确保nginx是启动状态,否则运行该命令会报错,报错信息如下:
- #[error] open() "/usr/local/nginx/logs/nginx.pid" failed (2: No such file or directory)
步骤三:创建PHP页面,测试LNMP架构能否解析PHP页面
1)创建PHP测试页面1,可以参考lnmp_soft/php_scripts/test.php:
- [root@proxy ~]# vim /usr/local/nginx/html/test.php
- <?php
- $i="This is a test Page";
- echo $i;
- ?>
2)创建PHP测试页面,连接并查询MariaDB数据库。
可以参考lnmp_soft/php_scripts/mysql.php:
- [root@proxy ~]# vim /usr/local/nginx/html/mysql.php
- <?php
- $mysqli = new mysqli('localhost','root','密码','mysql');
- //注意:root为mysql数据库的账户名称,密码需要修改为实际mysql密码,无密码则留空即可
- //localhost是数据库的域名或IP,mysql是数据库的名称
- if (mysqli_connect_errno()){
- die('Unable to connect!'). mysqli_connect_error();
- }
- $sql = "select * from user";
- $result = $mysqli->query($sql);
- while($row = $result->fetch_array()){
- printf("Host:%s",$row[0]);
- printf("</br>");
- printf("Name:%s",$row[1]);
- printf("</br>");
- }
- ?>
3)客户端使用浏览器访问服务器PHP首页文档,检验是否成功:
- [root@client ~]# firefox http://192.168.4.5/test.php
- [root@client ~]# firefox http://192.168.4.5/mysql.php
4)LNMP常见问题
Nginx的默认访问日志文件为/usr/local/nginx/logs/access.log
Nginx的默认错误日志文件为/usr/local/nginx/logs/error.log
PHP默认错误日志文件为/var/log/php-fpm/www-error.log
如果动态网站访问失败,可用参考错误日志,查找错误信息。
3 案例3:地址重写
3.1 问题
沿用练习二,通过调整Nginx服务端配置,实现以下目标:
- 所有访问a.html的请求,重定向到b.html;
- 所有访问192.168.4.5的请求重定向至www.tmooc.cn;
- 所有访问192.168.4.5/下面子页面,重定向至www.tmooc.cn/下相同的页面;
- 实现firefox与curl访问相同页面文件,返回不同的内容。
3.2 方案
关于Nginx服务器的地址重写,主要用到的配置参数是rewrite:
- rewrite regex replacement flag
- rewrite 旧地址 新地址 [选项]
案例:
- 访问http://www.360buy.com会自动跳转至http://www.jd.com。
- 访问http://www.baidu.com会自动跳转至https://www.baidu.com。
3.3 步骤
实现此案例需要按照如下步骤进行。
步骤一:修改配置文件(访问a.html重定向到b.html)
1)修改Nginx服务配置:
- [root@proxy ~]# vim /usr/local/nginx/conf/nginx.conf
- .. ..
- server {
- listen 80;
- server_name localhost;
- rewrite /a.html /b.html;
- location / {
- root html;
- index index.html index.htm;
- }
- }
- [root@proxy ~]# echo "BB" > /usr/local/nginx/html/b.html
2)重新加载配置文件
- [root@proxy ~]# /usr/local/nginx/sbin/nginx -s reload
3)客户端测试
- [root@client ~]# firefox http://192.168.4.5/a.html
步骤二:访问a.html重定向到b.html(跳转地址栏)
1)修改Nginx服务配置:
- [root@proxy ~]# vim /usr/local/nginx/conf/nginx.conf
- .. ..
- server {
- listen 80;
- server_name localhost;
- rewrite /a.html /b.html redirect;
- location / {
- root html;
- index index.html index.htm;
- }
- }
2)重新加载配置文件
- [root@proxy ~]# /usr/local/nginx/sbin/nginx -s reload
- #请先确保nginx是启动状态,否则运行该命令会报错,报错信息如下:
- #[error] open() "/usr/local/nginx/logs/nginx.pid" failed (2: No such file or directory)
3)客户端测试(仔细观察浏览器地址栏的变化)
- [root@client ~]# firefox http://192.168.4.5/a.html
步骤三:修改配置文件(访问192.168.4.5的请求重定向至www.tmooc.cn)
1) 修改Nginx服务配置
- [root@proxy ~]# vim /usr/local/nginx/conf/nginx.conf
- .. ..
- server {
- listen 80;
- server_name localhost;
- rewrite ^/ http://www.tmooc.cn/;
- location / {
- root html;
- index index.html index.htm;
- # rewrite /a.html /b.html redirect;
- }
- }
2)重新加载配置文件
- [root@proxy ~]# /usr/local/nginx/sbin/nginx -s reload
- #请先确保nginx是启动状态,否则运行该命令会报错,报错信息如下:
- #[error] open() "/usr/local/nginx/logs/nginx.pid" failed (2: No such file or directory)
3)客户端测试(真实机测试,真实机才可以连接tmooc)
- [root@room9pc01 ~]# firefox http://192.168.4.5
步骤四:修改配置文件(访问192.168.4.5/下面子页面,重定向至www.tmooc.cn/下相同的页面)
1) 修改Nginx服务配置
- [root@proxy ~]# vim /usr/local/nginx/conf/nginx.conf
- .. ..
- server {
- listen 80;
- server_name localhost;
- rewrite ^/(.*)$ http://www.tmooc.cn/$1;
- location / {
- root html;
- index index.html index.htm;
- }
- }
2)重新加载配置文件
- [root@proxy ~]# /usr/local/nginx/sbin/nginx -s reload
- #请先确保nginx是启动状态,否则运行该命令会报错,报错信息如下:
- #[error] open() "/usr/local/nginx/logs/nginx.pid" failed (2: No such file or directory)
3)客户端测试(真实机测试,真实机才可以连接tmooc)
- [root@room9pc01 ~]# firefox http://192.168.4.5
- [root@room9pc01 ~]# firefox http://192.168.4.5/test
步骤五:修改配置文件(实现curl和火狐访问相同链接返回的页面不同)
1) 创建网页目录以及对应的页面文件:
- [root@proxy ~]# echo "I am Normal page" > /usr/local/nginx/html/test.html
- [root@proxy ~]# mkdir -p /usr/local/nginx/html/firefox/
- [root@proxy ~]# echo "firefox page" > /usr/local/nginx/html/firefox/test.html
2) 修改Nginx服务配置
- [root@proxy ~]# vim /usr/local/nginx/conf/nginx.conf
- .. ..
- server {
- listen 80;
- server_name localhost;
- location / {
- root html;
- index index.html index.htm;
- }
- #这里,~符号代表正则匹配,*符号代表不区分大小写
- if ($http_user_agent ~* firefox) { //识别客户端firefox浏览器
- rewrite ^(.*)$ /firefox/$1;
- }
- }
3)重新加载配置文件
- [root@proxy ~]# /usr/local/nginx/sbin/nginx -s reload
- #请先确保nginx是启动状态,否则运行该命令会报错,报错信息如下:
- #[error] open() "/usr/local/nginx/logs/nginx.pid" failed (2: No such file or directory)
4)客户端测试
- [root@client ~]# firefox http://192.168.4.5/test.html
- [root@client ~]# curl http://192.168.4.5/test.html
5)地址重写格式【总结】
rewrite 旧地址 新地址 [选项];
last 不再读其他rewrite
break 不再读其他语句,结束请求
redirect 临时重定向
permanent 永久重定向