NSD Project1 DAY04
1 案例1:部署Git版本控制系统
1.1 问题
部署Git版本控制系统,管理网站代码,实现如下效果:
- 基于SSH协议的服务器
- 基于Git协议的服务器
- 基于HTTP协议的服务器
- 上传代码到版本仓库
1.2 方案
生产环境应该有一台独立的Git服务器,这里为了节约主机资源,我们使用数据库主机同时做完Git服务器,如图-1所示。
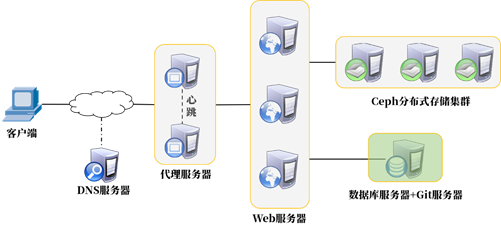
图-1
主机配置如表-1所示。
表-1

1.3 步骤
实现此案例需要按照如下步骤进行。
步骤一:部署SSH协议的版本控制服务器
1)安装软件包,创建空仓库。
- [root@database ~]# yum -y install git
- [root@database ~]# mkdir /var/lib/git/
- [root@database ~]# git init --bare /var/lib/git/wordpress.git #创建空仓库
2)登陆web1服务器克隆git仓库,上传网站代码到git服务器。
- [root@web1 var]# git config --global push.default simple
- [root@web1 var]# git config --global user.email you@example.com
- [root@web1 var]# git config --global user.name "Your Name"
- [root@web1 var]# cd /var/
- [root@web1 var]# git clone root@192.168.2.21:/var/lib/git/wordpress.git
- [root@web1 var]# cd /var/wordpress
- [root@web1 wordpress]# cp -a /usr/local/nginx/html/*
- [root@web1 wordpress]# git add .
- [root@web1 wordpress]# git commit -m "wordpress code"
- [root@web1 wordpress]# git push
- root@192.168.2.21's password:<输入192.168.2.21主机root的密码>
步骤二:部署Git协议的版本控制服务器
1)安装软件包(192.168.2.21操作)
- [root@database ~]# yum -y install git-daemon
2)修改配置文件,启动Git服务
- [root@database ~]# cat /usr/lib/systemd/system/git@.service
- #仅查看即可
- [root@database ~]# systemctl start git.socket
- [root@database ~]# systemctl status git.socket
3)客户端测试(使用web2做完客户端主机,192.168.2.12)
在web2执行clone等同于是把代码又备份了一份。
- [root@web2 ~]# cd /var/
- [root@web2 var]# git clone git://192.168.2.21/wordpress.git
步骤三:部署HTTP协议的版本控制服务器
1)安装软件包(192.168.2.21操作)
- [root@database ~]# yum -y install httpd gitweb
2)修改配置文件
- [root@database ~]# vim /etc/gitweb.conf
- $projectroot = "/var/lib/git"; #添加一行
3)启动服务
- [root@database ~]# systemctl start httpd
4)客户端验证
- 火狐浏览器访问 firefox http://192.168.2.21/git
访问网页可以查看到wordpress仓库,点击tree菜单后可以看到如图-2所示的代码。
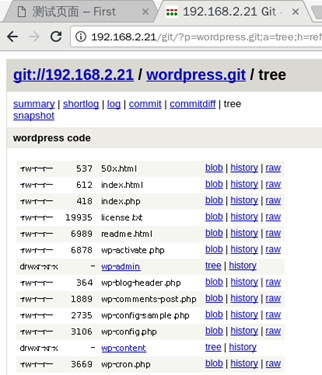
图-2
2 案例2:优化Web服务器
2.1 问题
优化Web服务器,实现如下效果:
- 自定义网站404错误页面
- 升级nginx至1.15.8版本,开启status模块
- 编写日志切割脚本,实现每周五备份日志
- 开启gzip压缩功能,提高数据传输效率
- 开启文件缓存功能
2.2 步骤
实现此案例需要按照如下步骤进行。
步骤一:自定义404错误页面
1)优化前测试(客户端访问一个不存在的页面)。
- 客户端浏览器访问: firefox http://www.lab.com/git
2) 修改Nginx配置文件,自定义错误页面
- [root@web1 ~]# vim /usr/local/nginx/conf/nginx.conf
- error_page 404 /404.html; //自定义错误页面
- [root@web2 ~]# vim /usr/local/nginx/conf/nginx.conf
- error_page 404 /404.html; //自定义错误页面
- [root@web3 ~]# vim /usr/local/nginx/conf/nginx.conf
- error_page 404 /404.html; //自定义错误页面
3) 重启nginx
- [root@web1 ~]# /usr/local/nginx/sbin/nginx -s reload
- [root@web2 ~]# /usr/local/nginx/sbin/nginx -s reload
- [root@web3 ~]# /usr/local/nginx/sbin/nginx -s reload
步骤二:升级nginx版本,开启status模块
1)配置、编译新的nginx(web1、web2、web3做相同操作,下面以web1为例)
- [root@web1 ~]# tar -xf nginx-1.15.8.tar.gz
- [root@web1 ~]# cd nginx-1.15.8
- [root@web1 nginx-1.15.8]# configure \
- --with-http_ssl_module \
- --with-http_stub_status_module
- [root@web1 nginx-1.15.8]# make
2) 备份老版本nginx,更新新版本nginx
- [root@web1 nginx-1.15.8]# mv /usr/local/nginx/sbin/nginx{,.old}
- [root@web1 nginx-1.15.8]# cp objs/nginx /usr/local/nginx/sbin/
3)修改配置文件
- [root@web1 ~]# vim /usr/local/nginx/conf/nginx.conf
- ... ...
- location /status {
- stub_status on;
- allow 192.168.2.0/24; #允许哪个网段查看状态页面
- deny all; #拒绝谁访问查看状态页面
- }
- ... ...
4) 升级或重启服务
注意:必须在nginx-1.15.8源码包目录下执行make upgrade命令。
- [root@web1 nginx-1.15.8]# make upgrade
或者手动执行killall命令杀死进程后重新启动,没有killall命令则需要安装psmisc软件包。
- [root@web1 ~]# killall nginx
- [root@web1 ~]# /usr/local/nginx/sbin/nginx
步骤三:编写日志切割脚本
1)编写脚本(以web1为例)
- [root@web1 ~]# vim /usr/local/nginx/logbak.sh
- #!/bin/bash
- date=`date +%Y%m%d`
- logpath=/usr/local/nginx/logs
- mv $logpath/access.log $logpath/access-$date.log
- mv $logpath/error.log $logpath/error-$date.log
- kill -USR1 $(cat $logpath/nginx.pid)
2)创建计划任务
- [root@web1 ~]# crontab -e
- 03 03 * * 5 /usr/local/nginx/logbak.sh
步骤四:对页面进行压缩处理
1)修改Nginx配置文件
- [root@web1 ~]# cat /usr/local/nginx/conf/nginx.conf
- http {
- .. ..
- gzip on; //开启压缩
- gzip_min_length 1000; //小文件不压缩
- gzip_comp_level 4; //压缩比率
- gzip_types text/plain text/css application/json application/x-javascript text/xml application/xml application/xml+rss text/javascript;
- //对特定文件压缩,类型参考mime.types
- .. ..
- }
步骤五:服务器内存缓存
1)如果需要处理大量静态文件,可以将文件缓存在内存,下次访问会更快。
- http {
- open_file_cache max=2000 inactive=20s;
- open_file_cache_valid 60s;
- open_file_cache_min_uses 5;
- open_file_cache_errors off;
- //设置服务器最大缓存2000个文件句柄,关闭20秒内无请求的文件句柄
- //文件句柄的有效时间是60秒,60秒后过期
- //只有访问次数超过5次会被缓存
- }
附加知识(常见面试题)
1)Git的主要功能是什么。它的常用命令有哪些?
答:
Git是一个分布式的版本控制软件,支持离线操作,主要功能为版本控制,支持日志、数据恢复等功能。
主要命令:
git clone、git add、git commit、git log、git branch、git checkout、git pull、git merge等。
2)工作中你都写过什么脚本?
答:
监控脚本(监控系统、监控服务、监控硬件信息、监控性能、安全监控等)
系统初始化脚本(创建目录,创建账户,安装软件包,设置权限,修改内核参数等)
一键部署(源码安装脚本)
备份脚本(自动备份数据库,备份网站数据,备份日志,备份配置文件等)
日志分析脚本(分析日志数据,汇总并统计相关信息,如PV、UV等)
3)Nginx你用到哪些模块,在proxy模块中你配置哪些参数?
答:
ngx_http_core_module(核心模块,包含http、server_name、root等配置参数)
ngx_http_access_module(访问控制模块,包含allow和deny配置参数)
ngx_http_auth_basic_module(用户认证模块,包含auth_basic等配置参数)
ngx_http_charset_module(字符集模块,包含charset utf8等配置参数)
ngx_http_fastcgi_module(fastcgi模块,包含fastcgi_pass等配置参数)
ngx_http_gzip_module(压缩模块,包含gzip、gzip_type等配置参数)
ngx_http_limit_conn_module(限制并发量模块,包含limit_conn等参数)
ngx_http_log_module(日志模块,包含access_log等配置参数)
ngx_http_proxy_module(代理模块,包含proxy_pass等配置参数)
ngx_http_rewrite_module(地址重写模块,包含rewrite、break、last等配置参数)
ngx_http_ssl_module(加密模块,包含ssl_certificate、ssl_certificate_key等参数)
ngx_http_stub_status_module(状态模块,包含stub_status配置参数)
ngx_http_upstream_module(调度器模块,包含upstream、hash、ip_hash等配置参数)
ngx_stream_core_module(4层代理模块)
在proxy模块中有proxy_pass、proxy_cache、proxy_cache_path、proxy_connect_timeout、proxy_limit_rate等参数)
4)HTTP常见状态码有哪些,分别是什么含义?
答案参考前面的运维课程
5)linux系统中你会用什么命令查看硬件使用的状态信息?
答:
uptime、lscpu查看CPU
free查看内存
lsblk、df、iostat查看磁盘
ifconfig、ip a s查看网卡
dmidecode查看主板设备信息
6)如果你用 grep -i "error" 过滤只是包含error的行,想同时过滤error上面和下面的行如何实现?
答:
grep -i "error" 文件 -A 后面的行数 -B 前面的行数
grep -i "error" 文件 -C 前后的行数