NSD PROJECT2 DAY01
1 案例1:配置逻辑卷
1.1 问题
具体配置如下:
- 添加磁盘
- 磁盘分区
- 创建LV
- 格式化
1.2 方案
分别给2台虚拟机添加2块5G的磁盘。如图-1所示。
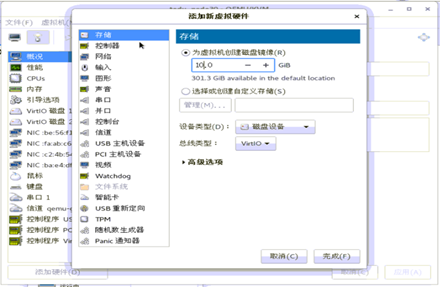
图-1
1.3
1.4 步骤
实现此案例需要按照如下步骤进行。
步骤一:磁盘分区(2台数据库服务器都配置)
1)创建分区,每块盘分1个区即可
- [root@mysql11 ~]# fdisk -l /dev/vdb //查看磁盘容量
- 磁盘 /dev/vdb:5368 MB, 5368709120 字节,10485760 个扇区
- Units = 扇区 of 1 * 512 = 512 bytes
- 扇区大小(逻辑/物理):512 字节 / 512 字节
- I/O 大小(最小/最佳):512 字节 / 512 字节
- [root@mysql11 ~]#
- [root@mysql11 ~]# fdisk -l /dev/vdc //查看磁盘容量
- 磁盘 /dev/vdc:5368 MB, 5368709120 字节,10485760 个扇区
- Units = 扇区 of 1 * 512 = 512 bytes
- 扇区大小(逻辑/物理):512 字节 / 512 字节
- I/O 大小(最小/最佳):512 字节 / 512 字节
- [root@mysql11 ~]#
- [root@mysql11 ~]# fdisk /dev/vdb //磁盘分区
- 欢迎使用 fdisk (util-linux 2.23.2)。
- 更改将停留在内存中,直到您决定将更改写入磁盘。
- 使用写入命令前请三思。
- Device does not contain a recognized partition table
- 使用磁盘标识符 0x882d04b7 创建新的 DOS 磁盘标签。
- 命令(输入 m 获取帮助):n //创建分区
- Partition type:
- p primary (0 primary, 0 extended, 4 free)
- e extended
- Select (default p): p //创建主分区
- 分区号 (1-4,默认 1):1 //指定编号
- 起始 扇区 (2048-10485759,默认为 2048): //起始柱面数
- 将使用默认值 2048
- Last 扇区, +扇区 or +size{K,M,G} (2048-10485759,默认为 10485759)://结束柱面数
- 将使用默认值 10485759
- 分区 1 已设置为 Linux 类型,大小设为 5 GiB
- 命令(输入 m 获取帮助):w //保存退出
- The partition table has been altered!
- Calling ioctl() to re-read partition table.
- 正在同步磁盘。
- [root@mysql11 ~]#
- [root@mysql11 ~]# fdisk /dev/vdc //给vdc盘分区
- 欢迎使用 fdisk (util-linux 2.23.2)。
- 更改将停留在内存中,直到您决定将更改写入磁盘。
- 使用写入命令前请三思。
- Device does not contain a recognized partition table
- 使用磁盘标识符 0x5184f504 创建新的 DOS 磁盘标签。
- 命令(输入 m 获取帮助):n
- Partition type:
- p primary (0 primary, 0 extended, 4 free)
- e extended
- Select (default p): p
- 分区号 (1-4,默认 1):1
- 起始 扇区 (2048-10485759,默认为 2048):
- 将使用默认值 2048
- Last 扇区, +扇区 or +size{K,M,G} (2048-10485759,默认为 10485759):
- 将使用默认值 10485759
- 分区 1 已设置为 Linux 类型,大小设为 5 GiB
- 命令(输入 m 获取帮助):w
- The partition table has been altered!
- Calling ioctl() to re-read partition table.
- 正在同步磁盘。
- [root@mysql11 ~]#
2)查看分区
- [root@mysql11 ~]# fdisk -l /dev/vdb
- 磁盘 /dev/vdb:5368 MB, 5368709120 字节,10485760 个扇区
- Units = 扇区 of 1 * 512 = 512 bytes
- 扇区大小(逻辑/物理):512 字节 / 512 字节
- I/O 大小(最小/最佳):512 字节 / 512 字节
- 磁盘标签类型:dos
- 磁盘标识符:0x882d04b7
- 设备 Boot Start End Blocks Id System
- /dev/vdb1 2048 10485759 5241856 83 Linux
- [root@mysql11 ~]#
- [root@mysql11 ~]#
- [root@mysql11 ~]# fdisk -l /dev/vdc
- 磁盘 /dev/vdc:5368 MB, 5368709120 字节,10485760 个扇区
- Units = 扇区 of 1 * 512 = 512 bytes
- 扇区大小(逻辑/物理):512 字节 / 512 字节
- I/O 大小(最小/最佳):512 字节 / 512 字节
- 磁盘标签类型:dos
- 磁盘标识符:0x5184f504
- 设备 Boot Start End Blocks Id System
- /dev/vdc1 2048 10485759 5241856 83 Linux
- [root@mysql11 ~]#
步骤二:创建LV
1)安装提供命令的软件
- [root@mysql11 ~]# rpm -q lvm2 || yum -y install lvm2 //安装软件
- 已加载插件:fastestmirror
- Loading mirror speeds from cached hostfile
- local_repo | 3.6 kB 00:00:00
- 正在解决依赖关系
- --> 正在检查事务
- ---> 软件包 lvm2.x86_64.7.2.02.177-4.el7 将被 安装
- ……
- ……
- 已安装:
- lvm2.x86_64 7:2.02.177-4.el7
- 作为依赖被安装:
- device-mapper-event.x86_64 7:1.02.146-4.el7
- device-mapper-event-libs.x86_64 7:1.02.146-4.el7
- device-mapper-persistent-data.x86_64 0:0.7.3-3.el7
- libaio.x86_64 0:0.3.109-13.el7
- lvm2-libs.x86_64 7:2.02.177-4.el7
- 完毕!
- [root@mysql11 ~]#
2)创建PV
- [root@mysql11 ~]#
- [root@mysql11 ~]# pvcreate /dev/vdb1 /dev/vdc1 //创建PV
- Physical volume "/dev/vdb1" successfully created.
- Physical volume "/dev/vdc1" successfully created.
- [root@mysql11 ~]#
- [root@mysql11 ~]# pvscan //查看PV信息
- PV /dev/vdb1 lvm2 [<5.00 GiB / 0 free]
- PV /dev/vdc1 lvm2 [<5.00 GiB / 0 free]
- PV /dev/sda2 VG centos lvm2 [<9.00 GiB / 0 free]
- Total: 3 [<18.99 GiB] / in use: 3 [<18.99 GiB] / in no VG: 0 [0 ]
- [root@mysql11 ~]# [root@mysql11 ~]#
3)创建VG
- [root@mysql11 ~]# vgcreate vg0 /dev/vdb1 /dev/vdc1 //创建vg 名称vg0
- Volume group "vg0" successfully created
- [root@mysql11 ~]#
- [root@mysql11 ~]# vgdisplay vg0 //查看vg0详细信息
- --- Volume group ---
- VG Name vg0
- System ID
- Format lvm2
- Metadata Areas 2
- Metadata Sequence No 2
- VG Access read/write
- VG Status resizable
- MAX LV 0
- Cur LV 1
- Open LV 1
- Max PV 0
- Cur PV 2
- Act PV 2
- VG Size 9.99 GiB //总大小
- PE Size 4.00 MiB
- Total PE 2558 //PE总个数
- Alloc PE / Size 2558 / 9.99 GiB
- Free PE / Size 0 / 0
- VG UUID l1MQ7u-CeXC-fdkP-mJCT-0GqP-1gFQ-qKxWNA
- [root@mysql11 ~]#
4)创建LV
- [root@mysql11 ~]# lvcreate -L 9.99G -n lv0 vg0 //创建LV 名称为lv0 大小9.99G
- Rounding up size to full physical extent 9.99 GiB
- Logical volume "lv0" created.
- [root@mysql11 ~]#
- [root@mysql11 ~]# lvdisplay /dev/vg0/lv0 //查看lv0信息
- --- Logical volume ---
- LV Path /dev/vg0/lv0
- LV Name lv0
- VG Name vg0
- LV UUID SciSrm-cp8l-4ZR2-wydh-xg6V-KMiI-pgW0j5
- LV Write Access read/write
- LV Creation host, time mysql11, 2021-02-02 10:33:35 -0500
- LV Status available
- # open 1
- LV Size 9.99 GiB //总大小
- Current LE 2558
- Segments 2
- Allocation inherit
- Read ahead sectors auto
- - currently set to 8192
- Block device 253:2
- [root@mysql11 ~]#
5)格式化
- [root@mysql11 ~]# mkfs.xfs /dev/vg0/lv0 //格式化为 xfs 文件系统
- meta-data=/dev/vg0/lv0 isize=512 agcount=4, agsize=654848 blks
- = sectsz=512 attr=2, projid32bit=1
- = crc=1 finobt=0, sparse=0
- data = bsize=4096 blocks=2619392, imaxpct=25
- = sunit=0 swidth=0 blks
- naming =version 2 bsize=4096 ascii-ci=0 ftype=1
- log =internal log bsize=4096 blocks=2560, version=2
- = sectsz=512 sunit=0 blks, lazy-count=1
- realtime =none extsz=4096 blocks=0, rtextents=0
- [root@mysql11 ~]# blkid /dev/vg0/lv0 //查看文件系统类型
- /dev/vg0/lv0: UUID="3e06f58f-8793-4800-b444-676f5a07fe10" TYPE="xfs"
- [root@mysql11 ~]#
2 案例2:配置数据库服务器
2.1 问题
具体操作如下:
- 安装MySQL软件
- 挂载LV分区
- 启动服务
- 管理员登录
2.2 步骤
实现此案例需要按照如下步骤进行。
步骤一:安装软件MySQL服务软件(2台数据库服务器都要安装)
1)解包软件
- [root@mysql11 ~]# tar -xvf mysql-5.7.17.tar
- mysql-community-client-5.7.17-1.el7.x86_64.rpm
- mysql-community-common-5.7.17-1.el7.x86_64.rpm
- mysql-community-devel-5.7.17-1.el7.x86_64.rpm
- mysql-community-embedded-5.7.17-1.el7.x86_64.rpm
- mysql-community-embedded-compat-5.7.17-1.el7.x86_64.rpm
- mysql-community-embedded-devel-5.7.17-1.el7.x86_64.rpm
- mysql-community-libs-5.7.17-1.el7.x86_64.rpm
- mysql-community-libs-compat-5.7.17-1.el7.x86_64.rpm
- mysql-community-minimal-debuginfo-5.7.17-1.el7.x86_64.rpm
- mysql-community-server-5.7.17-1.el7.x86_64.rpm
- mysql-community-test-5.7.17-1.el7.x86_64.rpm
- [root@mysql11 ~]#
- [root@mysql11 ~]# ls *.rpm
- mysql-community-client-5.7.17-1.el7.x86_64.rpm
- mysql-community-common-5.7.17-1.el7.x86_64.rpm
- mysql-community-devel-5.7.17-1.el7.x86_64.rpm
- mysql-community-embedded-5.7.17-1.el7.x86_64.rpm
- mysql-community-embedded-compat-5.7.17-1.el7.x86_64.rpm
- mysql-community-embedded-devel-5.7.17-1.el7.x86_64.rpm
- mysql-community-libs-5.7.17-1.el7.x86_64.rpm
- mysql-community-libs-compat-5.7.17-1.el7.x86_64.rpm
- mysql-community-minimal-debuginfo-5.7.17-1.el7.x86_64.rpm
- mysql-community-server-5.7.17-1.el7.x86_64.rpm
- mysql-community-test-5.7.17-1.el7.x86_64.rpm
- [root@mysql11 ~]#
2)安装软件
- [root@mysql11 ~]# yum -y install mysql-community-*.rpm
- 已加载插件:fastestmirror
- 正在检查 mysql-community-client-5.7.17-1.el7.x86_64.rpm: mysql-community-client-5.7.17-1.el7.x86_64
- mysql-community-client-5.7.17-1.el7.x86_64.rpm 将被安装
- ……
- ……
- 已安装:
- mysql-community-client.x86_64 0:5.7.17-1.el7 mysql-community-common.x86_64 0:5.7.17-1.el7
- mysql-community-devel.x86_64 0:5.7.17-1.el7 mysql-community-embedded.x86_64 0:5.7.17-1.el7
- mysql-community-embedded-compat.x86_64 0:5.7.17-1.el7 mysql-community-embedded-devel.x86_64 0:5.7.17-1.el7
- mysql-community-libs.x86_64 0:5.7.17-1.el7 mysql-community-libs-compat.x86_64 0:5.7.17-1.el7
- mysql-community-minimal-debuginfo.x86_64 0:5.7.17-1.el7 mysql-community-server.x86_64 0:5.7.17-1.el7
- mysql-community-test.x86_64 0:5.7.17-1.el7
- 作为依赖被安装:
- perl-Data-Dumper.x86_64 0:2.145-3.el7 perl-JSON.noarch 0:2.59-2.el7
- 完毕!
- [root@mysql11 ~]#
步骤二:挂载lv设备
1)设置开机挂载
- [root@mysql11 ~]# blkid /dev/vg0/lv0
- /dev/vg0/lv0: UUID="3e06f58f-8793-4800-b444-676f5a07fe10" TYPE="xfs"
- [root@mysql11 ~]#
- [root@mysql11 ~]# vim /etc/fstab
- /dev/vg0/lv0 /var/lib/mysql xfs defaults 0 0
- :wq
- [root@mysql11 ~]#
2)查看挂载信息
- [root@mysql11 ~]# mount -a
- [root@mysql11 ~]# mount | grep “/var/lib/mysql”
- /dev/mapper/vg0-lv0 on /var/lib/mysql type xfs (rw,relatime,attr2,inode64,noquota)
- [root@mysql11 ~]#
步骤三:启动服务
1)启动服务(俩台数据库服务器都要启动服务)
- [root@mysql11 ~]# systemctl start mysqld
- [root@mysql11 ~]#
- [root@mysql11 ~]# ls /var/lib/mysql
- auto.cnf client-cert.pem ibdata1 ibtmp1 mysql.sock.lock public_key.pem sys
- ca-key.pem client-key.pem ib_logfile0 mysql performance_schema server-cert.pem
- ca.pem ib_buffer_pool ib_logfile1 mysql.sock private_key.pem server-key.pem
- [root@mysql11 ~]#
- [root@mysql11 ~]# systemctl enable mysqld
- [root@mysql11 ~]#
- [root@mysql11 ~]# netstat -utnlp | grep :3306
- tcp6 0 0 :::3306 :::* LISTEN 1531/mysqld
- [root@mysql11 ~]#
- [root@mysql11 ~]# df -h | grep "/var/lib/mysql" //查看数据库目录容量
- /dev/mapper/vg0-lv0 10G 166M 9.9G 2% /var/lib/mysql
- [root@mysql11 ~]#
步骤四:管理员登录
1)查看初始密码
- [root@mysql11 ~]# grep “password” /var/log/mysqld.log
- 2019-07-05T01:56:51.895852Z 1 [Note] A temporary password is generated for root@localhost: bB0*uCmu:.Kj
- [root@mysql11 ~]#
- [root@mysql11 ~]# mysql -uroot -p'bB0*uCmu:.Kj' //初始密码登录
- mysql: [Warning] Using a password on the command line interface can be insecure.
- Welcome to the MySQL monitor. Commands end with ; or \g.
- Your MySQL connection id is 3
- Server version: 5.7.17
- Copyright (c) 2000, 2016, Oracle and/or its affiliates. All rights reserved.
- Oracle is a registered trademark of Oracle Corporation and/or its
- affiliates. Other names may be trademarks of their respective
- owners.
- Type 'help;' or '\h' for help. Type '\c' to clear the current input statement.
- mysql>
2)修改登录密码
- mysql> alter user root@"localhost" identified by "123qqq...A"; //修改密码
- Query OK, 0 rows affected (0.01 sec)
- mysql>
- mysql> exit
- Bye
- [root@mysql11 ~]#
3)新密码登录
- [root@mysql11 ~]# mysql -uroot -p123qqq...A
- mysql: [Warning] Using a password on the command line interface can be insecure.
- Welcome to the MySQL monitor. Commands end with ; or \g.
- Your MySQL connection id is 4
- Server version: 5.7.17 MySQL Community Server (GPL)
- Copyright (c) 2000, 2016, Oracle and/or its affiliates. All rights reserved.
- Oracle is a registered trademark of Oracle Corporation and/or its
- affiliates. Other names may be trademarks of their respective
- owners.
- Type 'help;' or '\h' for help. Type '\c' to clear the current input statement.
- mysql> show databases;
- +--------------------+
- | Database |
- +--------------------+
- | information_schema |
- | mysql |
- | performance_schema |
- | sys |
- +--------------------+
- 4 rows in set (0.00 sec)
3 案例3:配置主从同步
3.1 问题
配置步骤如下:
- 配置主服务器
- 配置从服务器
3.2 步骤
实现此案例需要按照如下步骤进行。
步骤一:配置主服务器
1)启用binlog日志
- [root@mysql11 ~]# vim /etc/my.cnf
- [mysqld]
- server_id=11
- log-bin=master11
- :wq
- [root@mysql11 ~]# systemctl restart mysqld
- [root@mysql11 ~]#
2)用户授权
- [root@mysql11 ~]# mysql -uroot -p123qqq...A
- mysql: [Warning] Using a password on the command line interface can be insecure.
- Welcome to the MySQL monitor. Commands end with ; or \g.
- Your MySQL connection id is 3
- mysql>
- mysql> grant replication slave on *.* to repluser@"%" identified by "123qqq...A";
- Query OK, 0 rows affected, 1 warning (0.04 sec)
- mysql>
3)查看日志信息
- [root@mysql11 ~]# mysql -uroot -p123qqq...A
- mysql> show master status;
- +-----------------+----------+--------------+------------------+-------------------+
- | File | Position | Binlog_Do_DB | Binlog_Ignore_DB | Executed_Gtid_Set |
- +-----------------+----------+--------------+------------------+-------------------+
- | master11.000001 | 441 | | | |
- +-----------------+----------+--------------+------------------+-------------------+
- 1 row in set (0.00 sec)
- mysql>
步骤二:配置从服务器
1)指定server_id
- [root@mysql22 ~]# vim /etc/my.cnf
- [mysqld]
- server_id=22
- :wq
- [root@mysql22 ~]# systemctl restart mysqld
2)指定主服务器信息
- [root@mysql22 ~]# mysql -uroot -p123qqq...A
- mysql: [Warning] Using a password on the command line interface can be insecure.
- Welcome to the MySQL monitor. Commands end with ; or \g.
- Your MySQL connection id is 3
- Server version: 5.7.17 MySQL Community Server (GPL)
- Mysql>
- mysql> change master to master_host="192.168.4.11",master_user="repluser",
- -> master_password="123qqq...A",master_log_file="master11.000001",master_log_pos=441;
- Query OK, 0 rows affected, 2 warnings (0.41 sec)
- mysql>
3)启动slave进程
- mysql> start slave ;
- Query OK, 0 rows affected (0.02 sec)
- mysql>
4)查看状态信息
- [root@mysql22 ~]# mysql -uroot -p123qqq...A -e "show slave status\G" |grep -i yes
- mysql: [Warning] Using a password on the command line interface can be insecure.
- Slave_IO_Running: Yes
- Slave_SQL_Running: Yes
- [root@mysql22 ~]#
- [root@mysql22 ~]# mysql -uroot -p123qqq...A -e "show slave status\G" |grep -i 192.168.4.11
- mysql: [Warning] Using a password on the command line interface can be insecure.
- Master_Host: 192.168.4.11
- [root@mysql22 ~]#
4 案例4:配置读写分离服务
4.1 问题
配置步骤如下:
- 安装软件
- 修改配置文件
- 配置数据库服务器
- 启动服务
- 查看服务状态
- 查看监控信息
4.2 步骤
实现此案例需要按照如下步骤进行。
步骤一:配置读写分离服务
1)安装软件
- [root@maxscale77 ~]# rpm -ivh maxscale-2.1.2-1.rhel.7.x86_64.rpm //安装软件
- 警告:maxscale-2.1.2-1.rhel.7.x86_64.rpm: 头V4 RSA/SHA1 Signature, 密钥 ID 8167ee24: NOKEY
- 准备中... ################################# [100%]
- 正在升级/安装...
- 1:maxscale-2.1.2-1 ( 2%################################# [100%]
- [root@maxscale77 ~]#
- [root@maxscale77 ~]# ls /etc/maxscale.cnf //主配置文件
- /etc/maxscale.cnf
- [root@maxscale77 ~]# ls /var/log/maxscale/ //日志目录
2)修改配置文件
- [root@maxscale77 ~]# vim /etc/maxscale.cnf
- [maxscale] //服务线程数量
- threads=auto
- [server1] //第1台数据库服务器
- type=server
- address=192.168.4.11
- port=3306
- protocol=MySQLBackend
- [server2] //第2台数据库服务器
- type=server
- address=192.168.4.22
- port=3306
- protocol=MySQLBackend
- [MySQL Monitor] //指定监控数据库服务器server1 和 server2
- type=monitor
- module=mysqlmon
- servers=server1,server2
- user=mysqla //监控用户
- passwd=123qqq...A //密码
- monitor_interval=10000
- [Read-Write Service] //定义读写分离服务
- type=service
- router=readwritesplit
- servers=server1,server2
- user=mysqlb //路由用户
- passwd=123qqq...A //密码
- max_slave_connections=100%
- [MaxAdmin Service] //定义管理服务
- type=service
- router=cli
- [Read-Write Listener] //定义读写分离服务端口
- type=listener
- service=Read-Write Service
- protocol=MySQLClient
- port=4006 //端口号
- [MaxAdmin Listener] //定义管理服务端口
- type=listener
- service=MaxAdmin Service
- protocol=maxscaled
- socket=default
- port=4016 //端口号
- :wq
- [root@maxscale77 ~]#
步骤二:配置数据库服务器
1)创建用户:在主服务器上添加,从服务器查看即可
- [root@mysql11 ~]# mysql -uroot -p123qqq...A
- mysql> grant replication slave, replication client on *.*
- -> to mysqla@"%"identified by "123qqq...A";
- mysql> grant select on mysql.* to
- -> mysqlb@"%" identified by "123qqq...A";
- mysql>
2) 从服务器查看授权用户
- [root@mysql22 ~]# mysql -uroot -p123qqq...A -e 'select user,host from mysql.user where user like "maxscale%" '
- mysql: [Warning] Using a password on the command line interface can be insecure.
- +----------------+------+
- | user | host |
- +----------------+------+
- | mysqla | % |
- | mysqlb | % |
- +----------------+------+
- [root@mysql22 ~]#
步骤三:启动maxsacle服务
1)启动服务
- [root@maxscale77 ~]# maxscale -f /etc/maxscale.cnf
2)查看服务信息(进程 和 端口)
- [root@maxscale77 ~]# ps -C maxscale
- PID TTY TIME CMD
- 23254 ? 00:00:00 maxscale
- [root@maxscale77 ~]#
- [root@maxscale77 ~]# netstat -utnlp | grep maxscale
- tcp6 0 0 :::4006 :::* LISTEN 23254/maxscale
- tcp6 0 0 :::4016 :::* LISTEN 23254/maxscale
- [root@maxscale77 ~]#
3)在maxscale服务本机访问管理服务,查看监控信息
- [root@maxscale77 ~]# maxadmin -uadmin -pmariadb -P4016
- MaxScale> list servers
- Servers.
- -------------------+-----------------+-------+-------------+--------------------
- Server | Address | Port | Connections | Status
- -------------------+-----------------+-------+-------------+--------------------
- server1 | 192.168.4.11 | 3306 | 0 | Master, Running
- server2 | 192.168.4.22 | 3306 | 0 | Slave, Running
- -------------------+-----------------+-------+-------------+--------------------
- MaxScale>
- MaxScale> exit
- [root@maxscale77 ~]#
5 案例5:准备NFS服务存储磁盘
5.1 问题
具体配置如下:
- 添加磁盘
- 磁盘分区
- 创建LV
- 格式化
5.2 方案
给NFS服务器主机添加1块3G的磁盘。如图-2所示。

图-2
5.3
5.4 步骤
实现此案例需要按照如下步骤进行。
步骤一:磁盘分区
1)创建分区,分1个区即可
- [root@nfs30 ~]# fdisk -l /dev/vdb //查看磁盘信息
- 磁盘 /dev/vdb:10.7 GB, 10737418240 字节,20971520 个扇区
- Units = 扇区 of 1 * 512 = 512 bytes
- 扇区大小(逻辑/物理):512 字节 / 512 字节
- I/O 大小(最小/最佳):512 字节 / 512 字节
- [root@nfs30 ~]#
- [root@nfs30 ~]# fdisk /dev/vdb //磁盘分区
- 欢迎使用 fdisk (util-linux 2.23.2)。
- 更改将停留在内存中,直到您决定将更改写入磁盘。
- 使用写入命令前请三思。
- Device does not contain a recognized partition table
- 使用磁盘标识符 0x67bb10cf 创建新的 DOS 磁盘标签。
- 命令(输入 m 获取帮助):n //新建分区
- Partition type:
- p primary (0 primary, 0 extended, 4 free)
- e extended
- Select (default p):
- Select (default p): p //创建主分区
- 分区号 (1-4,默认 1): //回车
- 起始 扇区 (2048-20971519,默认为 2048): //回车
- 将使用默认值 2048
- Last 扇区, +扇区 or +size{K,M,G} (2048-20971519,默认为 20971519)://回车
- 将使用默认值 20971519
- 分区 1 已设置为 Linux 类型,大小设为 10 GiB
- 命令(输入 m 获取帮助):w //保存退出
- The partition table has been altered!
- Calling ioctl() to re-read partition table.
- 正在同步磁盘。
- [root@nfs30 ~]#
2)查看分区
- [root@nfs30 ~]# fdisk -l /dev/vdb
- 磁盘 /dev/vdb:10.7 GB, 10737418240 字节,20971520 个扇区
- Units = 扇区 of 1 * 512 = 512 bytes
- 扇区大小(逻辑/物理):512 字节 / 512 字节
- I/O 大小(最小/最佳):512 字节 / 512 字节
- 磁盘标签类型:dos
- 磁盘标识符:0x67bb10cf
- 设备 Boot Start End Blocks Id System
- /dev/vdb1 2048 20971519 10484736 83 Linux
- [root@nfs30 ~]#
步骤二:挂载磁盘
1)格式化
- [root@nfs30 ~]# mkfs.xfs /dev/vdb1 //格式化
- meta-data=/dev/vdb1 isize=512 agcount=4, agsize=655296 blks
- = sectsz=512 attr=2, projid32bit=1
- = crc=1 finobt=0, sparse=0
- data = bsize=4096 blocks=2621184, imaxpct=25
- = sunit=0 swidth=0 blks
- naming =version 2 bsize=4096 ascii-ci=0 ftype=1
- log =internal log bsize=4096 blocks=2560, version=2
- = sectsz=512 sunit=0 blks, lazy-count=1
- realtime =none extsz=4096 blocks=0, rtextents=0
- [root@nfs30 ~]#
- [root@nfs30 ~]# blkid /dev/vdb1 //查看
- /dev/vdb1: UUID="81740d7a-51f1-4ce1-a830-7b6517cc778e" TYPE="xfs"
- [root@nfs30 ~]#
2)配置开机挂载
- [root@nfs30 ~]# vim /etc/fstab //修改配置文件
- /dev/vdb1 /sitedir xfs defaults 0 0
- [root@nfs30 ~]#
- [root@nfs30 ~]# mkdir /sitedir //创建挂载目录
- [root@nfs30 ~]# chmod o+w /sitedir //赋予写权限
- [root@nfs30 ~]# mount –a //加载文件中所有未加载的设备
- [root@nfs30 ~]# mount | grep "/sitedir" //查看加载信息
- /dev/vdb1 on /sitedir type xfs (rw,relatime,attr2,inode64,noquota)
- [root@nfs30 ~]#
6 案例6:配置NFS服务
6.1 问题
具体配置如下:
- 安装软件
- 修改配置文件
- 启动服务
- 查看共享信息
6.2 步骤
实现此案例需要按照如下步骤进行。
步骤一:部署NFS服务
1)安装软件
- [root@nfs30 ~]# yum -y install nfs-utils rpcbind
- 已安装:
- nfs-utils.x86_64 1:1.3.0-0.54.el7 rpcbind.x86_64 0:0.2.0-44.el7
- 作为依赖被安装:
- gssproxy.x86_64 0:0.7.0-17.el7 keyutils.x86_64 0:1.5.8-3.el7
- libbasicobjects.x86_64 0:0.1.1-29.el7 libcollection.x86_64 0:0.7.0-29.el7
- libevent.x86_64 0:2.0.21-4.el7 libini_config.x86_64 0:1.3.1-29.el7
- libnfsidmap.x86_64 0:0.25-19.el7 libpath_utils.x86_64 0:0.2.1-29.el7
- libref_array.x86_64 0:0.1.5-29.el7 libtirpc.x86_64 0:0.2.4-0.10.el7
- libverto-libevent.x86_64 0:0.2.5-4.el7 quota.x86_64 1:4.01-17.el7
- quota-nls.noarch 1:4.01-17.el7 tcp_wrappers.x86_64 0:7.6-77.el7
- 完毕!
- [root@nfs30 ~]#
2)修改配置文件
- [root@nfs30 ~]#
- [root@nfs30 ~]# vim /etc/exports
- /sitedir *(rw)
- :wq
- [root@nfs30 ~]# exportfs –r //加载配置
- [root@nfs30 ~]#
步骤二:启动服务
1)启动服务
- [root@nfs30 ~]# systemctl start rpcbind
- [root@nfs30 ~]#
- [root@nfs30 ~]# systemctl start nfs
- [root@nfs30 ~]#
- [root@nfs30 ~]# systemctl enable nfs
- Created symlink from /etc/systemd/system/multi-user.target.wants/nfs-server.service to /usr/lib/systemd/system/nfs-server.service.
- [root@nfs30 ~]#
- [root@nfs30 ~]# systemctl enable rpcbind
- [root@nfs30 ~]#
2)查看共享信息
- [root@nfs30 ~]# showmount -e localhost
- Export list for localhost:
- /sitedir *
- [root@nfs30 ~]#
7 案例7:配置网站服务
7.1 问题
具体配置如下:
- 安装软件
- 挂载共享存储
- 启动服务
7.2 步骤
实现此案例需要按照如下步骤进行。
步骤一:安装软件
1)安装软件
- [root@web33 ~]# yum -y install java-1.8.0-openjdk-1.8.0.161-2.b14.el7.x86_64 //安装JDK
- [root@web33 ~]# tar -zxvf apache-tomcat-8.0.30.tar.gz //解压tomcat源码
- [root@web33 ~]#mv apache-tomcat-8.0.30 /usr/local/tomcat //方便管理移动目录
- [root@web33 ~]#yum -y install mysql-connector-java //安装连接mysql服务软件
- [root@web33 ~]#cp /usr/share/java/mysql-connector-java.jar /usr/local/tomcat/lib/ //拷贝连接命令
- [root@web33 ~]# rm -rf /usr/local/tomcat/webapps/ROOT/* //删除默认的网页文件
- [root@web33 ~]# yum -y install nfs-utils //安装提供showmount命令软件
步骤二:挂载共享
1)查看共享目录
- [root@web33 ~]# showmount -e 192.168.4.30 //查看共享
- Export list for 192.168.4.30:
- /sitedir *
- [root@web33 ~]#
2)挂载共享目录
- [root@web33 ~]# vim /etc/fstab //配置开机挂载
- 192.168.4.30:/sitedir /usr/local/tomcat/webapps/ROOT nfs defaults 0 0
- :wq
- [root@web33 ~]# mount –a //加载所有未加载的设备
3)查看挂载
- [root@web33 ~]# mount | grep "sitedir" //查看挂载
- 192.168.4.30:/sitedir on /usr/local/tomcat/webapps/ROOT type nfs4 (rw,relatime,vers=4.1,rsize=65536,wsize=65536,namlen=255,hard,proto=tcp,port=0,timeo=600,retrans=2,sec=sys,clientaddr=192.168.4.33,local_lock=none,addr=192.168.4.30)
- [root@web33 ~]# systemctl enable remote-fs.target //设置远程加载服务开机运行
步骤三:启动服务
1)启动服务
- [root@web33 ~]# /usr/local/tomcat/bin/startup.sh
- [root@web33 ~]# echo “/usr/local/tomcat/bin/startup.sh” >> /etc/rc.local //设置服务开机运行
- [root@web33 ~]# chmod +x /etc/rc.local
2)查看服务运行信息
- [root@web33 ~]# netstat -utnlp | grep java
- tcp6 0 0 127.0.0.1:8005 :::* LISTEN 83033/java
- tcp6 0 0 :::8009 :::* LISTEN 83033/java
- tcp6 0 0 :::8080 :::* LISTEN 83033/java
8 案例8:测试配置
8.1 问题
具体配置如下:
- 测试NFS服务
- 测试MySQL服务
- 测试Tomcat连接MySQL服务
8.2 步骤
实现此案例需要按照如下步骤进行。
步骤一:测试NFS服务
1)在nfs服务器创建网页 test.html
- [root@nfs30 ~]# echo "web test page" > /sitedir/test.html
- [root@nfs30 ~]#
- [root@nfs30 ~]# ls /sitedir/
- test.html
- [root@nfs30 ~]#
2)在客户端访问网站服务
- [root@room9pc17 ~]# curl http://192.168.4.33/test.html //访问网站33主机
- web test page
- [root@room9pc17 ~]#
步骤二:测试MySQL服务
1)在主数据库服务器上添加,访问数据的连接用户
- [root@mysql11 ~]# mysql -uroot -p123qqq...A
- mysql> create database gamedb; //建库
- mysql> create table gamedb.user(name char(10)); //建表
- mysql> grant select,insert,update,delete on gamedb.* to yaya99@"%" identified by "123qqq...A"; //用户授权
2)在从服务器查看是否同步数据
- [root@mysql22 ~]# mysql -uroot -p123qqq...A
- mysql> show grants for yaya99@"%"; //查看授权用户
- +--------------------------------------------------------------------+
- | Grants for yaya99@% |
- +--------------------------------------------------------------------+
- | GRANT USAGE ON *.* TO 'yaya99'@'%' |
- | GRANT SELECT, INSERT, UPDATE, DELETE ON `gamedb`.* TO 'yaya99'@'%' |
- +--------------------------------------------------------------------+
- 2 rows in set (0.00 sec)
- mysql> desc gamedb.user; //查看库表
- +-------+----------+------+-----+---------+-------+
- | Field | Type | Null | Key | Default | Extra |
- +-------+----------+------+-----+---------+-------+
- | name | char(10) | YES | | NULL | |
- +-------+----------+------+-----+---------+-------+
- mysql> insert into gamedb.user values("xdd"); //用来验证数据读写分离
- mysql> select * from gamedb.user;
- +------+
- | name |
- +------+
- | xdd |
- +------+
- 1 row in set (0.00 sec)
- mysql>
3)测试读写分离服务
在网站服务器上,连接数据读写分离服务器77
- [root@web33 ~]# yum -y install mariadb //安装提供连接命令软件
- 已安装:
- mariadb.x86_64 1:5.5.56-2.el7
- 作为依赖被安装:
- mariadb-libs.x86_64 1:5.5.56-2.el7
- 完毕!
- [root@web33 ~]#
- [root@web33 ~]# mysql -h192.168.4.77 -P4006 -uyaya99 -p123qqq...A //连接读写分离服务
- Welcome to the MariaDB monitor. Commands end with ; or \g.
- Your MySQL connection id is 23258
- Server version: 10.0.0 2.1.2-maxscale MySQL Community Server (GPL)
- Copyright (c) 2000, 2017, Oracle, MariaDB Corporation Ab and others.
- Type 'help;' or '\h' for help. Type '\c' to clear the current input statement.
- MySQL [(none)]>
4)查询数据
- MySQL [(none)]> select * from gamedb.user; //显示的是从服务器上的数据
- +------+
- | name |
- +------+
- | xdd |
- +------+
- 1 row in set (0.00 sec)
- MySQL [(none)]>
5)存储数据
- MySQL [(none)]> insert into gamedb.user values("pmm"); //插入记录
- Query OK, 1 row affected (0.05 sec)
- MySQL [(none)]> select * from gamedb.user; //查看记录
- +------+
- | name |
- +------+
- | xdd |
- | pmm |
- +------+
- 2 rows in set (0.00 sec)
- MySQL [(none)]>
6)在主服务器本机登录查看数据
- [root@mysql11 ~]# mysql -uroot -p123qqq...A -e "select * from gamedb.user"
- mysql: [Warning] Using a password on the command line interface can be insecure.
- +------+
- | name |
- +------+
- | pmm |
- +------+
- [root@mysql11 ~]#
步骤三:Tomcat连接MySQL服务
1)在nfs服务共享目录编写网页文件
- [root@nfs30 ~]# vim /sitedir/linkdb.jsp
- <%@ page language="java" import="java.util.*" pageEncoding="gbk"%>
- <%@ page import="java.naming.*" %>
- <%@ page import="java.sql.*" %>
- <html>
- <body>
- <%
- Class.forName("com.mysql.jdbc.Driver");
- Connection con=DriverManager.getConnection("jdbc:mysql://192.168.4.11:3306/gamedb","yaya99","123qqq...A");
- Statement state=con.createStatement();
- String sql="insert into user values('TOM')";
- state.executeUpdate(sql);
- %>
- <h1>data save ok</h1>
- </body>
- </html>
- :wq
2)在浏览器地址栏里输入网站访问
- http://192.168.4.33:8080/linkdb.jsp
3)在据库服务器查看数据
- [root@mysql11 ~]# mysql -uadmin -p123qqq...A -e 'select * from gamedb.user'
- mysql: [Warning] Using a password on the command line interface can be insecure.
- +------+
- | name |
- +------+
- | TOM |
- | xdd |
- | pmm |
- +------+
- [root@mysql11 ~]#