NSD PROJECT2 DAY02
1 案例1:升级网站运行平台
1.1 问题
具体配置如下:
- 清除当前配置
- 部署LNMP
- 测试配置
1.2 步骤
实现此案例需要按照如下步骤进行。
步骤一:清除当前配置
1)停止网站服务
- [root@web33 ~]# /usr/local/tomcat/bin/shutdown.sh
- [root@web33 ~]# vim /etc/rc.local
- #/usr/local/tomcat/bin/startup.sh
- :wq
2)卸载共享存储
- [root@web33 ~]# umount /usr/local/tomcat/webapps/ROOT //卸载当前挂载
- [root@web33 ~]# vim /etc/fstab //清除开机挂载
- #192.168.4.30:/sitedir /usr/local/tomcat/webapps/ROOT nfs defaults 0 0
- :wq
步骤二:部署LNMP
1)安装软件
- [root@web33 ~]# yum -y install gcc zlib-devel pcre-devel //安装源码Nginx依赖软件
- 已安装:
- gcc.x86_64 0:4.8.5-28.el7 pcre-devel.x86_64 0:8.32-17.el7 zlib-devel.x86_64 0:1.2.7-17.el7
- 作为依赖被安装:
- cpp.x86_64 0:4.8.5-28.el7 glibc-devel.x86_64 0:2.17-222.el7 glibc-headers.x86_64 0:2.17-222.el7 kernel-headers.x86_64 0:3.10.0-862.el7 libmpc.x86_64 0:1.0.1-3.el7
- mpfr.x86_64 0:3.1.1-4.el7
- 完毕!
- [root@web33 ~]#
- [root@web33 ~]# tar -zxvf nginx-1.12.2.tar.gz //解压
- [root@web33 ~]# cd nginx-1.12.2 //进源码目录
- [root@web33 nginx-1.12.2]# ./configure //配置
- ......
- Configuration summary
- + using system PCRE library
- + OpenSSL library is not used
- + using system zlib library
- nginx path prefix: "/usr/local/nginx"
- nginx binary file: "/usr/local/nginx/sbin/nginx"
- nginx modules path: "/usr/local/nginx/modules"
- nginx configuration prefix: "/usr/local/nginx/conf"
- nginx configuration file: "/usr/local/nginx/conf/nginx.conf"
- nginx pid file: "/usr/local/nginx/logs/nginx.pid"
- nginx error log file: "/usr/local/nginx/logs/error.log"
- nginx http access log file: "/usr/local/nginx/logs/access.log"
- nginx http client request body temporary files: "client_body_temp"
- nginx http proxy temporary files: "proxy_temp"
- nginx http fastcgi temporary files: "fastcgi_temp"
- nginx http uwsgi temporary files: "uwsgi_temp"
- nginx http scgi temporary files: "scgi_temp"
- [root@web33 nginx-1.12.2]# make //编译
- ……
- ……
- sed -e "s|%%PREFIX%%|/usr/local/nginx|" \
- -e "s|%%PID_PATH%%|/usr/local/nginx/logs/nginx.pid|" \
- -e "s|%%CONF_PATH%%|/usr/local/nginx/conf/nginx.conf|" \
- -e "s|%%ERROR_LOG_PATH%%|/usr/local/nginx/logs/error.log|" \
- < man/nginx.8 > objs/nginx.8
- make[1]: 离开目录“/root/nginx-1.12.2”
- [root@web33 nginx-1.12.2]#
- [root@web33 nginx-1.12.2]# make install //安装
- ……
- ……
- cp conf/nginx.conf '/usr/local/nginx/conf/nginx.conf.default'
- test -d '/usr/local/nginx/logs' \
- || mkdir -p '/usr/local/nginx/logs'
- test -d '/usr/local/nginx/logs' \
- || mkdir -p '/usr/local/nginx/logs'
- test -d '/usr/local/nginx/html' \
- || cp -R html '/usr/local/nginx'
- test -d '/usr/local/nginx/logs' \
- || mkdir -p '/usr/local/nginx/logs'
- make[1]: 离开目录“/root/nginx-1.12.2”
- [root@web33 nginx-1.12.2]#
- [root@web33 nginx-1.12.2]# ls /usr/local/nginx //查看安装目录
- conf html logs sbin
- [root@web33 nginx-1.12.2]#
- [root@web33 ~]# yum -y install php-fpm //安装php-fpm 软件
- ……
- ……
- 已安装:
- php-fpm.x86_64 0:5.4.16-45.el7
- 作为依赖被安装:
- libzip.x86_64 0:0.10.1-8.el7 php-common.x86_64 0:5.4.16-45.el7
- 完毕!
- [root@web33 ~]# yum -y install php php-mysql //安装php 及 php-mysql 软件
- ……
- ……
- 已安装:
- php.x86_64 0:5.4.16-45.el7 php-mysql.x86_64 0:5.4.16-45.el7
- 作为依赖被安装:
- mariadb-libs.x86_64 1:5.5.56-2.el7 php-cli.x86_64 0:5.4.16-45.el7 php-pdo.x86_64 0:5.4.16-45.el7
- 完毕!
- [root@web33 ~]#
2)挂载共享存储
- [root@web33 ~]# vim /etc/fstab //开机挂载
- 192.168.4.30:/sitedir /usr/local/nginx/html nfs defaults 0 0
- :wq
- [root@web33 ~]# mount -a //挂载设备
- [root@web33 ~]# mount | grep "/usr/local/nginx/html" //查看挂载
- 192.168.4.30:/sitedir on /usr/local/nginx/html type nfs4 (rw,relatime,vers=4.1,rsize=262144,wsize=262144,namlen=255,hard,proto=tcp,port=0,timeo=600,retrans=2,sec=sys,clientaddr=192.168.4.33,local_lock=none,addr=192.168.4.30)
- [root@web33 ~]#
3)启动服务
- [root@web33 ~]# vim +65 /usr/local/nginx/conf/nginx.conf //修改主配置文件
- location ~ \.php$ {
- root html;
- fastcgi_pass 127.0.0.1:9000;
- fastcgi_index index.php;
- #fastcgi_param SCRIPT_FILENAME /scripts$fastcgi_script_name;
- include fastcgi.conf;
- }
- :wq
- [root@web33 ~]# /usr/local/nginx/sbin/nginx //启动服务
- [root@web33 ~]#
- [root@web33 ~]# netstat -utnlp | grep :80 //查看端口
- tcp 0 0 0.0.0.0:80 0.0.0.0:* LISTEN 26335/nginx: master
- [root@web33 ~]#
- [root@web33 ~]# systemctl start php-fpm
- [root@web33 ~]#
- [root@web33 ~]# netstat -utnlp | grep :9000
- tcp 0 0 127.0.0.1:9000 0.0.0.0:* LISTEN 26345/php-fpm: mast
- [root@web33 ~]#
步骤三:测试配置
1)编写PHP脚本
- [root@nfs30 ~]# vim /sitedir/linkdb2.php //在nfs30共享目录编写php脚本文件
- <?php
- $conn=mysql_connect("192.168.4.11","yaya99","123qqq...A");
- mysql_select_db("gamedb");
- $sql = 'insert into user (name) values ("PLJ")';
- mysql_query($sql);
- mysql_close();
- echo "save data ok";
- ?>
- :wq
2)访问脚本
- [root@client50 ~]# curl http://192.168.4.33/linkdb2.php //访问web33服务器
- save data ok
- [root@client50 ~]#
3)查看数据
- [root@mysql11 ~]# mysql –uyaya99 -p123qqq...A -e 'select * from gamedb.user where name="PLJ"' //在数据库服务器查看数据
- mysql: [Warning] Using a password on the command line interface can be insecure.
- +------+
- | name |
- +------+
- | PLJ |
- +------+
- [root@mysql11 ~]#
2 案例2:部署内存存储服务
2.1 问题
具体操作如下:
- 部署redis服务器
- 创建redis集群
- 配置网站服务器
- 测试配置
2.2 方案
克隆7台虚拟机配置要求如图-1所示。
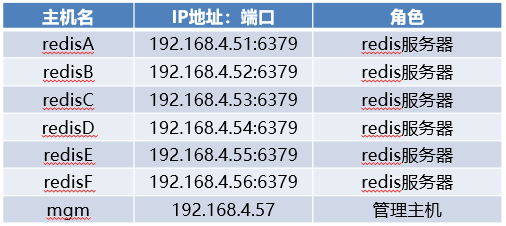
图-1
2.3 步骤
实现此案例需要按照如下步骤进行。
步骤一:部署redis服务器(6台都要配置)
1)搭建redis服务器
- [root@redisA ~]# rpm -q gcc || yum -y install gcc //安装编译工具
- [root@redisA ~]# tar -zxvf redis-4.0.8.tar.gz //解压
- [root@redisA ~]# cd redis-4.0.8/ //进源码目录
- [root@redisA redis-4.0.8]# make install //安装软件
- ……
- ……
- INSTALL install
- INSTALL install
- INSTALL install
- INSTALL install
- INSTALL install
- make[1]: 离开目录“/root/redis-4.0.8/src”
- [root@redisA redis-4.0.8]#
- [root@redisA redis-4.0.8]# ./utils/install_server.sh //初始化配置
- Welcome to the redis service installer
- This script will help you easily set up a running redis server
- Please select the redis port for this instance: [6379] //端口号
- Selecting default: 6379
- Please select the redis config file name [/etc/redis/6379.conf] //主配置文件
- Selected default - /etc/redis/6379.conf
- Please select the redis log file name [/var/log/redis_6379.log] //日志文件
- Selected default - /var/log/redis_6379.log
- Please select the data directory for this instance [/var/lib/redis/6379] //数据库目录
- Selected default - /var/lib/redis/6379
- Please select the redis executable path [/usr/local/bin/redis-server] //服务启动启动程序
- Selected config: //配置总结
- Port : 6379
- Config file : /etc/redis/6379.conf
- Log file : /var/log/redis_6379.log
- Data dir : /var/lib/redis/6379
- Executable : /usr/local/bin/redis-server
- Cli Executable : /usr/local/bin/redis-cli
- Is this ok? Then press ENTER to go on or Ctrl-C to abort.
- Copied /tmp/6379.conf => /etc/init.d/redis_6379
- Installing service...
- Successfully added to chkconfig!
- Successfully added to runlevels 345!
- Starting Redis server... //服务启动提示
- Installation successful! //安装完成提示
- [root@redisA redis-4.0.8]#
- [root@redisA redis-4.0.8]# /etc/init.d/redis_6379 stop //停止服务
- Stopping ...
- Redis stopped
- [root@redisA redis-4.0.8]#
- [root@redisA redis-4.0.8]# vim /etc/redis/6379.conf //修改配置文件,启用集群配置
- 70 bind 192.168.4.51
- 815 cluster-enabled yes
- 823 cluster-config-file nodes-6379.conf
- 829 cluster-node-timeout 5000
- :wq
- [root@redisA redis-4.0.8]# /etc/init.d/redis_6379 start //启动服务
- Starting Redis server...
- [root@redisA redis-4.0.8]# netstat -utnlp | grep redis-server //查看端口
- tcp 0 0 192.168.4.51:6379 0.0.0.0:* LISTEN 29720/redis-server //redis服务端口
- tcp 0 0 192.168.4.51:16379 0.0.0.0:* LISTEN 29720/redis-server //集群端口
- [root@redisB ~]# rpm -q gcc || yum -y install gcc //安装编译工具
- [root@redisB ~]# tar -zxvf redis-4.0.8.tar.gz //解压
- [root@redisB ~]# cd redis-4.0.8/ //进源码目录
- [root@redisB redis-4.0.8]# make install //安装软件
- ……
- ……
- INSTALL install
- INSTALL install
- INSTALL install
- INSTALL install
- INSTALL install
- make[1]: 离开目录“/root/redis-4.0.8/src”
- [root@redisB redis-4.0.8]#
- [root@redisB redis-4.0.8]# ./utils/install_server.sh //初始化配置
- Welcome to the redis service installer
- This script will help you easily set up a running redis server
- Please select the redis port for this instance: [6379] //端口号
- Selecting default: 6379
- Please select the redis config file name [/etc/redis/6379.conf] //主配置文件
- Selected default - /etc/redis/6379.conf
- Please select the redis log file name [/var/log/redis_6379.log] //日志文件
- Selected default - /var/log/redis_6379.log
- Please select the data directory for this instance [/var/lib/redis/6379] //数据库目录
- Selected default - /var/lib/redis/6379
- Please select the redis executable path [/usr/local/bin/redis-server] //服务启动启动程序
- Selected config: //配置总结
- Port : 6379
- Config file : /etc/redis/6379.conf
- Log file : /var/log/redis_6379.log
- Data dir : /var/lib/redis/6379
- Executable : /usr/local/bin/redis-server
- Cli Executable : /usr/local/bin/redis-cli
- Is this ok? Then press ENTER to go on or Ctrl-C to abort.
- Copied /tmp/6379.conf => /etc/init.d/redis_6379
- Installing service...
- Successfully added to chkconfig!
- Successfully added to runlevels 345!
- Starting Redis server... //服务启动提示
- Installation successful! //安装完成提示
- [root@redisB redis-4.0.8]#
- [root@redisB redis-4.0.8]# /etc/init.d/redis_6379 stop //停止服务
- Stopping ...
- Redis stopped
- [root@redisB redis-4.0.8]#
- [root@redisB redis-4.0.8]# vim /etc/redis/6379.conf //修改配置文件,启用集群配置
- 70 bind 192.168.4.52
- 815 cluster-enabled yes
- 823 cluster-config-file nodes-6379.conf
- 829 cluster-node-timeout 5000
- :wq
- [root@redisB redis-4.0.8]# /etc/init.d/redis_6379 start //启动服务
- Starting Redis server...
- [root@redisB redis-4.0.8]# netstat -utnlp | grep redis-server //查看端口
- tcp 0 0 192.168.4.52:6379 0.0.0.0:* LISTEN 29720/redis-server //redis服务端口
- tcp 0 0 192.168.4.52:16379 0.0.0.0:* LISTEN 29720/redis-server //集群端口
- [root@redisC ~]# rpm -q gcc || yum -y install gcc //安装编译工具
- [root@redisC ~]# tar -zxvf redis-4.0.8.tar.gz //解压
- [root@redisC ~]# cd redis-4.0.8/ //进源码目录
- [root@redisC redis-4.0.8]# make install //安装软件
- ……
- ……
- INSTALL install
- INSTALL install
- INSTALL install
- INSTALL install
- INSTALL install
- make[1]: 离开目录“/root/redis-4.0.8/src”
- [root@redisC redis-4.0.8]#
- [root@redisC redis-4.0.8]# ./utils/install_server.sh //初始化配置
- Welcome to the redis service installer
- This script will help you easily set up a running redis server
- Please select the redis port for this instance: [6379] //端口号
- Selecting default: 6379
- Please select the redis config file name [/etc/redis/6379.conf] //主配置文件
- Selected default - /etc/redis/6379.conf
- Please select the redis log file name [/var/log/redis_6379.log] //日志文件
- Selected default - /var/log/redis_6379.log
- Please select the data directory for this instance [/var/lib/redis/6379] //数据库目录
- Selected default - /var/lib/redis/6379
- Please select the redis executable path [/usr/local/bin/redis-server] //服务启动启动程序
- Selected config: //配置总结
- Port : 6379
- Config file : /etc/redis/6379.conf
- Log file : /var/log/redis_6379.log
- Data dir : /var/lib/redis/6379
- Executable : /usr/local/bin/redis-server
- Cli Executable : /usr/local/bin/redis-cli
- Is this ok? Then press ENTER to go on or Ctrl-C to abort.
- Copied /tmp/6379.conf => /etc/init.d/redis_6379
- Installing service...
- Successfully added to chkconfig!
- Successfully added to runlevels 345!
- Starting Redis server... //服务启动提示
- Installation successful! //安装完成提示
- [root@redisC redis-4.0.8]#
- [root@redisC redis-4.0.8]# /etc/init.d/redis_6379 stop //停止服务
- Stopping ...
- Redis stopped
- [root@redisC redis-4.0.8]#
- [root@redisC redis-4.0.8]# vim /etc/redis/6379.conf //修改配置文件,启用集群配置
- 70 bind 192.168.4.53
- 815 cluster-enabled yes
- 823 cluster-config-file nodes-6379.conf
- 829 cluster-node-timeout 5000
- :wq
- [root@redisC redis-4.0.8]# /etc/init.d/redis_6379 start //启动服务
- Starting Redis server...
- [root@redisC redis-4.0.8]# netstat -utnlp | grep redis-server //查看端口
- tcp 0 0 192.168.4.53:6379 0.0.0.0:* LISTEN 29720/redis-server //redis服务端口
- tcp 0 0 192.168.4.53:16379 0.0.0.0:* LISTEN 29720/redis-server //集群端口
- [root@redisD ~]# rpm -q gcc || yum -y install gcc //安装编译工具
- [root@redisD ~]# tar -zxvf redis-4.0.8.tar.gz //解压
- [root@redisD ~]# cd redis-4.0.8/ //进源码目录
- [root@redisD redis-4.0.8]# make install //安装软件
- ……
- ……
- INSTALL install
- INSTALL install
- INSTALL install
- INSTALL install
- INSTALL install
- make[1]: 离开目录“/root/redis-4.0.8/src”
- [root@redisD redis-4.0.8]#
- [root@redisD redis-4.0.8]# ./utils/install_server.sh //初始化配置
- Welcome to the redis service installer
- This script will help you easily set up a running redis server
- Please select the redis port for this instance: [6379] //端口号
- Selecting default: 6379
- Please select the redis config file name [/etc/redis/6379.conf] //主配置文件
- Selected default - /etc/redis/6379.conf
- Please select the redis log file name [/var/log/redis_6379.log] //日志文件
- Selected default - /var/log/redis_6379.log
- Please select the data directory for this instance [/var/lib/redis/6379] //数据库目录
- Selected default - /var/lib/redis/6379
- Please select the redis executable path [/usr/local/bin/redis-server] //服务启动启动程序
- Selected config: //配置总结
- Port : 6379
- Config file : /etc/redis/6379.conf
- Log file : /var/log/redis_6379.log
- Data dir : /var/lib/redis/6379
- Executable : /usr/local/bin/redis-server
- Cli Executable : /usr/local/bin/redis-cli
- Is this ok? Then press ENTER to go on or Ctrl-C to abort.
- Copied /tmp/6379.conf => /etc/init.d/redis_6379
- Installing service...
- Successfully added to chkconfig!
- Successfully added to runlevels 345!
- Starting Redis server... //服务启动提示
- Installation successful! //安装完成提示
- [root@redisD redis-4.0.8]#
- [root@redisD redis-4.0.8]# /etc/init.d/redis_6379 stop //停止服务
- Stopping ...
- Redis stopped
- [root@redisD redis-4.0.8]#
- [root@redisD redis-4.0.8]# vim /etc/redis/6379.conf //修改配置文件,启用集群配置
- 70 bind 192.168.4.54
- 815 cluster-enabled yes
- 823 cluster-config-file nodes-6379.conf
- 829 cluster-node-timeout 5000
- :wq
- [root@redisD redis-4.0.8]# /etc/init.d/redis_6379 start //启动服务
- Starting Redis server...
- [root@redisD redis-4.0.8]# netstat -utnlp | grep redis-server //查看端口
- tcp 0 0 192.168.4.54:6379 0.0.0.0:* LISTEN 29720/redis-server //redis服务端口
- tcp 0 0 192.168.4.54:16379 0.0.0.0:* LISTEN 29720/redis-server //集群端口
- [root@redisE ~]# rpm -q gcc || yum -y install gcc //安装编译工具
- [root@redisE ~]# tar -zxvf redis-4.0.8.tar.gz //解压
- [root@redisE ~]# cd redis-4.0.8/ //进源码目录
- [root@redisE redis-4.0.8]# make install //安装软件
- ……
- ……
- INSTALL install
- INSTALL install
- INSTALL install
- INSTALL install
- INSTALL install
- make[1]: 离开目录“/root/redis-4.0.8/src”
- [root@redisE redis-4.0.8]#
- [root@redisE redis-4.0.8]# ./utils/install_server.sh //初始化配置
- Welcome to the redis service installer
- This script will help you easily set up a running redis server
- Please select the redis port for this instance: [6379] //端口号
- Selecting default: 6379
- Please select the redis config file name [/etc/redis/6379.conf] //主配置文件
- Selected default - /etc/redis/6379.conf
- Please select the redis log file name [/var/log/redis_6379.log] //日志文件
- Selected default - /var/log/redis_6379.log
- Please select the data directory for this instance [/var/lib/redis/6379] //数据库目录
- Selected default - /var/lib/redis/6379
- Please select the redis executable path [/usr/local/bin/redis-server] //服务启动启动程序
- Selected config: //配置总结
- Port : 6379
- Config file : /etc/redis/6379.conf
- Log file : /var/log/redis_6379.log
- Data dir : /var/lib/redis/6379
- Executable : /usr/local/bin/redis-server
- Cli Executable : /usr/local/bin/redis-cli
- Is this ok? Then press ENTER to go on or Ctrl-C to abort.
- Copied /tmp/6379.conf => /etc/init.d/redis_6379
- Installing service...
- Successfully added to chkconfig!
- Successfully added to runlevels 345!
- Starting Redis server... //服务启动提示
- Installation successful! //安装完成提示
- [root@redisE redis-4.0.8]#
- [root@redisE redis-4.0.8]# /etc/init.d/redis_6379 stop //停止服务
- Stopping ...
- Redis stopped
- [root@redisE redis-4.0.8]#
- [root@redisE redis-4.0.8]# vim /etc/redis/6379.conf //修改配置文件,启用集群配置
- 70 bind 192.168.4.55
- 815 cluster-enabled yes
- 823 cluster-config-file nodes-6379.conf
- 829 cluster-node-timeout 5000
- :wq
- [root@redisE redis-4.0.8]# /etc/init.d/redis_6379 start //启动服务
- Starting Redis server...
- [root@redisE redis-4.0.8]# netstat -utnlp | grep redis-server //查看端口
- tcp 0 0 192.168.4.55:6379 0.0.0.0:* LISTEN 29720/redis-server //redis服务端口
- tcp 0 0 192.168.4.55:16379 0.0.0.0:* LISTEN 29720/redis-server //集群端口
- [root@redisF ~]# rpm -q gcc || yum -y install gcc //安装编译工具
- [root@redisF ~]# tar -zxvf redis-4.0.8.tar.gz //解压
- [root@redisF ~]# cd redis-4.0.8/ //进源码目录
- [root@redisF redis-4.0.8]# make install //安装软件
- ……
- ……
- INSTALL install
- INSTALL install
- INSTALL install
- INSTALL install
- INSTALL install
- make[1]: 离开目录“/root/redis-4.0.8/src”
- [root@redisF redis-4.0.8]#
- [root@redisF redis-4.0.8]# ./utils/install_server.sh //初始化配置
- Welcome to the redis service installer
- This script will help you easily set up a running redis server
- Please select the redis port for this instance: [6379] //端口号
- Selecting default: 6379
- Please select the redis config file name [/etc/redis/6379.conf] //主配置文件
- Selected default - /etc/redis/6379.conf
- Please select the redis log file name [/var/log/redis_6379.log] //日志文件
- Selected default - /var/log/redis_6379.log
- Please select the data directory for this instance [/var/lib/redis/6379] //数据库目录
- Selected default - /var/lib/redis/6379
- Please select the redis executable path [/usr/local/bin/redis-server] //服务启动启动程序
- Selected config: //配置总结
- Port : 6379
- Config file : /etc/redis/6379.conf
- Log file : /var/log/redis_6379.log
- Data dir : /var/lib/redis/6379
- Executable : /usr/local/bin/redis-server
- Cli Executable : /usr/local/bin/redis-cli
- Is this ok? Then press ENTER to go on or Ctrl-C to abort.
- Copied /tmp/6379.conf => /etc/init.d/redis_6379
- Installing service...
- Successfully added to chkconfig!
- Successfully added to runlevels 345!
- Starting Redis server... //服务启动提示
- Installation successful! //安装完成提示
- [root@redisF redis-4.0.8]#
- [root@redisF redis-4.0.8]# /etc/init.d/redis_6379 stop //停止服务
- Stopping ...
- Redis stopped
- [root@redisF redis-4.0.8]#
- [root@redisF redis-4.0.8]# vim /etc/redis/6379.conf //修改配置文件,启用集群配置
- 70 bind 192.168.4.56
- 815 cluster-enabled yes
- 823 cluster-config-file nodes-6379.conf
- 829 cluster-node-timeout 5000
- :wq
- [root@redisF redis-4.0.8]# /etc/init.d/redis_6379 start //启动服务
- Starting Redis server...
- [root@redisF redis-4.0.8]# netstat -utnlp | grep redis-server //查看端口
- tcp 0 0 192.168.4.56:6379 0.0.0.0:* LISTEN 29720/redis-server //redis服务端口
- tcp 0 0 192.168.4.56:16379 0.0.0.0:* LISTEN 29720/redis-server //集群端口
步骤二:创建redis集群
1)配置管理主机
- [root@mgm ~]# yum -y install ruby rubygems //安装依赖
- ……
- ……
- 已安装:
- ruby.x86_64 0:2.0.0.648-33.el7_4 rubygems.noarch 0:2.0.14.1-33.el7_4
- 作为依赖被安装:
- libyaml.x86_64 0:0.1.4-11.el7_0 ruby-irb.noarch 0:2.0.0.648-33.el7_4 ruby-libs.x86_64 0:2.0.0.648-33.el7_4 rubygem-bigdecimal.x86_64 0:1.2.0-33.el7_4
- rubygem-io-console.x86_64 0:0.4.2-33.el7_4 rubygem-json.x86_64 0:1.7.7-33.el7_4 rubygem-psych.x86_64 0:2.0.0-33.el7_4 rubygem-rdoc.noarch 0:4.0.0-33.el7_4
- 完毕!
- [root@mgm ~]#
- [root@mgm ~]# gem install redis-3.2.1.gem //安装依赖软件gem程序
- Successfully installed redis-3.2.1
- Parsing documentation for redis-3.2.1
- Installing ri documentation for redis-3.2.1
- 1 gem installed
- [root@mgm ~]# mkdir /root/bin
- [root@mgm ~]# tar -zxvf redis-4.0.8.tar.gz
- [root@mgm ~]# cp redis-4.0.8/src/redis-trib.rb /root/bin/ //拷贝脚本
- [root@mgm ~]#
- [root@mgm ~]# chmod +x /root/bin/redis-trib.rb //确保脚本有执行权限
- [root@mgm ~]#
- [root@mgm ~]# redis-trib.rb help //查看帮助
- Usage: redis-trib <command> <options> <arguments ...>
- create host1:port1 ... hostN:portN
- --replicas <arg>
- check host:port
- info host:port
- fix host:port
- --timeout <arg>
- reshard host:port
- --from <arg>
- --to <arg>
- --slots <arg>
- --yes
- --timeout <arg>
- --pipeline <arg>
- rebalance host:port
- --weight <arg>
- --auto-weights
- --use-empty-masters
- --timeout <arg>
- --simulate
- --pipeline <arg>
- --threshold <arg>
- add-node new_host:new_port existing_host:existing_port
- --slave
- --master-id <arg>
- del-node host:port node_id
- set-timeout host:port milliseconds
- call host:port command arg arg .. arg
- import host:port
- --from <arg>
- --copy
- --replace
- help (show this help)
- For check, fix, reshard, del-node, set-timeout you can specify the host and port of any working node in the cluster.
- [root@mgm ~]#
2)创建集群
- ]# redis-trib.rb create --replicas 1 \
- 192.168.4.51:6379 192.168.4.52:6379 192.168.4.53:6379 \ 192.168.4.54:6379 192.168.4.55:6379 192.168.4.56:6379
- >>> Performing hash slots allocation on 6 nodes...
- Using 3 masters:
- 192.168.4.51:6379
- 192.168.4.52:6379
- 192.168.4.53:6379
- Adding replica 192.168.4.56:6379 to 192.168.4.51:6379
- Adding replica 192.168.4.55:6379 to 192.168.4.52:6379
- Adding replica 192.168.4.54:6379 to 192.168.4.53:6379
- M: d9f8fe6d6d9dd391be8e7904501db1535e4d17cb 192.168.4.51:6379
- slots:0-5460 (5461 slots) master
- M: 324e05df3f143ef97e50d09be0328a695e655986 192.168.4.52:6379
- slots:5461-10922 (5462 slots) master
- M: 9e44139cffb8ebd7ed746aabbf4bcea9bf207645 192.168.4.53:6379
- slots:10923-16383 (5461 slots) master
- S: d9634ba0aa5c1a07193da4a013da6051c1515922 192.168.4.54:6379
- replicates 9e44139cffb8ebd7ed746aabbf4bcea9bf207645
- S: 2d343a9df48f6f6e207949e980ef498466a44dad 192.168.4.56:6379
- replicates d9f8fe6d6d9dd391be8e7904501db1535e4d17cb
- S: 894dd0008053f6fb65e9e4a36b755d9351607500 192.168.4.55:6379
- replicates 324e05df3f143ef97e50d09be0328a695e655986
- Can I set the above configuration? (type 'yes' to accept): yes //同意以上配置
- >>> Nodes configuration updated
- >>> Assign a different config epoch to each node
- >>> Sending CLUSTER MEET messages to join the cluster
- Waiting for the cluster to join...
- >>> Performing Cluster Check (using node 192.168.4.51:6379)
- M: d9f8fe6d6d9dd391be8e7904501db1535e4d17cb 192.168.4.51:6379
- slots:0-5460 (5461 slots) master
- 1 additional replica(s)
- S: d9634ba0aa5c1a07193da4a013da6051c1515922 192.168.4.54:6379
- slots: (0 slots) slave
- replicates 9e44139cffb8ebd7ed746aabbf4bcea9bf207645
- S: 894dd0008053f6fb65e9e4a36b755d9351607500 192.168.4.56:6379
- slots: (0 slots) slave
- replicates 324e05df3f143ef97e50d09be0328a695e655986
- M: 324e05df3f143ef97e50d09be0328a695e655986 192.168.4.52:6379
- slots:5461-10922 (5462 slots) master
- 1 additional replica(s)
- M: 9e44139cffb8ebd7ed746aabbf4bcea9bf207645 192.168.4.53:6379
- slots:10923-16383 (5461 slots) master
- 1 additional replica(s)
- S: 2d343a9df48f6f6e207949e980ef498466a44dad 192.168.4.57:6379
- slots: (0 slots) slave
- replicates d9f8fe6d6d9dd391be8e7904501db1535e4d17cb
- [OK] All nodes agree about slots configuration.
- >>> Check for open slots...
- >>> Check slots coverage...
- [OK] All 16384 slots covered. //提示16384个槽分配完毕
- [root@mgm ~]#
3)查看集群信息
- [root@mgm ~]# redis-trib.rb info 192.168.4.51:6379 //查看集群信息
- 192.168.4.51:6379 (d9f8fe6d...) -> 0 keys | 5461 slots | 1 slaves.
- 192.168.4.52:6379 (324e05df...) -> 0 keys | 5462 slots | 1 slaves.
- 192.168.4.53:6379 (9e44139c...) -> 0 keys | 5461 slots | 1 slaves.
- [OK] 0 keys in 3 masters.
- keys per slot on average
[root@mgm ~]# redis-trib.rb check 192.168.4.51:6379 //检测集群
>>> Performing Cluster Check (using node 192.168.4.51:6379)
M: d9f8fe6d6d9dd391be8e7904501db1535e4d17cb 192.168.4.51:6379
slots:0-5460 (5461 slots) master
1 additional replica(s)
S: d9634ba0aa5c1a07193da4a013da6051c1515922 192.168.4.54:6379
slots: (0 slots) slave
replicates 9e44139cffb8ebd7ed746aabbf4bcea9bf207645
S: 894dd0008053f6fb65e9e4a36b755d9351607500 192.168.4.55:6379
slots: (0 slots) slave
replicates 324e05df3f143ef97e50d09be0328a695e655986
M: 324e05df3f143ef97e50d09be0328a695e655986 192.168.4.52:6379
slots:5461-10922 (5462 slots) master
1 additional replica(s)
M: 9e44139cffb8ebd7ed746aabbf4bcea9bf207645 192.168.4.53:6379
slots:10923-16383 (5461 slots) master
1 additional replica(s)
S: 2d343a9df48f6f6e207949e980ef498466a44dad 192.168.4.56:6379
slots: (0 slots) slave
replicates d9f8fe6d6d9dd391be8e7904501db1535e4d17cb
[OK] All nodes agree about slots configuration.
>>> Check for open slots...
>>> Check slots coverage...
[OK] All 16384 slots covered.
4)测试配置(在客户端连接集群中的任意一台服务器存取数据)
- [root@client50 ~]# redis-cli -c -h 192.168.4.51 -p 6379 //连接服务器51
- 192.168.4.51:6379>
- 192.168.4.51:6379> set x 100 //存储
- -> Redirected to slot [16287] located at 192.168.4.53:6379 //提示存储在53主机
- OK
- 192.168.4.53:6379> keys *
- 1) "x"
- 192.168.4.53:6379>
- 192.168.4.53:6379> set y 200
- OK
- 192.168.4.53:6379> keys *
- 1) "y"
- 2) "x"
- 192.168.4.53:6379> set z 300 //存储
- -> Redirected to slot [8157] located at 192.168.4.52:6379 //提示存储在52主机
- OK
- 192.168.4.52:6379> keys * //在52主机查看数据 只有变量z
- 1) "z"
- 192.168.4.52:6379> get x
- -> Redirected to slot [16287] located at 192.168.4.53:6379 //连接53主机获取数据
- "100"
- 192.168.4.53:6379> keys *
- 1) "y"
- 2) "x"
- 192.168.4.53:6379> get z
- -> Redirected to slot [8157] located at 192.168.4.52:6379
- "300"
- 192.168.4.52:6379> set i 400
- -> Redirected to slot [15759] located at 192.168.4.53:6379
- OK
- 192.168.4.53:6379> set j 500
- -> Redirected to slot [3564] located at 192.168.4.51:6379
- OK
- 192.168.4.51:6379>
步骤三:配置网站服务器
- [root@web33 ~ ]# yum -y install php-devel //安装依赖
- ……
- ……
- 已安装:
- php-devel.x86_64 0:5.4.16-45.el7
- 作为依赖被安装:
- autoconf.noarch 0:2.69-11.el7 automake.noarch 0:1.13.4-3.el7 m4.x86_64 0:1.4.16-10.el7 perl-Test-Harness.noarch 0:3.28-3.el7 perl-Thread-Queue.noarch 0:3.02-2.el7
- 完毕!
- [root@web33 ~]#
- [root@web33 ~]# tar -zxvf redis-cluster-4.3.0.tgz //解压
- [root@web33 ~]# cd redis-4.3.0/ //进入源码目录
- [root@web33 redis-4.3.0]# phpize //创建configure命令及配置信息文件/usr/bin/php-config
- Configuring for:
- PHP Api Version: 20100412
- Zend Module Api No: 20100525
- Zend Extension Api No: 220100525
- [root@web33 redis-4.3.0]#
- [root@web33 redis-4.3.0]# ./configure --with-php-config=/usr/bin/php-config
- ……
- ……
- configure: creating config.status
- config.status: creating config.h
- config.status: config.h is unchanged
- config.status: executing libtool commands
- [root@web33 redis-4.3.0]#
- [root@web33 redis-4.3.0]# make //编译
- ……
- ……
- Build complete.
- Don't forget to run 'make test'.
- [root@web33 redis-4.3.0]#
- [root@web33 redis-4.3.0]# make install //安装
- Installing shared extensions: /usr/lib64/php/modules/ //提示模块安装目录
- [root@web33 redis-4.3.0]#
- [root@web33 redis-4.3.0]# ls /usr/lib64/php/modules/ //查看目录列表
- curl.so fileinfo.so json.so mysqli.so mysql.so pdo_mysql.so pdo.so pdo_sqlite.so phar.so redis.so sqlite3.so zip.so
- [root@web33 redis-4.3.0]#
修改配置文件
- [root@web33 redis-4.3.0]# vim /etc/php.ini
- 728 extension_dir = "/usr/lib64/php/modules/" //模块目录
- 730 extension = "redis.so" //模块名
- :wq
- [root@web33 redis-4.3.0]# systemctl restart php-fpm //重启php-fpm服务
- [root@web33 redis-4.3.0]# php -m | grep -i redis //查看模块
- redis
- [root@web33 redis-4.3.0]#
步骤四:测试配置
1)在存储服务器共享目录下,创建连接集群PHP脚本
- nfs30~ ]# vim /sitedir/set_data.php //存储数据脚本
- <?php
- $redis_list = ['192.168.4.51:6379','192.168.4.52:6379','192.168.4.53:6379','192.168.4.54:6379','192.168.4.55:6379','192.168.4.56:6379']; //定义redis服务器列表
- $client = new RedisCluster(NUll,$redis_list); //定义连接redis服务器变量
- $client->set("i","tarenaA "); //存储数据 变量名 i
- $client->set("j","tarenaB "); //存储数据 变量名 j
- $client->set("k","tarenaC "); //存储数据 变量名 k
- ?>
- :wq
- nfs30~ ]# vim /sitedir/get_data.php //获取数据脚本
- <?php
- $redis_list = ['192.168.4.51:6379','192.168.4.52:6379','192.168.4.53:6379','192.168.4.54:6379','192.168.4.55:6379','192.168.4.56:6379']; //定义redis服务器列表
- $client = new RedisCluster(NUll,$redis_list); //定义连接redis服务器变量
- echo $client->get("i"); //获取变量i 的数据
- echo $client->get("j"); //获取变量j 的数据
- echo $client->get("k"); //获取变量k 的数据
- ?>
- :wq
- nfs30~ ]# vim /sitedir/test3.php //存/取数据脚本
- <?php
- $redis_list = ['192.168.4.51:6379','192.168.4.52:6379','192.168.4.53:6379','192.168.4.54:6379','192.168.4.55:6379','192.168.4.56:6379'];
- $client = new RedisCluster(NUll,$redis_list);
- $client->set(“name“,”panglijing”); //存数据
- echo $client->get(“name”); //取数据
- ?>
- :wq
2)访问网站执行脚本(在任意主机访问网站服务器都可以)
- ]# curl http://192.168.4.33/set_data.php
- ]# curl http://192.168.4.33/get_data.php
- ]# curl http://192.168.4.33/test3.php
3)命令行连接任意一台redis服务器查看数据(在任意主机连接redis服务器都可以)
- ]# redis-cli -c -h 192.168.4.51 -p 6379
- 192.168.4.51:6379> keys *
- 1) i
- 192.168.4.51:6379> exit
- ]# redis-cli -c -h 192.168.4.52 -p 6379
- 192.168.4.52:6379> keys *
- 1) j
- 192.168.4.52:6379> exit
- ]# redis-cli -c -h 192.168.4.53 -p 6379
- 192.168.4.52:6379> keys *
- 1) k
- 192.168.4.52:6379> exit
3 案例3:数据迁移
3.1 问题
要求如下:
- 配置从服务器
- 配置第1台PXC服务器
- 配置第2台PXC服务器
- 配置第3台PXC服务器
- 公共配置
- 测试配置
3.2 方案
创建3台新的虚拟机,具体配置要求如图-2所示。

图-2
3.3 步骤
实现此案例需要按照如下步骤进行。
步骤一:配置从服务器(把主机192.168.4.66 配置为192.168.4.11的从服务器)
1)在192.168.4.66主机安装数据库服务软件并启动mysqld服务
- [root@pxcnode66 ~]# tar -xvf mysql-5.7.17.tar //解包
- mysql-community-client-5.7.17-1.el7.x86_64.rpm
- mysql-community-common-5.7.17-1.el7.x86_64.rpm
- mysql-community-devel-5.7.17-1.el7.x86_64.rpm
- mysql-community-embedded-5.7.17-1.el7.x86_64.rpm
- mysql-community-embedded-compat-5.7.17-1.el7.x86_64.rpm
- mysql-community-embedded-devel-5.7.17-1.el7.x86_64.rpm
- mysql-community-libs-5.7.17-1.el7.x86_64.rpm
- mysql-community-libs-compat-5.7.17-1.el7.x86_64.rpm
- mysql-community-minimal-debuginfo-5.7.17-1.el7.x86_64.rpm
- mysql-community-server-5.7.17-1.el7.x86_64.rpm
- mysql-community-test-5.7.17-1.el7.x86_64.rpm
- [root@pxcnode66 ~]#
- [root@pxcnode66 ~]# ls *.rpm //查看软件列表
- mysql-community-client-5.7.17-1.el7.x86_64.rpm
- mysql-community-common-5.7.17-1.el7.x86_64.rpm
- mysql-community-devel-5.7.17-1.el7.x86_64.rpm
- mysql-community-embedded-5.7.17-1.el7.x86_64.rpm
- mysql-community-embedded-compat-5.7.17-1.el7.x86_64.rpm
- mysql-community-embedded-devel-5.7.17-1.el7.x86_64.rpm
- mysql-community-libs-5.7.17-1.el7.x86_64.rpm
- mysql-community-libs-compat-5.7.17-1.el7.x86_64.rpm
- mysql-community-minimal-debuginfo-5.7.17-1.el7.x86_64.rpm
- mysql-community-server-5.7.17-1.el7.x86_64.rpm
- mysql-community-test-5.7.17-1.el7.x86_64.rpm
- [root@pxcnode66 ~]#
- [root@pxcnode66 ~]# yum -y install mysql-community-*.rpm //安装软件
- 已加载插件:fastestmirror
- 正在检查 mysql-community-client-5.7.17-1.el7.x86_64.rpm: mysql-community-client-5.7.17-1.el7.x86_64
- mysql-community-client-5.7.17-1.el7.x86_64.rpm 将被安装
- ……
- ……
- 已安装:
- mysql-community-client.x86_64 0:5.7.17-1.el7 mysql-community-common.x86_64 0:5.7.17-1.el7
- mysql-community-devel.x86_64 0:5.7.17-1.el7 mysql-community-embedded.x86_64 0:5.7.17-1.el7
- mysql-community-embedded-compat.x86_64 0:5.7.17-1.el7 mysql-community-embedded-devel.x86_64 0:5.7.17-1.el7
- mysql-community-libs.x86_64 0:5.7.17-1.el7 mysql-community-libs-compat.x86_64 0:5.7.17-1.el7
- mysql-community-minimal-debuginfo.x86_64 0:5.7.17-1.el7 mysql-community-server.x86_64 0:5.7.17-1.el7
- mysql-community-test.x86_64 0:5.7.17-1.el7
- 作为依赖被安装:
- perl-Data-Dumper.x86_64 0:2.145-3.el7 perl-JSON.noarch 0:2.59-2.el7
- 完毕!
- [root@pxcnode66 ~]#
- [root@pxcnode66 ~]# systemctl start mysqld //启动服务
- [root@pxcnode66 ~]# ls /var/lib/mysql //查看数据库文件列表
- auto.cnf client-cert.pem ibdata1 ibtmp1 mysql.sock.lock public_key.pem sys
- ca-key.pem client-key.pem ib_logfile0 mysql performance_schema server-cert.pem
- ca.pem ib_buffer_pool ib_logfile1 mysql.sock private_key.pem server-key.pem
- [root@pxcnode66 ~]# systemctl enable mysqld //设置服务开机运行
- [root@pxcnode66 ~]# netstat -utnlp | grep :3306 //查看端口
- tcp6 0 0 :::3306 :::* LISTEN 1531/mysqld
- [root@pxcnode66 ~]#
- [root@pxcnode66 ~]# grep password /var/log/mysqld.log //查看初始密码
- 2019-07-05T01:56:51.895852Z 1 [Note] A temporary password is generated for root@localhost: bB0*uCmu:.Kj
- [root@pxcnode66 ~]# mysql -uroot -p'bB0*uCmu:.Kj' //初始密码登录
- mysql: [Warning] Using a password on the command line interface can be insecure.
- Welcome to the MySQL monitor. Commands end with ; or \g.
- Your MySQL connection id is 3
- Server version: 5.7.17
- Copyright (c) 2000, 2016, Oracle and/or its affiliates. All rights reserved.
- Oracle is a registered trademark of Oracle Corporation and/or its
- affiliates. Other names may be trademarks of their respective
- owners.
- Type 'help;' or '\h' for help. Type '\c' to clear the current input statement.
- mysql>
- mysql> alter user root@"localhost" identified by "123qqq...A";//修改登录密码
- Query OK, 0 rows affected (0.01 sec)
- mysql>
- mysql> exit //断开连接
- Bye
- [root@pxcnode66 ~]# mysql -uroot -p123qqq...A //新密码登录
- mysql: [Warning] Using a password on the command line interface can be insecure.
- Welcome to the MySQL monitor. Commands end with ; or \g.
- Your MySQL connection id is 4
- Server version: 5.7.17 MySQL Community Server (GPL)
- Copyright (c) 2000, 2016, Oracle and/or its affiliates. All rights reserved.
- Oracle is a registered trademark of Oracle Corporation and/or its
- affiliates. Other names may be trademarks of their respective
- owners.
- Type 'help;' or '\h' for help. Type '\c' to clear the current input statement.
- mysql> show databases; //查看数据库
- +--------------------+
- | Database |
- +--------------------+
- | information_schema |
- | mysql |
- | performance_schema |
- | sys |
- +--------------------+
- 4 rows in set (0.00 sec)
- Mysql>
2)修改服务主配置文件
- [root@pxcnode66 ~]# vim /etc/my.cnf
- [mysqld]
- server_id=66 //指定server_id
- :wq
- [root@pxcnode66 ~]# systemctl restart mysqld //重启服务
- [root@pxcnode66 ~]#
3)确保数据一致 (pxcnode66主机 使用mysql11主机的完全备份恢复数据确保数据一致 )
- [root@mysql11 ~]# rpm -ivh libev-4.15-1.el6.rf.x86_64.rpm //安装依赖软件
- [root@mysql11 ~]# yum -y install percona-xtrabackup-24-2.4.7-1.el7.x86_64.rpm //安装在线热备软件
- [root@mysql11 ~]# innobackupex --user root --password 123qqq...A --slave-info /allbak --no-timestamp //备份所有数据,并记录备份数据对应的binlog日志名
- [root@mysql11 ~]# scp -r /allbak root@192.168.4.66:/root/ //把备份文件发送给pxcnode66主机
- [root@pxcnode66 ~]# rpm -ivh libev-4.15-1.el6.rf.x86_64.rpm //安装依赖软件
- [root@pxcnode66 ~]# yum -y install percona-xtrabackup-24-2.4.13-1.el7.x86_64.rpm //安装在线热备软件
- [root@pxcnode66 ~]# systemctl stop mysqld //停止服务
- [root@pxcnode66 ~]# rm -rf /var/lib/mysql/* //清空数据库目录
- [root@pxcnode66 ~]# innobackupex --apply-log /root/allbak/ //准备恢复数据
- [root@pxcnode66 ~]# innobackupex --copy-back /root/allbak/ //恢复数据
- [root@pxcnode66 ~]# chown -R mysql:mysql /var/lib/mysql //修改所有者
- [root@pxcnode66 ~]# systemctl start mysqld //启动服务
4)指定主服务器
- [root@pxcnode66 ~]# cat /root/allbak/xtrabackup_info | grep master11 //查binlog日志
- binlog_pos = filename 'master11.000001', position '7700'
- [root@pxcnode66 ~]# mysql -uroot -p123qqq...A //管理员登录指定主服务器信息
- mysql> change master to
- master_host="192.168.4.11", //主服务器ip地址
- master_user="repluser", //主服务器授权用户
- master_password="123qqq...A", //授权密码
- master_log_file="master11.000001", //binlog日志名
- master_log_pos=7700; //日志偏移量
- Query OK, 0 rows affected, 2 warnings (0.31 sec)
- mysql> start slave ; //启动slave 程序
- Query OK, 0 rows affected (0.09 sec)
- mysql> exit //断开连接
- Bye
- [root@pxcnode66 ~]#
- [root@pxcnode66 ~]# mysql -uroot -p123qqq...A -e "show slave status\G" | grep -i 192.168.4.11 //查看主服务器地址
- mysql: [Warning] Using a password on the command line interface can be insecure.
- Master_Host: 192.168.4.11 //主服务器ip地址
- [root@pxcnode66 ~]# mysql -uroot -p123qqq...A -e "show slave status\G" | grep -i "yes" //查看状态信息
- mysql: [Warning] Using a password on the command line interface can be insecure.
- Slave_IO_Running: Yes //IO线程正常
- Slave_SQL_Running: Yes //SQL线程正常
- [root@pxcnode66 ~]#
步骤二:配置第1台PXC服务器(192.168.4.66)
1)停止mysqld服务、卸载mysqld服务软件
- [root@pxcnode66 ~]# systemctl stop mysqld //停止服务
- [root@pxnode66 ~]# rpm -qa | grep -i mysql //查看安装的MySQL服务软件
- mysql-community-server-5.7.17-1.el7.x86_64
- mysql-community-embedded-compat-5.7.17-1.el7.x86_64
- mysql-community-common-5.7.17-1.el7.x86_64
- mysql-community-client-5.7.17-1.el7.x86_64
- mysql-community-devel-5.7.17-1.el7.x86_64
- mysql-community-test-5.7.17-1.el7.x86_64
- mysql-community-libs-compat-5.7.17-1.el7.x86_64
- mysql-community-minimal-debuginfo-5.7.17-1.el7.x86_64
- perl-DBD-MySQL-4.023-6.el7.x86_64
- mysql-community-libs-5.7.17-1.el7.x86_64
- mysql-community-embedded-5.7.17-1.el7.x86_64
- mysql-community-embedded-devel-5.7.17-1.el7.x86_64
- [root@pxcnode66 ~]#
- [root@pxcnode66 ~]# rpm -e --nodeps mysql-community-server mysql-community-embedded-compat mysql-community-common mysql-community-client mysql-community-devel \
- > mysql-community-test mysql-community-libs-compat mysql-community-minimal-debuginfo mysql-community-libs mysql-community-embedded mysql-community-embedded-devel //卸载所有的MySQL服务软件
- 警告:/etc/my.cnf 已另存为 /etc/my.cnf.rpmsave
- [root@pxcnode66 ~]#
2)安装PXC软件、修改配置文件、启动mysql服务
- [root@pxcnode66 ~]# cd PXC //进软件目录
- [root@pxcnode66 PXC]# rpm -ivh qpress-1.1-14.11.x86_64.rpm //安装依赖
- 警告:qpress-1.1-14.11.x86_64.rpm: 头V3 DSA/SHA1 Signature, 密钥 ID 6cb7b81f: NOKEY
- 准备中... ################################# [100%]
- 正在升级/安装...
- 1:qpress-1.1-14.11 ################################# [100%]
- [root@pxcnode66 PXC]#
- [root@pxcnode66 PXC]# tar -xvf Percona-XtraDB-Cluster-5.7.25-31.35-r463-el7-x86_64-bundle.tar //解压PXC软件包
- Percona-XtraDB-Cluster-57-5.7.25-31.35.1.el7.x86_64.rpm
- Percona-XtraDB-Cluster-57-debuginfo-5.7.25-31.35.1.el7.x86_64.rpm
- Percona-XtraDB-Cluster-client-57-5.7.25-31.35.1.el7.x86_64.rpm
- Percona-XtraDB-Cluster-devel-57-5.7.25-31.35.1.el7.x86_64.rpm
- Percona-XtraDB-Cluster-full-57-5.7.25-31.35.1.el7.x86_64.rpm
- Percona-XtraDB-Cluster-garbd-57-5.7.25-31.35.1.el7.x86_64.rpm
- Percona-XtraDB-Cluster-server-57-5.7.25-31.35.1.el7.x86_64.rpm
- Percona-XtraDB-Cluster-shared-57-5.7.25-31.35.1.el7.x86_64.rpm
- Percona-XtraDB-Cluster-shared-compat-57-5.7.25-31.35.1.el7.x86_64.rpm
- Percona-XtraDB-Cluster-test-57-5.7.25-31.35.1.el7.x86_64.rpm
- [root@pxcnode66 PXC]#
- [root@pxcnode66 PXC]# yum -y install Percona-XtraDB-Cluster-*.rpm //安装软件
- 已安装:
- Percona-XtraDB-Cluster-57.x86_64 0:5.7.25-31.35.1.el7 Percona-XtraDB-Cluster-57-debuginfo.x86_64 0:5.7.25-31.35.1.el7
- Percona-XtraDB-Cluster-client-57.x86_64 0:5.7.25-31.35.1.el7 Percona-XtraDB-Cluster-devel-57.x86_64 0:5.7.25-31.35.1.el7
- Percona-XtraDB-Cluster-full-57.x86_64 0:5.7.25-31.35.1.el7 Percona-XtraDB-Cluster-garbd-57.x86_64 0:5.7.25-31.35.1.el7
- Percona-XtraDB-Cluster-server-57.x86_64 0:5.7.25-31.35.1.el7 Percona-XtraDB-Cluster-shared-57.x86_64 0:5.7.25-31.35.1.el7
- Percona-XtraDB-Cluster-shared-compat-57.x86_64 0:5.7.25-31.35.1.el7 Percona-XtraDB-Cluster-test-57.x86_64 0:5.7.25-31.35.1.el7
- 作为依赖被安装:
- keyutils-libs-devel.x86_64 0:1.5.8-3.el7 krb5-devel.x86_64 0:1.15.1-18.el7 libcom_err-devel.x86_64 0:1.42.9-11.el7 libkadm5.x86_64 0:1.15.1-18.el7
- libselinux-devel.x86_64 0:2.5-12.el7 libsepol-devel.x86_64 0:2.5-8.1.el7 libverto-devel.x86_64 0:0.2.5-4.el7 openssl-devel.x86_64 1:1.0.2k-12.el7
- pcre-devel.x86_64 0:8.32-17.el7 perl-Env.noarch 0:1.04-2.el7 perl-Test-Harness.noarch 0:3.28-3.el7 perl-Test-Simple.noarch 0:0.98-243.el7
- zlib-devel.x86_64 0:1.2.7-17.el7
- 完毕!
- [root@pxcnode66 PXC]#
- [root@pxcnode66 PXC]# vim /etc/percona-xtradb-cluster.conf.d/mysqld.cnf //修改数据库服务配置文件
- [mysqld]
- server-id=66 //指定server_id
- :wq
- [root@pxcnode66 PXC]#
- [root@pxcnode66 PXC]# vim /etc/percona-xtradb-cluster.conf.d/wsrep.cnf //修改集群服务配置文件
- wsrep_cluster_address=gcomm:// 不需要写ip地址
- wsrep_node_address=192.168.4.66 //指定本机Ip地址
- wsrep_cluster_name=pxc-cluster //指定集群名称(另外2台的集群名称要于此相同)
- wsrep_node_name=pxcnode66 //指定本机主机名
- wsrep_sst_auth="sstuser:123qqq...A" //数据全量同步授权用户及密码
- :wq
- [root@pxcnode66 PXC]#
- [root@pxcnode66 PXC]# systemctl start mysql //启动服务
- [root@pxcnode66 PXC]# netstat -utnlp | grep :3306 //查看MySQL服务端口
- tcp6 0 0 :::3306 :::* LISTEN 24482/mysqld
- [root@pxcnode66 PXC]# netstat -utnlp | grep :4567 //查看集群通信端口
- tcp 0 0 0.0.0.0:4567 0.0.0.0:* LISTEN 24472/mysqld
- [root@pxcnode66 PXC]# systemctl enable mysql //设置服务开机运行
- [root@pxcnode66 PXC]#
3)数据库管理员登录、用户授权、查看状态信息
- [root@pxcnode66 PXC]# mysql -uroot -p123qqq...A //管理员登录
- mysql> grant all on *.* to sstuser@"localhost" identified by "123qqq...A"; //用户授权
- Query OK, 0 rows affected, 1 warning (0.10 sec)
- mysql> show status like "%wsrep%"; //查看集群状态信息
- | wsrep_incoming_addresses | 192.168.4.66:3306 |
- | wsrep_cluster_weight | 1 |
- | wsrep_desync_count | 0 |
- | wsrep_evs_delayed | |
- | wsrep_evs_evict_list | |
- | wsrep_evs_repl_latency | 0/0/0/0/0 |
- | wsrep_evs_state | OPERATIONAL |
- | wsrep_gcomm_uuid | 73809cc5-cf00-11e9-aac3-b223959fecdf |
- | wsrep_cluster_conf_id | 1 |
- | wsrep_cluster_size | 1 |
- | wsrep_cluster_state_uuid | 73848b1a-cf00-11e9-9058-36c1ac1e1359 |
- | wsrep_cluster_status | Primary |
- | wsrep_connected | ON |
- | wsrep_local_bf_aborts | 0 |
- | wsrep_local_index | 0 |
- | wsrep_provider_name | Galera |
- | wsrep_provider_vendor | Codership Oy <info@codership.com> |
- | wsrep_provider_version | 3.35(rddf9876) |
- | wsrep_ready | ON |
- +----------------------------------+--------------------------------------+
- 71 rows in set (0.00 sec)
- mysql> exit ;
- [root@pxcnode66 ~]#
- [root@pxcnode66 ~]# mysql -uroot -p123qqq...A -e "show slave status\G" | grep -i "yes" //查看状态信息依然是192.168.4.11的从服务器
- mysql: [Warning] Using a password on the command line interface can be insecure.
- Slave_IO_Running: Yes //IO线程正常
- Slave_SQL_Running: Yes //SQL线程正常
- [root@pxcnode66 ~]#
步骤三:配置第2台PXC服务器(192.168.4.10)
1)安装PXC软件
- [root@pxcnode10 ~]# cd PXC //进软件目录
- [root@pxcnode10 PXC]# rpm -ivh qpress-1.1-14.11.x86_64.rpm //安装依赖
- 警告:qpress-1.1-14.11.x86_64.rpm: 头V3 DSA/SHA1 Signature, 密钥 ID 6cb7b81f: NOKEY
- 准备中... ################################# [100%]
- 正在升级/安装...
- 1:qpress-1.1-14.11 ################################# [100%]
- [root@pxcnode10 PXC]#
- [root@pxcnode10 PXC]# tar -xvf Percona-XtraDB-Cluster-5.7.25-31.35-r463-el7-x86_64-bundle.tar //解压PXC软件包
- Percona-XtraDB-Cluster-57-5.7.25-31.35.1.el7.x86_64.rpm
- Percona-XtraDB-Cluster-57-debuginfo-5.7.25-31.35.1.el7.x86_64.rpm
- Percona-XtraDB-Cluster-client-57-5.7.25-31.35.1.el7.x86_64.rpm
- Percona-XtraDB-Cluster-devel-57-5.7.25-31.35.1.el7.x86_64.rpm
- Percona-XtraDB-Cluster-full-57-5.7.25-31.35.1.el7.x86_64.rpm
- Percona-XtraDB-Cluster-garbd-57-5.7.25-31.35.1.el7.x86_64.rpm
- Percona-XtraDB-Cluster-server-57-5.7.25-31.35.1.el7.x86_64.rpm
- Percona-XtraDB-Cluster-shared-57-5.7.25-31.35.1.el7.x86_64.rpm
- Percona-XtraDB-Cluster-shared-compat-57-5.7.25-31.35.1.el7.x86_64.rpm
- Percona-XtraDB-Cluster-test-57-5.7.25-31.35.1.el7.x86_64.rpm
- [root@pxcnode10 PXC]#
- [root@pxcnode10 PXC]# yum -y install Percona-XtraDB-Cluster-*.rpm //安装软件
- 已安装:
- Percona-XtraDB-Cluster-57.x86_64 0:5.7.25-31.35.1.el7 Percona-XtraDB-Cluster-57-debuginfo.x86_64 0:5.7.25-31.35.1.el7
- Percona-XtraDB-Cluster-client-57.x86_64 0:5.7.25-31.35.1.el7 Percona-XtraDB-Cluster-devel-57.x86_64 0:5.7.25-31.35.1.el7
- Percona-XtraDB-Cluster-full-57.x86_64 0:5.7.25-31.35.1.el7 Percona-XtraDB-Cluster-garbd-57.x86_64 0:5.7.25-31.35.1.el7
- Percona-XtraDB-Cluster-server-57.x86_64 0:5.7.25-31.35.1.el7 Percona-XtraDB-Cluster-shared-57.x86_64 0:5.7.25-31.35.1.el7
- Percona-XtraDB-Cluster-shared-compat-57.x86_64 0:5.7.25-31.35.1.el7 Percona-XtraDB-Cluster-test-57.x86_64 0:5.7.25-31.35.1.el7
- 作为依赖被安装:
- keyutils-libs-devel.x86_64 0:1.5.8-3.el7 krb5-devel.x86_64 0:1.15.1-18.el7 libcom_err-devel.x86_64 0:1.42.9-11.el7 libkadm5.x86_64 0:1.15.1-18.el7
- libselinux-devel.x86_64 0:2.5-12.el7 libsepol-devel.x86_64 0:2.5-8.1.el7 libverto-devel.x86_64 0:0.2.5-4.el7 openssl-devel.x86_64 1:1.0.2k-12.el7
- pcre-devel.x86_64 0:8.32-17.el7 perl-Env.noarch 0:1.04-2.el7 perl-Test-Harness.noarch 0:3.28-3.el7 perl-Test-Simple.noarch 0:0.98-243.el7
- zlib-devel.x86_64 0:1.2.7-17.el7
- 完毕!
- [root@pxcnode10 PXC]#
2)修改配置文件
- [root@pxcnode10 PXC]# vim /etc/percona-xtradb-cluster.conf.d/mysqld.cnf //修改数据库服务配置
- [mysqld]
- server-id=10 //指定server_id
- :wq
- [root@pxcnode10 PXC]#
- [root@pxcnode10 PXC]# vim /etc/percona-xtradb-cluster.conf.d/wsrep.cnf //修改集群服务配置文件
- wsrep_cluster_address=gcomm://192.168.4.66,192.168.4.10 //集群成员列表
- wsrep_node_address=192.168.4.10 //指定本机Ip地址
- wsrep_cluster_name=pxc-cluster //指定集群名称(另外2台的集群名称要于此相同)
- wsrep_node_name=pxcnode10 //指定本机主机名
- wsrep_sst_auth="sstuser:123qqq...A" //数据全量同步授权用户及密码
- :wq
- [root@pxcnode10 PXC]#
3)启动mysql服务
- [root@pxcnode10 PXC]# systemctl start mysql //启动服务
- [root@pxcnode10 PXC]# systemctl enable mysql //服务开机运行
- [root@pxcnode10 PXC]# netstat -utnlp | grep :3306 //查看MySQL服务端口
- tcp6 0 0 :::3306 :::* LISTEN 24482/mysqld
- [root@pxcnode10 PXC]# netstat -utnlp | grep :4567 //查看集群端口
- tcp6 0 0 :::4567 :::* LISTEN 24489/mysqld
- [root@pxcnode10 PXC]#
- mysql> show status like "%wsrep%"; //查看集群状态信息
- | wsrep_incoming_addresses | 192.168.4.66:3306,192.168.4.10:3306|
- | wsrep_cluster_weight | 1 |
- | wsrep_desync_count | 0 |
- | wsrep_evs_delayed | |
- | wsrep_evs_evict_list | |
- | wsrep_evs_repl_latency | 0/0/0/0/0 |
- | wsrep_evs_state | OPERATIONAL |
- | wsrep_gcomm_uuid | 73809cc5-cf00-11e9-aac3-b223959fecdf |
- | wsrep_cluster_conf_id | 1 |
- | wsrep_cluster_size | 1 |
- | wsrep_cluster_state_uuid | 73848b1a-cf00-11e9-9058-36c1ac1e1359 |
- | wsrep_cluster_status | Primary |
- | wsrep_connected | ON |
- | wsrep_local_bf_aborts | 0 |
- | wsrep_local_index | 0 |
- | wsrep_provider_name | Galera |
- | wsrep_provider_vendor | Codership Oy <info@codership.com> |
- | wsrep_provider_version | 3.35(rddf9876) |
- | wsrep_ready | ON |
- +----------------------------------+--------------------------------------+
- 71 rows in set (0.00 sec)
- mysql> exit ;
- [root@pxcnode10 ~]#
步骤四:配置第3台PXC服务器(192.168.4.88)
1)安装PXC软件
- [root@pxcnode88 ~]# cd PXC //进软件目录
- [root@pxcnode88 PXC]# rpm -ivh qpress-1.1-14.11.x86_64.rpm //安装依赖
- 警告:qpress-1.1-14.11.x86_64.rpm: 头V3 DSA/SHA1 Signature, 密钥 ID 6cb7b81f: NOKEY
- 准备中... ################################# [100%]
- 正在升级/安装...
- 1:qpress-1.1-14.11 ################################# [100%]
- [root@pxcnode88 PXC]#
- [root@pxcnode88 PXC]# tar -xvf Percona-XtraDB-Cluster-5.7.25-31.35-r463-el7-x86_64-bundle.tar //解压PXC软件包
- Percona-XtraDB-Cluster-57-5.7.25-31.35.1.el7.x86_64.rpm
- Percona-XtraDB-Cluster-57-debuginfo-5.7.25-31.35.1.el7.x86_64.rpm
- Percona-XtraDB-Cluster-client-57-5.7.25-31.35.1.el7.x86_64.rpm
- Percona-XtraDB-Cluster-devel-57-5.7.25-31.35.1.el7.x86_64.rpm
- Percona-XtraDB-Cluster-full-57-5.7.25-31.35.1.el7.x86_64.rpm
- Percona-XtraDB-Cluster-garbd-57-5.7.25-31.35.1.el7.x86_64.rpm
- Percona-XtraDB-Cluster-server-57-5.7.25-31.35.1.el7.x86_64.rpm
- Percona-XtraDB-Cluster-shared-57-5.7.25-31.35.1.el7.x86_64.rpm
- Percona-XtraDB-Cluster-shared-compat-57-5.7.25-31.35.1.el7.x86_64.rpm
- Percona-XtraDB-Cluster-test-57-5.7.25-31.35.1.el7.x86_64.rpm
- [root@pxcnode88 PXC]#
- [root@pxcnode88 PXC]# yum -y install Percona-XtraDB-Cluster-*.rpm //安装软件
- 已安装:
- Percona-XtraDB-Cluster-57.x86_64 0:5.7.25-31.35.1.el7 Percona-XtraDB-Cluster-57-debuginfo.x86_64 0:5.7.25-31.35.1.el7
- Percona-XtraDB-Cluster-client-57.x86_64 0:5.7.25-31.35.1.el7 Percona-XtraDB-Cluster-devel-57.x86_64 0:5.7.25-31.35.1.el7
- Percona-XtraDB-Cluster-full-57.x86_64 0:5.7.25-31.35.1.el7 Percona-XtraDB-Cluster-garbd-57.x86_64 0:5.7.25-31.35.1.el7
- Percona-XtraDB-Cluster-server-57.x86_64 0:5.7.25-31.35.1.el7 Percona-XtraDB-Cluster-shared-57.x86_64 0:5.7.25-31.35.1.el7
- Percona-XtraDB-Cluster-shared-compat-57.x86_64 0:5.7.25-31.35.1.el7 Percona-XtraDB-Cluster-test-57.x86_64 0:5.7.25-31.35.1.el7
- 作为依赖被安装:
- keyutils-libs-devel.x86_64 0:1.5.8-3.el7 krb5-devel.x86_64 0:1.15.1-18.el7 libcom_err-devel.x86_64 0:1.42.9-11.el7 libkadm5.x86_64 0:1.15.1-18.el7
- libselinux-devel.x86_64 0:2.5-12.el7 libsepol-devel.x86_64 0:2.5-8.1.el7 libverto-devel.x86_64 0:0.2.5-4.el7 openssl-devel.x86_64 1:1.0.2k-12.el7
- pcre-devel.x86_64 0:8.32-17.el7 perl-Env.noarch 0:1.04-2.el7 perl-Test-Harness.noarch 0:3.28-3.el7 perl-Test-Simple.noarch 0:0.98-243.el7
- zlib-devel.x86_64 0:1.2.7-17.el7
- 完毕!
- [root@pxcnode88 PXC]#
2)修改配置文件
- [root@pxcnode88 PXC]# vim /etc/percona-xtradb-cluster.conf.d/mysqld.cnf //修改数据库服务配置
- [mysqld]
- server-id=88 //指定server_id
- :wq
- [root@pxcnode88 PXC]#
- [root@pxcnode88 PXC]# vim /etc/percona-xtradb-cluster.conf.d/wsrep.cnf //修改集群服务配置文件
- wsrep_cluster_address=gcomm://192.168.4.66 //集群成员ip地址
- wsrep_node_address=192.168.4.88 //指定本机Ip地址
- wsrep_cluster_name=pxc-cluster //指定集群名称(另外2台的集群名称要于此相同)
- wsrep_node_name=pxcnode88 //指定本机主机名
- wsrep_sst_auth="sstuser:123qqq...A" //数据全量同步授权用户及密码
- :wq
- [root@pxcnode88 PXC]#
3)启动mysql服务
- [root@pxcnode88 PXC]# systemctl start mysql //启动服务
- [root@pxcnode88 PXC]# systemctl enable mysql //服务开机运行
- [root@pxcnode88 PXC]# netstat -utnlp | grep :3306 //查看MySQL服务端口
- tcp6 0 0 :::3306 :::* LISTEN 24472/mysqld
- [root@pxcnode88 PXC]# netstat -utnlp | grep :4567 //查看集群端口
- tcp6 0 0 :::4567 :::* LISTEN 24486/mysqld
- [root@pxcnode88 PXC]#
- #
步骤五:公共配置(192.168.4.88、192.168.4.10、192.168.4.66)
1)修改192.168.4.88主机的集群配置文件
- [root@pxcnode88 ~]# vim /etc/percona-xtradb-cluster.conf.d/wsrep.cnf
- wsrep_cluster_address=gcomm://192.168.4.66,192.168.4.10,192.168.4.88 //指定集群成员列表
- :wq
- [root@pxcnode88 ~]#
2)修改192.168.4.10主机的集群配置文件
- [root@pxcnode10 ~]# vim /etc/percona-xtradb-cluster.conf.d/wsrep.cnf
- wsrep_cluster_address=gcomm://192.168.4.66,192.168.4.88,192.168.4.10 //指定集群成员列表
- :wq
- [root@pxcnode10 ~]#
3)修改192.168.4.66主机的集群配置文件
- [root@pxcnode66 ~]# vim /etc/percona-xtradb-cluster.conf.d/wsrep.cnf
- wsrep_cluster_address=gcomm://192.168.4.66,192.168.4.88,192.168.4.10 //指定集群成员列表
- :wq
- [root@pxcnode66 ~]#
步骤6:测试配置:在网站服务器连接PXC集群主机存取数据:
1)存储数据:在网站服务器连接PXC集群主机存储数据
- [root@web33 ~]# mysql -h192.168.4.66 -uyaya99 -p123qqq…A gamedb
- Mysql> insert into gamedb.user values (“pljA”);
- Mysql> exit ;
- [root@web33 ~]# mysql -h192.168.4.10 -uyaya99 -p123qqq…A gamedb
- Mysql> insert into gamedb.user values (“pljB”);
- Mysql> exit ;
- [root@web33 ~]# mysql -h192.168.4.88 -uyaya99 -p123qqq…A gamedb
- Mysql> insert into gamedb.user values (“pljC”);
- Mysql> exit ;
2)查询数据:在网站服务器连接PXC集群主机查询数据
- [root@web44 ~]# mysql -h192.168.4.66 -uyaya99 -p123qqq…A gamedb
- Mysql> select * from gamedb.user;
- +------+
- | name|
- +------+
- | pljA|
- | pljB|
- | pljC|
- +------+
- Mysql> exit ;
- [root@web44 ~]# mysql -h192.168.4.10 -uyaya99 -p123qqq…A gamedb
- Mysql> select * from gamedb.user;
- +------+
- | name|
- +------+
- | pljA|
- | pljB|
- | pljC|
- +------+
- Mysql> exit ;Mysql> exit ;
- [root@web44 ~]# mysql -h192.168.4.88 -uyaya99 -p123qqq…A gamedb
- Mysql> select * from gamedb.user;
- +------+
- | name|
- +------+
- | pljA|
- | pljB|
- | pljC|
- +------+
- Mysql> exit ;Mysql> exit ;
4 案例4:部署LB集群
4.1 问题
配置步骤如下:
- 安装软件
- 修改配置文件
- 启动服务
- 测试配置
4.2 方案
拓扑结构如图-3所示。创建1台新的虚拟机,配置ip地址 eth0 192.168.4.99 主机名 haproxy99 ;运行haproxy服务 接受客户端访问数据库的连接请求,把请求平均分发给3台PXC集群主机。
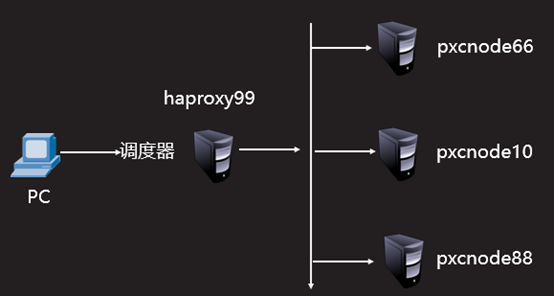
图-3
4.3 步骤
实现此案例需要按照如下步骤进行。
步骤一:安装软件: 在haproxy99主机上安装haproxy软件
- [root@haproxy99 ~]# yum -y install haproxy
- ……
- Running transaction
- 正在安装 : haproxy-1.5.18-7.el7.x86_64 1/1
- 验证中 : haproxy-1.5.18-7.el7.x86_64 1/1
- 已安装:
- haproxy.x86_64 0:1.5.18-7.el7
- 完毕!
- [root@haproxy99 ~]#
步骤二:修改配置文件
- [root@haproxy99 ~]# vim /etc/haproxy/haproxy.cfg
- Global //全局配置默认即可
- log 127.0.0.1 local2
- chroot /var/lib/haproxy
- pidfile /var/run/haproxy.pid
- maxconn 4000
- user haproxy
- group haproxy
- daemon
- stats socket /var/lib/haproxy/stats
- defaults //默认配置(不需要修改)
- mode http
- log global
- option httplog
- option dontlognull
- option http-server-close
- option forwardfor except 127.0.0.0/8
- option redispatch
- retries 3
- timeout http-request 10s
- timeout queue 1m
- timeout connect 10s
- timeout client 1m
- timeout server 1m
- timeout http-keep-alive 10s
- timeout check 10s
- maxconn 3000
- listen status //定义监控页面
- mode http //模式为http
- bind *:80 //端口80
- stats enable //启用配置
- stats uri /admin //访问目录名
- stats auth admin:admin //登录用户与密码
- listen mysql_3306 *:3306 //定义haproxy服务名称与端口号
- mode tcp //mysql服务 得使用 tcp 协议
- option tcpka //使用长连接
- balance roundrobin //调度算法
- server mysql_01 192.168.4.66:3306 check //第1台数据库服务器
- server mysql_02 192.168.4.10:3306 check //第2台数据库服务器
- server mysql_03 192.168.4.88:3306 check //第3台数据库服务器
- :wq
- [root@haproxy99 haproxy]#
步骤三:启动服务
- [root@haproxy99 ~]# systemctl start haproxy //启动服务
- [root@haproxy99 ~]# systemctl enable haproxy //开机运行
- Created symlink from /etc/systemd/system/multi-user.target.wants/haproxy.service to /usr/lib/systemd/system/haproxy.service.
- [root@haproxy99 ~]# netstat -utnlp | grep :3306 //查看端口
- tcp6 0 0 :::3306 :::* LISTEN 29768/haproxy
- [root@haproxy99 ~]#
步骤四:测试配置:在网站服务器连接haproxy99主机访问数据
- [root@web33 ~]# mysql –h192.168.4.99 –uyaya99 –p123qqq…A -e 'select @@hostname'
- mysql: [Warning] Using a password on the command line interface can be insecure.
- +------------+
- | @@hostname |
- +------------+
- | pxcnode66 | //第1次连接
- +------------+
- [root@web33 ~]#
- [root@web33 ~]# mysql –h192.168.4.99 –uyaya99 –p123qqq…A -e 'select @@hostname'
- mysql: [Warning] Using a password on the command line interface can be insecure.
- +------------+
- | @@hostname |
- +------------+
- | pxcnode10 | //第2次连接
- +------------+
- [root@web33 ~]#
- [root@web33 ~]# mysql –h192.168.4.99 –uyaya99 –p123qqq…A -e 'select @@hostname'
- mysql: [Warning] Using a password on the command line interface can be insecure.
- +------------+
- | @@hostname |
- +------------+
- | pxcnode88 | //第3次连接
- +------------+
- [root@web33 ~]#
5 案例5:部署HA集群
5.1 问题
具体配置如下:
- 准备备用调度器主机
- 安装软件
- 修改配置文件
- 启动服务
- 测试配置
5.2 方案
拓扑结构如图-4所示。创建1台新的虚拟机,在eth0 接口配置ip地址为192.168.4.98做备用调度器。
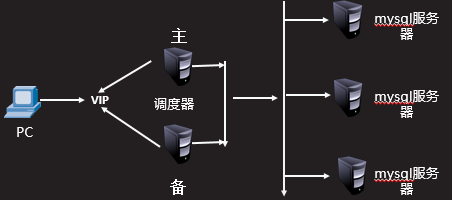
图-4
5.3 步骤
实现此案例需要按照如下步骤进行。
步骤一:准备备用调度器主机
- [root@haproxy98 ~]# yum -y install haproxy
- 正在安装 : haproxy-1.5.18-7.el7.x86_64 1/1
- 验证中 : haproxy-1.5.18-7.el7.x86_64 1/1
- 已安装:
- haproxy.x86_64 0:1.5.18-7.el7
- 完毕!
- [root@haproxy98 ~]#
2)修改haproxy98主机haproxy.conf文件(直接拷贝haproxy99主机的配置文件也可以)
- [root@haproxy98 ~]# scp root@192.168.4.99:/etc/haproxy/haproxy.cfg /etc/haproxy/
- Warning: Permanently added '192.168.4.99' (ECDSA) to the list of known hosts.
- root@192.168.4.99's password: //输入haproxy99主机的密码
- haproxy.cfg 100% 3142 6.0MB/s 00:00
- [root@haproxy98 ~]#
3)启动haproxy服务
- [root@haproxy98 ~]# systemctl start haproxy //启动服务
- [root@haproxy98 ~]# systemctl enable haproxy //服务开机运行
- Created symlink from /etc/systemd/system/multi-user.target.wants/haproxy.service to /usr/lib/systemd/system/haproxy.service.
- [root@haproxy98 ~]# netstat -utnlp | grep :3306 //查看端口
- tcp6 0 0 :::3306 :::* LISTEN 29768/haproxy
步骤二:安装软件
1)在haproxy99主机安装keepalived软件
- [root@haproxy99 ~]# yum -y install keepalived.x86_64
- 已安装:
- keepalived.x86_64 0:1.3.5-6.el7
- 作为依赖被安装:
- lm_sensors-libs.x86_64 0:3.4.0-4.20160601gitf9185e5.el7 net-snmp-agent-libs.x86_64 1:5.7.2-32.el7
- net-snmp-libs.x86_64 1:5.7.2-32.el7
- [root@haproxy99 ~]#
2)在haproxy98主机安装keepalived软件
- [root@haproxy98 ~]# yum -y install keepalived.x86_64
- 已安装:
- keepalived.x86_64 0:1.3.5-6.el7
- 作为依赖被安装:
- lm_sensors-libs.x86_64 0:3.4.0-4.20160601gitf9185e5.el7 net-snmp-agent-libs.x86_64 1:5.7.2-32.el7
- net-snmp-libs.x86_64 1:5.7.2-32.el7
- [root@haproxy98 ~]#
- 完毕!
- [root@haproxy98 ~]#
步骤三:修改配置文件
1)修改haproxy99主机的配置文件
- [root@haproxy99 ~]# sed -i '36,$d' /etc/keepalived/keepalived.conf //删除无关的配置行
- [root@haproxy99 ~]#vim /etc/keepalived/keepalived.conf
- global_defs {
- ……
- ……
- vrrp_iptables //禁止iptables
- }
- vrrp_instance VI_1 {
- state MASTER //主服务器标识
- interface eth0
- virtual_router_id 51
- priority 150 //haproxy99 主机做主服务器,优先级要比 haproxy88主机高
- advert_int 1
- authentication {
- auth_type PASS //主备服务器连接方式
- auth_pass 1111 //连接密码
- }
- virtual_ipaddress {
- 192.168.4.100 //定义vip地址
- }
- }
- [root@haproxy99 ~]# scp /etc/keepalived/keepalived.conf root@192.168.4.98: /etc/keepalived/
- root@192.168.4.98's password: //输入haproxy98主机的密码
2)修改haproxy98主机的配置文件
- [root@haproxy98 ~]#vim /etc/keepalived/keepalived.conf
- global_defs {
- ……
- ……
- vrrp_iptables //禁止iptables
- }
- vrrp_instance VI_1 {
- state BACKUP //备用服务器标识
- interface eth0
- virtual_router_id 51
- priority 100 //优先级要比 haproxy99低
- advert_int 1
- authentication {
- auth_type PASS
- auth_pass 1111
- }
- virtual_ipaddress {
- 192.168.4.100 //定义vip地址
- }
- }
- [root@haproxy98 ~]#
步骤四:启动服务
1)在haproxy99主机启动keepalived服务
- [root@haproxy99 ~]# systemctl start keepalived.service //启动服务
- [root@haproxy99 ~]#
- [root@haproxy99 ~]# ip addr show | grep 192.168.4.100 //查看vip地址
- inet 192.168.4.100/32 scope global eth0
- [root@haproxy99 ~]#
2)在haproxy98主机启动keepalived服务
- [root@haproxy98 ~]# systemctl start keepalived.service //启动服务
- [root@haproxy98 ~]#
- [root@haproxy98 ~]# ip addr show | grep 192.168.4.100 //查看不到vip
- [root@haproxy98 ~]#
步骤五:测试配置
1)客户端连接vip地址,访问数据库服务
- [root@web33 ~]# mysql -h192.168.4.100 –uyaya99 –p123qqq…A -e 'select @@hostname'
- mysql: [Warning] Using a password on the command line interface can be insecure.
- +------------+
- | @@hostname |
- +------------+
- | pxcnode66 |
- +------------+
- [root@web33 ~]#
- [root@web33 ~]# mysql -h192.168.4.100 –uyaya99 –p123qqq…A -e 'select @@hostname'
- mysql: [Warning] Using a password on the command line interface can be insecure.
- +------------+
- | @@hostname |
- +------------+
- | pxcnode10 |
- +------------+
- [root@web33 ~]# mysql -h192.168.4.100 –uyaya99 –p123qqq…A -e 'select @@hostname'
- mysql: [Warning] Using a password on the command line interface can be insecure.
- +------------+
- | @@hostname |
- +------------+
- | pxcnode88 |
- +------------+
- [root@web33 ~]#
2)测试高可用
- [root@haproxy99 ~]# ip addr show | grep 192.168.4.100 //在haproxy99 主机查看VIP地址
- inet 192.168.4.100/32 scope global eth0
- [root@haproxy99 ~]#
- [root@haproxy99 ~]# systemctl stop keepalived.service //停止keepalived服务
- [root@haproxy99 ~]#
- [root@haproxy99 ~]#
- [root@haproxy99 ~]# ip addr show | grep 192.168.4.100 //查看不到vip地址
- [root@haproxy99 ~]#
- [root@haproxy98 ~]# ip addr show | grep 192.168.4.100 //在备用的haproxy98主机查看地址
- inet 192.168.4.100/32 scope global eth0
- [root@haproxy98 ~]#
- //客户端连接vip地址访问数据库服务
- [root@web33 ~]# mysql -h192.168.4.100 –uyaya99 –p123qqq…A -e 'select @@hostname'
- mysql: [Warning] Using a password on the command line interface can be insecure.
- +------------+
- | @@hostname |
- +------------+
- | pxcnode66 |
- +------------+
- [root@web33 ~]#
- [root@web33 ~]# mysql -h192.168.4.100 –uyaya99 –p123qqq…A -e 'select @@hostname'
- mysql: [Warning] Using a password on the command line interface can be insecure.
- +------------+
- | @@hostname |
- +------------+
- | pxcnode10 |
- +------------+
- [root@web33 ~]# mysql -h192.168.4.100 –uyaya99 –p123qqq…A -e 'select @@hostname'
- mysql: [Warning] Using a password on the command line interface can be insecure.
- +------------+
- | @@hostname |
- +------------+
- | pxcnode88 |
- +------------+
- [root@web33 ~]#