NSD RDBMS1 DAY01
1 案例1:构建MySQL服务器
1.1 问题
要求如下:
- 在IP地址192.168.4.50主机上部署mysql服务
- 设置数据库管理员root本机登录密码为tarena
1.2 方案
克隆新的虚拟机:
eth0网卡:192.168.4.50
主机名称:host50
关闭防火墙(如果有的话)
关闭SELinux(如果有的话)
1.3 步骤
实现此案例需要按照如下步骤进行。
步骤一:准备工作
1)如果之前有mariadb,则需要先卸载,并删除对应的配置与数据:
- [root@localhost ~]# systemctl stop mariadb
2)删除/etc/my.cnf配置文件
此配置文件由RHEL自带的mariadb-libs库提供:
[root@localhost ~]# rm -rf /etc/my.cnf
3)删除数据
- [root@localhost ~]# rm -rf /var/lib/mysql/*
4)卸载软件包(没有会显示未安装软件包)
- [root@localhost ~]# rpm -e --nodeps mariadb-server mariadb
- 警告:/var/log/mariadb/mariadb.log 已另存为/var/log/mariadb/mariadb.log.rpmsave
步骤二:安装mysql软件包
1)解压mysql-5.7.17.tar 软件包
- [root@host50 ~]# tar -xvf mysql-5.7.17.tar //解压mysql整合包
- mysql-community-client-5.7.17-1.el7.x86_64.rpm
- mysql-community-common-5.7.17-1.el7.x86_64.rpm
- mysql-community-devel-5.7.17-1.el7.x86_64.rpm
- mysql-community-embedded-5.7.17-1.el7.x86_64.rpm
- mysql-community-embedded-compat-5.7.17-1.el7.x86_64.rpm
- mysql-community-embedded-devel-5.7.17-1.el7.x86_64.rpm
- mysql-community-libs-5.7.17-1.el7.x86_64.rpm
- mysql-community-libs-compat-5.7.17-1.el7.x86_64.rpm
- mysql-community-minimal-debuginfo-5.7.17-1.el7.x86_64.rpm
- mysql-community-server-5.7.17-1.el7.x86_64.rpm
- mysql-community-test-5.7.17-1.el7.x86_64.rpm
2)安装MySQL软件包
- [root@host50 ~]# yum -y install mysql-community-*.rpm //yum安装自动解决依赖
- mysql-community-client-5.7.17-1.el7.x86_64.rpm
- mysql-community-common-5.7.17-1.el7.x86_64.rpm
- mysql-community-devel-5.7.17-1.el7.x86_64.rpm
- mysql-community-embedded-5.7.17-1.el7.x86_64.rpm
- mysql-community-embedded-compat-5.7.17-1.el7.x86_64.rpm
- mysql-community-embedded-devel-5.7.17-1.el7.x86_64.rpm
- mysql-community-libs-5.7.17-1.el7.x86_64.rpm
- mysql-community-libs-compat-5.7.17-1.el7.x86_64.rpm
- mysql-community-minimal-debuginfo-5.7.17-1.el7.x86_64.rpm
- mysql-community-server-5.7.17-1.el7.x86_64.rpm
- mysql-community-test-5.7.17-1.el7.x86_64.rpm
3)启动MySQL数据库服务并设置开机自启
提示:第一次启动,需要初始化数据,会比较慢
- [root@host50 ~]# systemctl start mysqld //启动mysql服务
- [root@host50 ~]# systemctl enable mysqld //设置开机自启
- [root@host50 ~]# systemctl status mysqld //查看mysql服务状态
- ● mysqld.service - MySQL Server
- Loaded: loaded (/usr/lib/systemd/system/mysqld.service; enabled; vendor preset: disabled)
- Active: active (running) since 二 2018-08-28 10:03:24 CST; 8min ago
- Docs: man:mysqld(8)
- http://dev.mysql.com/doc/refman/en/using-systemd.html
- Main PID: 4284 (mysqld)
- CGroup: /system.slice/mysqld.service
- └─4284 /usr/sbin/mysqld --daemonize --pid-file=/var/r...
- 8月 28 10:02:56 localhost.localdomain systemd[1]: Starting MySQ...
- 8月 28 10:03:24 localhost.localdomain systemd[1]: Started MySQL...
- Hint: Some lines were ellipsized, use -l to show in full.
步骤三:连接MySQL服务器,修改密码
1)查看初始密码
- [root@host50 ~]#grep –i 'password' /var/log/mysqld.log
- 2017-04-01T18:10:42.948679Z 1 [Note] A temporary password is generated for root@localhost: mtoa>Av<p6Yk //随机生成的管理密码为mtoa>Av<p6Yk
2)使用初始密码连接mysql服务
- [root@host50 ~]# mysql -u root -p'mtoa>Av<p6Yk' //初始密码登录,
- mysql: [Warning] Using a password on the command line interface can be insecure.
- Welcome to the MySQL monitor. Commands end with ; or \g.
- Your MySQL connection id is 11
- Server version: 5.7.17
- Copyright (c) 2000, 2016, Oracle and/or its affiliates. All rights reserved.
- Oracle is a registered trademark of Oracle Corporation and/or its
- affiliates. Other names may be trademarks of their respective
- owners.
- Type 'help;' or '\h' for help. Type '\c' to clear the current input statement.
- mysql> //登录成功后,进入SQL操作环境
3)重置数据库管理员roo本机登录密码
- mysql> show databases;
- ERROR 1820 (HY000): You must reset your password using ALTER USER statement before executing this statement //提示必须修改密码
- mysql> alter user root@”localhost” identified by "123qqq…A"; //修改登陆密码
- Query OK, 0 rows affected (0.00 sec)
- mysql> exit //断开连接
- [root@host50 ~]#
4)修改密码策略
- [root@host50 ~]# mysql -uroot –p123qqq…A
- mysql>
- mysql>set global validate_password_policy=0; //只验证长度
- Query OK, 0 rows affected (0.00 sec)
- mysql>set global validate_password_length=6; //修改密码长度,默认值是8个字符
- Query OK, 0 rows affected (0.00 sec)
- mysql> alter user root@”localhost” identified by "tarena"; //修改登陆密码
- Query OK, 0 rows affected (0.00 sec)
- mysql>exit
5)使用修改后的密码登录
- [root@host50 ~]# mysql -uroot -ptarena //登录
- Welcome to the MySQL monitor. Commands end with ; or \g.
- Your MySQL connection id is 15
- Server version: 5.7.17 MySQL Community Server (GPL)
- Copyright (c) 2000, 2016, Oracle and/or its affiliates. All rights reserved.
- Oracle is a registered trademark of Oracle Corporation and/or its
- affiliates. Other names may be trademarks of their respective
- owners.
- mysql> show databases; //查看数据库
- +--------------------+
- | Database |
- +--------------------+
- | information_schema |
- | mysql |
- | performance_schema |
- | sys |
- +--------------------+
- 4 rows in set (0.00 sec)
- mysql>
2 案例2:数据库基本管理
2.1 问题
本案例练习对库、表、记录的基本管理,具体操作如下:
- 使用mysql命令连接数据库
- 练习库管理命令(查看、删除、创建库、切换)
- 练习表管理命令(查看、删除、创建表)
- 练习记录管理命令(插入、查看、修改、删除)
表-1 测试用表数据

2.2 步骤
实现此案例需要按照如下步骤进行。
步骤一:使用mysql命令连接数据库
连接MySQL服务器时,最基本的用法是通过 -u 选项指定用户名、-p指定密码。密码可以写在命令行(如果不写,则出现交互,要求用户输入),当然基于安全考虑一般不推荐这么做:
- [root@dbsvr1 ~]# mysql -uroot -p123456 //紧挨着选项,不要空格
- mysql: [Warning] Using a password on the command line interface can be insecure.
- Welcome to the MySQL monitor. Commands end with ; or \g.
- Your MySQL connection id is 16
- Server version: 5.7.17 MySQL Community Server (GPL)
- Copyright (c) 2000, 2016, Oracle and/or its affiliates. All rights reserved.
- Oracle is a registered trademark of Oracle Corporation and/or its
- affiliates. Other names may be trademarks of their respective
- owners.
- Type 'help;' or '\h' for help. Type '\c' to clear the current input statement.
- mysql> exit //退出已登录的mysql> 环境
- Bye
默认情况下,msyql命令会连接本机的MySQL服务。但在需要的时候,可以通过 -h 选项指定远程主机;
- [root@dbsvr1 ~]# mysql -h 127.0.0.1 –u root –p
- Enter password:
- Welcome to the MySQL monitor. Commands end with ; or \g.
- Your MySQL connection id is 17
- Server version: 5.7.17 MySQL Community Server (GPL)
- Copyright (c) 2000, 2016, Oracle and/or its affiliates. All rights reserved.
- Oracle is a registered trademark of Oracle Corporation and/or its
- affiliates. Other names may be trademarks of their respective
- owners.
- Type 'help;' or '\h' for help. Type '\c' to clear the current input statement.
- mysql> exit //退出已登录的mysql环境
- Bye
步骤二:练习查看/删除/创建库的相关操作
以root用户登入“mysql> ”环境后,可以执行各种MySQL指令、SQL指令。基本的用法事项如下:
- 操作指令不区分大小写(库名/表名、密码、变量值等除外)。
- 每条SQL指令以 ; 结束或分隔。
- 不支持 Tab 键自动补齐。
- \c 可废弃当前编写错的操作指令。
1)查看现有的库
- mysql> show databases; //查看现有的库
- +--------------------+
- | Database |
- +--------------------+
- | information_schema | //信息概要库
- | mysql | //授权库
- | performance_schema | //性能结构库
- | sys | //系统元数据库
- +--------------------+
- 4 rows in set (0.15 sec)
2)切换/使用指定的库
- mysql> use sys; //切换到sys库
- Database changed
- mysql> select database(); //确认当前所在的库
- +------------+
- | DATABASE() |
- +------------+
- | sys |
- +------------+
- 1 row in set (0.00 sec)
切换到mysql库:
- mysql> use mysql; //切换到mysql库
- Reading table information for completion of table and column names
- You can turn off this feature to get a quicker startup with -A
- Database changed
- mysql> select database(); //确认当前所在的库
- +------------+
- | DATABASE() |
- +------------+
- | mysql |
- +------------+
- 1 row in set (0.00 sec)
- 5 rows in set (0.00 sec)
3)新建名为newdb的库,确认结果:
- mysql> create database newdb; //新建名为newdb的库
- Query OK, 1 row affected (0.00 sec)
- mysql> show databases;
- +--------------------+
- | Database |
- +--------------------+
- | information_schema |
- | mydb | //新建的mydb库
- | mysql |
- | newdb | //新建的newdb库
- | performance_schema |
- | sys |
- +--------------------+
- 6 rows in set (0.00 sec)
4)删除指定的库
- mysql> drop database newdb; //删除名为newdb的库
- Query OK, 0 rows affected (0.01 sec)
- mysql> show databases; //确认删除结果,已无newdb库
- +--------------------+
- | Database |
- +--------------------+
- | information_schema |
- | mydb |
- | mysql |
- | performance_schema |
- | sys |
- +--------------------+
- 5 rows in set (0.00 sec)
步骤三:练习查看/删除/创建表的相关操作
1)查看指定的库里有哪些表
查看mysql库里有哪些表:
- mysql> use mysql;
- Reading table information for completion of table and column names
- You can turn off this feature to get a quicker startup with -A
- Database changed
- mysql> show tables;
- +---------------------------+
- | Tables_in_mysql |
- +---------------------------+
- | columns_priv |
- | db |
- | engine_cost |
- | event |
- | func |
- | general_log |
- | gtid_executed |
- | help_category |
- | help_keyword |
- | help_relation |
- | help_topic |
- | innodb_index_stats |
- | innodb_table_stats |
- | ndb_binlog_index |
- | plugin |
- | proc |
- | procs_priv |
- | proxies_priv |
- | server_cost |
- | servers |
- | slave_master_info |
- | slave_relay_log_info |
- | slave_worker_info |
- | slow_log |
- | tables_priv |
- | time_zone |
- | time_zone_leap_second |
- | time_zone_name |
- | time_zone_transition |
- | time_zone_transition_type |
- | user | //存放数据库用户的表
- +---------------------------+
- 31 rows in set (0.00 sec)
2)查看指定表的字段结构
当前库为mysql,查看columns_priv表的结构,以列表形式展现:
- mysql> desc columns_priv\G //查看表结构,以列表形式展现,末尾不用分号
- *************************** 1. row ***************************
- Field: Host
- Type: char(60)
- Null: NO
- Key: PRI
- Default:
- Extra:
- *************************** 2. row ***************************
- Field: Db
- Type: char(64)
- Null: NO
- Key: PRI
- Default:
- Extra:
- *************************** 3. row ***************************
- Field: User
- Type: char(32)
- Null: NO
- Key: PRI
- Default:
- Extra:
- *************************** 4. row ***************************
- Field: Table_name
- Type: char(64)
- Null: NO
- Key: PRI
- Default:
- Extra:
- *************************** 5. row ***************************
- Field: Column_name
- Type: char(64)
- Null: NO
- Key: PRI
- Default:
- Extra:
- *************************** 6. row ***************************
- Field: Timestamp
- Type: timestamp
- Null: NO
- Key:
- Default: CURRENT_TIMESTAMP
- Extra: on update CURRENT_TIMESTAMP
- *************************** 7. row ***************************
- Field: Column_priv
- Type: set('Select','Insert','Update','References')
- Null: NO
- Key:
- Default:
- Extra:
- 7 rows in set (0.01 sec)
查看columns_priv表的结构,以表格形式展现:
- mysql> desc columns_priv; //查看表结构,以表格形式展现末尾需要有分号
- +-------------+----------------------------------------------+------+-----+-------------------+-----------------------------+
- | Field | Type | Null | Key | Default | Extra |
- +-------------+----------------------------------------------+------+-----+-------------------+-----------------------------+
- | Host | char(60) | NO | PRI | | |
- | Db | char(64) | NO | PRI | | |
- | User | char(32) | NO | PRI | | |
- | Table_name | char(64) | NO | PRI | | |
- | Column_name | char(64) | NO | PRI | | |
- | Timestamp | timestamp | NO | | CURRENT_TIMESTAMP | on update CURRENT_TIMESTAMP |
- | Column_priv | set('Select','Insert','Update','References') | NO | | | |
- +-------------+----------------------------------------------+------+-----+-------------------+-----------------------------+
- 7 rows in set (0.00 sec)
上述操作中,当引用非当前库中的表时,可以用“库名.表名”的形式。比如,切换为mysql库再执行“desc columns_priv;”,与以下操作的效果是相同的:
- mysql> desc mysql.columns_priv;
- +-------------+----------------------------------------------+------+-----+-------------------+-----------------------------+
- | Field | Type | Null | Key | Default | Extra |
- +-------------+----------------------------------------------+------+-----+-------------------+-----------------------------+
- | Host | char(60) | NO | PRI | | |
- | Db | char(64) | NO | PRI | | |
- | User | char(16) | NO | PRI | | |
- | Table_name | char(64) | NO | PRI | | |
- | Column_name | char(64) | NO | PRI | | |
- | Timestamp | timestamp | NO | | CURRENT_TIMESTAMP | on update CURRENT_TIMESTAMP |
- | Column_priv | set('Select','Insert','Update','References') | NO | | | |
- +-------------+----------------------------------------------+------+-----+-------------------+-----------------------------+
- 7 rows in set (0.00 sec)
3)在test库中创建一个名为pwlist的表
包括name、password两列,其中name列作为主键。两个字段值均不允许为空,其中密码列赋予默认空值,相关操作如下所述。
切换到mydb库:
- mysql> use mydb;
- Database changed
新建pwlist表:
- mysql> create table pwlist(
- -> name char(16) not null,
- -> password char(48)default '',
- -> primary key(name)
- -> );
- Query OK, 0 rows affected (0.38 sec)
确认新创建的表:
- mysql> show tables;
- +----------------+
- | Tables_in_mydb |
- +----------------+
- | pwlist | //新建的pwlist表
- +----------------+
- 1 rows in set (0.01 sec)
查看pwlist表的字段结构:
- mysql> desc pwlist;
- +----------+----------+------+-----+---------+-------+
- | Field | Type | Null | Key | Default | Extra |
- +----------+----------+------+-----+---------+-------+
- | name | char(16) | NO | PRI | NULL | |
- | password | char(48) | YES | | | |
- +----------+----------+------+-----+---------+-------+
- 2 rows in set (0.01 sec)
4)删除指定的表
删除当前库中的pwlist表:
- mysql> drop table pwlist;
- Query OK, 0 rows affected (0.01 sec)
确认删除结果:
- mysql> show tables;
- Empty set (0.00 sec)
5)在mydb库中创建一个学员表
表格结构及数据内容如表-1所示。
在MySQL表内存储中文数据时,需要更改字符集(默认为latin1不支持中文),以便MySQL支持存储中文数据记录;比如,可以在创建库或表的时候,手动添加“DEFAULT CHARSET=utf8”来更改字符集。
根据上述表格结构,创建支持中文的student表:
- mysql> CREATE TABLE mydb.student(
- -> 学号 char(9) NOT NULL,
- -> 姓名 varchar(4) NOT NULL,
- -> 性别 enum('男','女') NOT NULL,
- -> 手机号 char(11) DEFAULT '',
- -> 通信地址 varchar(64),
- -> PRIMARY KEY(学号)
- -> ) DEFAULT CHARSET=utf8; //手工指定字符集,采用utf8
- Query OK, 0 rows affected (0.31sec)
查看student表的字段结构:
- mysql> DESC mydb.student;
- +--------------+-------------------+------+-----+---------+-------+
- | Field | Type | Null | Key | Default | Extra |
- +--------------+-------------------+------+-----+---------+-------+
- | 学号 | char(9) | NO | PRI | NULL | |
- | 姓名 | varchar(4) | NO | | NULL | |
- | 性别 | enum('男','女') | NO | | NULL | |
- | 手机号 | char(11) | YES | | | |
- | 通信地址 | varchar(64) | YES | | NULL | |
- +--------------+-------------------+------+-----+---------+-------+
- 5 rows in set (0.00 sec)
查看student表的实际创建指令:
- mysql> SHOW CREATE TABLE mydb.student;
- +---------+------------------------------------------------------------------------------------------------------------------------------------------------------------------------------------------------------------------------------------------+
- |Table |Create Table |
- +---------+--------------------------------------------------------------------------------------------------------------------------------------------------------------------------------------------------------------------------------------------------------------------------------------------------------------------------------+
- | student | CREATE TABLE `student` (
- `学号` char(9) NOT NULL,
- `姓名` varchar(4) NOT NULL,
- `性别` enum('男','女') NOT NULL,
- `手机号` char(11) DEFAULT '',
- `通信地址` varchar(64) DEFAULT NULL,
- PRIMARY KEY (`学号`)
- ) ENGINE=InnoDB DEFAULT CHARSET=utf8 |
- +---------+--------------------------------------------------------------------------------------------------------------------------------------------------------------------------------------------------------------------------------------------------------------------------+
- 1 row in set (0.00 sec)
注意:若要修改MySQL服务的默认字符集,可以更改服务器的my.cnf配置文件,添加character_set_server=utf8 配置,然后重启数据库服务。
- [root@dbsvr1 ~]# vim /etc/my.cnf //修改运行服务配置
- [mysqld]
- .. ..
- character_set_server=utf8
- [root@dbsvr1 ~]# systemctl restart mysqld //重启服务
- .. ..
- [root@dbsvr1 ~]# mysql –u root -p
- Enter password:
- .. ..
- mysql> SHOW VARIABLES LIKE 'character%'; //确认更改结果
- +--------------------------+----------------------------+
- | Variable_name | Value |
- +--------------------------+----------------------------+
- | character_set_client | utf8 |
- | character_set_connection | utf8 |
- | character_set_database | utf8 |
- | character_set_filesystem | binary |
- | character_set_results | utf8 |
- | character_set_server | utf8 |
- | character_set_system | utf8 |
- | character_sets_dir | /usr/share/mysql/charsets/ |
- +--------------------------+----------------------------+
- 8 rows in set (0.03 sec)
3 案例3:字符类型
3.1 问题
- 按照 图-1 所示建表。
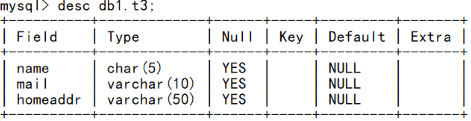
图-1
3.2 步骤
实现此案例需要按照如下步骤进行。
步骤一:创建a3表
1)新建db1库,并切换到db1库
- mysql> CREATE DATABASE db1;
- Query OK, 1 row affected (0.00 sec)
- mysql> USE db1;
- Database changed
2)新建t3表
- mysql> CREATE TABLE db1.t3 (
- -> name char(5) ,
- -> mail varchar(10),
- -> homedir varchar(50)
- -> );
- Query OK, 0 rows affected (0.61sec)
3) 查看a3表结构
- mysql> DESC db1.a3;
- +----------+----------------------+------+-----+---------+-------+
- | Field | Type | Null | Key | Default | Extra |
- +----------+----------------------+------+-----+---------+-------+
- | name | char(5) | YES | | NULL | |
- | mail | varchar(10) | YES | | NULL | |
- | homedir | varchar(50) | YES | | NULL | |
- +----------+----------------------+------+-----+---------+-------+
- 3 rows in set (0.00 sec)
4 案例4:数值类型
4.1 问题
按照 图-2 所示建表。
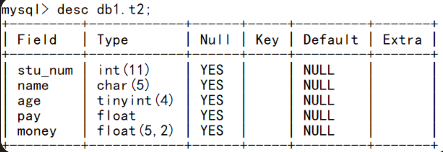
图-2
4.2 步骤
实现此案例需要按照如下步骤进行。
步骤一:创建t2表
1)切换到db1库
- mysql> USE db1;
- Database changed
2)新建t2表
- mysql> create table db1.t2(
- -> stu_num int,
- -> name char(5),
- -> age tinyint,
- -> pay float,
- -> money float(5,2)
- -> );
- Query OK, 0 rows affected (0.03 sec)
3) 查看t2表结构
- mysql> desc db1.t2;
- +---------+------------+------+-----+---------+-------+
- | Field | Type | Null | Key | Default | Extra |
- +---------+------------+------+-----+---------+-------+
- | stu_num | int(11) | YES | | NULL | |
- | name | char(5) | YES | | NULL | |
- | age | tinyint(4) | YES | | NULL | |
- | pay | float | YES | | NULL | |
- | money | float(5,2) | YES | | NULL | |
- +---------+------------+------+-----+---------+-------+
- 5 rows in set (0.00 sec)
- mysql>
5 案例5:日期时间类型
5.1 问题
练习如下时间函数的使用:
- now( ) year( ) month( ) day( ) date( ) time( )
- curtime( ) curdate( )
- 按照图-3所示建表
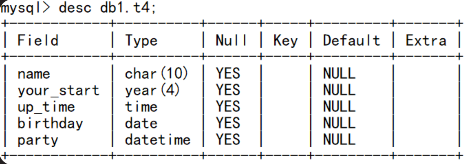
图-3
5.2 步骤
实现此案例需要按照如下步骤进行。
步骤一:练习时间函数的使用
1)使用now()查看当前的日期和时间
- mysql> SELECT now();
- +---------------------+
- | now() |
- +---------------------+
- | 2019-07-03 05:00:15 |
- +---------------------+
- 1 row in set (0.00 sec)
- mysql>
2)使用curdate()获得当前的日期
- mysql> SELECT curdate();
- +------------+
- | curdate() |
- +------------+
- | 2019-07-03 |
- 1 row in set (0.00 sec)
- mysql>
3)使用curtime()获得当前的时间
- mysql> SELECT curtime();
- +-----------+
- | curtime() |
- +-----------+
- | 04:04:55 |
- +-----------+
- 1 row in set (0.00 sec)
4)分别获取当前日期时间中的年份、月份、日
- mysql> SELECT year(now()) , month(now()) , day(now());
- +-------------+--------------+------------+
- | year(now()) | month(now()) | day(now()) |
- +-------------+--------------+------------+
- | 2019 | 7 | 3 |
- +-------------+--------------+------------+
- 1 row in set (0.00 sec)
- mysql>
5)获取系统日期
- mysql> select date(now());
- +-------------+
- | date(now()) |
- +-------------+
- | 2019-07-03 |
- +-------------+
- 1 row in set (0.00 sec)1 row in set (0.00 sec)
- Mysql>
步骤二:创建t4表
1)建表
- mysql> create table db1.t4(
- -> name char(10),
- -> your_start year,
- -> up_time time,
- -> birthday date,
- -> party datetime
- -> );
- Query OK, 0 rows affected (0.04 sec)
- mysql>
2) 查看表结构
- Mysql>
- mysql> desc db1.t4;
- +------------+----------+------+-----+---------+-------+
- | Field | Type | Null | Key | Default | Extra |
- +------------+----------+------+-----+---------+-------+
- | name | char(10) | YES | | NULL | |
- | your_start | year(4) | YES | | NULL | |
- | up_time | time | YES | | NULL | |
- | birthday | date | YES | | NULL | |
- | party | datetime | YES | | NULL | |
- +------------+----------+------+-----+---------+-------+
- 5 rows in set (0.00 sec)
- mysql>
3)插入记录
- mysql>
- mysql> insert into db1.t4 values("bob",1990,083000,20191120,2019082820000);
- Query OK, 1 row affected, 1 warning (0.01 sec)
- mysql> insert into db1.t4 values("tom",1991,090000,20191120,now());
- Query OK, 1 row affected (0.02 sec)
- mysql>
4)查看表记录
mysql>
mysql> select * from db1.t4;
+------+------------+----------+------------+---------------------+
| name | your_start | up_time | birthday | party |
+------+------------+----------+------------+---------------------+
| bob | 1990 | 08:30:00 | 2019-11-20 | 0000-00-00 00:00:00 |
| tom | 1991 | 09:00:00 | 2019-11-20 | 2019-07-03 05:12:41 |
+------+------------+----------+------------+---------------------+
2 rows in set (0.00 sec)
mysql>
6 案例6:枚举类型
6.1 问题
- 按照图-4所示建表

图-4
6.2 步骤
实现此案例需要按照如下步骤进行。
步骤一:创建t5表
1)建表
- mysql>
- mysql> create table db1.t5 (
- -> name char(5),
- -> likes set("eat","game","film","music"),
- -> sex enum("boy","girl","no")
- -> );
- Query OK, 0 rows affected (0.04 sec)
- Mysql>
2)查看表结构
- mysql>
- mysql> desc db1.t5;
- +-------+----------------------------------+------+-----+---------+-------+
- | Field | Type | Null | Key | Default | Extra |
- +-------+----------------------------------+------+-----+---------+-------+
- | name | char(5) | YES | | NULL | |
- | likes | set('eat','game','film','music') | YES | | NULL | |
- | sex | enum('boy','girl','no') | YES | | NULL | |
- +-------+----------------------------------+------+-----+---------+-------+
- 3 rows in set (0.00 sec)
- mysql>
3)插入表记录
- mysql>
- mysql> insert into db1.t5 values ("bob","eat,film,game","boy");
- Query OK, 1 row affected (0.03 sec)
- mysql>
4)查看表记录
- mysql> select * from db1.t5;
- +------+---------------+------+
- | name | likes | sex |
- +------+---------------+------+
- | bob | eat,game,film | boy |
- +------+---------------+------+
- 1 rows in set (0.00 sec)
- mysql>