NSD RDBM2 DAY04
1 案例1:准备MHA集群环境
1.1 问题
- 公共配置
- 配置SSH免密登录
- 安装依赖包
- 配置MySQL一主多从结构
1.2 方案
准备5台虚拟机,角色规划如图-1所示。
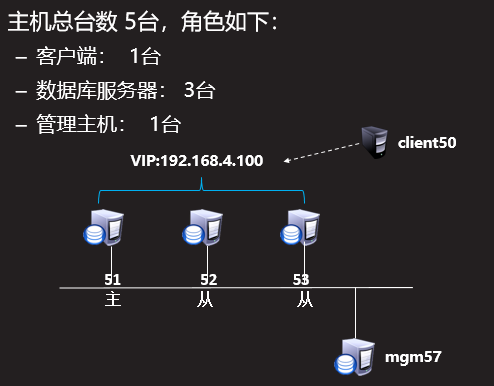
图-1
IP规划,如图-2所示:
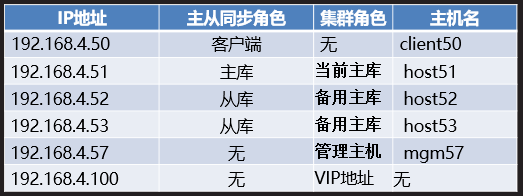
图-2
1.3 步骤
实现此案例需要按照如下步骤进行。
步骤一: 公共配置
1)配置数据库服务器192.168.4.51
[root@host51 ~]# vim /etc/my.cnf
[mysqld]
plugin-load="rpl_semi_sync_master=semisync_master.so;rpl_semi_sync_slave=semisync_slave.so"
rpl_semi_sync_master_enabled=1
rpl_semi_sync_slave_enabled=1
relay_log_purge=0
server_id=51
log_bin=master51
:wq
[root@host51 ~]# systemctl restart mysqld
[root@host51 ~]# mysql -uroot -p123qqq…A
Mysql> grant replication slave on *.* to repluser@”%”
Identified by “123qqq…A”;
Mysql>
2)配置数据库服务器192.168.4.52
[root@host52 ~]# vim /etc/my.cnf
[mysqld]
plugin-load="rpl_semi_sync_master=semisync_master.so;rpl_semi_sync_slave=semisync_slave.so"
rpl_semi_sync_master_enabled=1
rpl_semi_sync_slave_enabled=1
relay_log_purge=0
server_id=52
log_bin=master52
:wq
[root@host52 ~]# systemctl restart mysqld
[root@host52 ~]# mysql -uroot -p123qqq…A
Mysql> grant replication slave on *.* to repluser@”%”
Identified by “123qqq…A”;
Mysql>
3)配置数据库服务器192.168.4.53
[root@host53 ~]# vim /etc/my.cnf
[mysqld]
plugin-load="rpl_semi_sync_master=semisync_master.so;rpl_semi_sync_slave=semisync_slave.so"
rpl_semi_sync_master_enabled=1
rpl_semi_sync_slave_enabled=1
relay_log_purge=0
server_id=53
log_bin=master53
:wq
[root@host53 ~]# systemctl restart mysqld
[root@host53 ~]# mysql -uroot -p123qqq…A
Mysql> grant replication slave on *.* to repluser@”%”
Identified by “123qqq…A”;
Mysql>
步骤二: 配置ssh免密登录
1)配置数据库服务器192.168.4.51
[root@host51 ~]# ssh-keygen //创建秘钥对
Generating public/private rsa key pair.
Enter file in which to save the key (/root/.ssh/id_rsa): //回车
Enter passphrase (empty for no passphrase): //回车
Enter same passphrase again:
Your identification has been saved in /root/.ssh/id_rsa.
Your public key has been saved in /root/.ssh/id_rsa.pub.
The key fingerprint is:
SHA256:qb7EZByHad3Jadr+zkiEbo7ZKGmCNlctgp+Wfp3Yad0 root@pxcnode71
The key's randomart image is:
+---[RSA 2048]----+
| |
| + o o |
| = o * |
| o o * |
| . = S o |
| . . * + o |
| .. =.O * + |
|.o.*+= & o E |
|. =+..B.o ..+ |
+----[SHA256]-----+
[root@host51 ~]#
[root@host51 ~]# ssh-copy-id root@192.168.4.52 //传递公钥给host52主机
/usr/bin/ssh-copy-id: INFO: Source of key(s) to be installed: "/root/.ssh/id_rsa.pub"
/usr/bin/ssh-copy-id: INFO: attempting to log in with the new key(s), to filter out any that are already installed
/usr/bin/ssh-copy-id: INFO: 1 key(s) remain to be installed -- if you are prompted now it is to install the new keys
root@192.168.4.71's password: //输入host52主机系统管理员root用户密码
Number of key(s) added: 1
Now try logging into the machine, with: "ssh 'root@192.168.4.52'"
and check to make sure that only the key(s) you wanted were added.
[root@host51 ~]#
[root@host51 ~]# ssh-copy-id root@192.168.4.53 //传递公钥给host53主机
/usr/bin/ssh-copy-id: INFO: Source of key(s) to be installed: "/root/.ssh/id_rsa.pub"
/usr/bin/ssh-copy-id: INFO: attempting to log in with the new key(s), to filter out any that are already installed
/usr/bin/ssh-copy-id: INFO: 1 key(s) remain to be installed -- if you are prompted now it is to install the new keys
root@192.168.4.71's password: //输入host53主机系统管理员root用户密码
Number of key(s) added: 1
Now try logging into the machine, with: "ssh 'root@192.168.4.53'"
and check to make sure that only the key(s) you wanted were added.
[root@host51 ~]#
[root@host51 ~]# ssh root@192.168.4.52 //可以无密码连接52主机
Last login: Fri Jun 21 13:21:39 2019 from 192.168.4.254
[root@host52 ~]#
[root@host52 ~]# exit //断开连接
登出
Connection to 192.168.4.52 closed.
[root@host51 ~]#
[root@host51 ~]# ssh root@192.168.4.53 //可以无密码连接52主机
Last login: Fri Jun 21 09:01:15 2019 from 192.168.4.254
[root@host53 ~]# exit//断开连接
登出
Connection to 192.168.4.53 closed.
[root@host51 ~]#
2)配置数据库服务器192.168.4.52
[root@host52 ~]# ssh-keygen //创建秘钥对
Generating public/private rsa key pair.
Enter file in which to save the key (/root/.ssh/id_rsa): //回车
Enter passphrase (empty for no passphrase): //回车
Enter same passphrase again:
Your identification has been saved in /root/.ssh/id_rsa.
Your public key has been saved in /root/.ssh/id_rsa.pub.
The key fingerprint is:
SHA256:qb7EZByHad3Jadr+zkiEbo7ZKGmCNlctgp+Wfp3Yad0 root@pxcnode71
The key's randomart image is:
+---[RSA 2048]----+
| |
| + o o |
| = o * |
| o o * |
| . = S o |
| . . * + o |
| .. =.O * + |
|.o.*+= & o E |
|. =+..B.o ..+ |
+----[SHA256]-----+
[root@host52 ~]#
[root@host52 ~]# ssh-copy-id root@192.168.4.51 //传递公钥给host51主机
/usr/bin/ssh-copy-id: INFO: Source of key(s) to be installed: "/root/.ssh/id_rsa.pub"
/usr/bin/ssh-copy-id: INFO: attempting to log in with the new key(s), to filter out any that are already installed
/usr/bin/ssh-copy-id: INFO: 1 key(s) remain to be installed -- if you are prompted now it is to install the new keys
root@192.168.4.51's password: //输入host51主机系统管理员root用户密码
Number of key(s) added: 1
Now try logging into the machine, with: "ssh 'root@192.168.4.51'"
and check to make sure that only the key(s) you wanted were added.
[root@host52 ~]#
[root@host52 ~]# ssh-copy-id root@192.168.4.53 //传递公钥给host53主机
/usr/bin/ssh-copy-id: INFO: Source of key(s) to be installed: "/root/.ssh/id_rsa.pub"
/usr/bin/ssh-copy-id: INFO: attempting to log in with the new key(s), to filter out any that are already installed
/usr/bin/ssh-copy-id: INFO: 1 key(s) remain to be installed -- if you are prompted now it is to install the new keys
root@192.168.4.53's password: //输入host53主机系统管理员root用户密码
Number of key(s) added: 1
Now try logging into the machine, with: "ssh 'root@192.168.4.53'"
and check to make sure that only the key(s) you wanted were added.
[root@host52 ~]#
[root@host52 ~]# ssh root@192.168.4.51 //可以无密码连接51主机
Last login: Fri Jun 21 13:21:39 2019 from 192.168.4.254
[root@host51 ~]# exit //断开连接
登出
Connection to 192.168.4.52 closed.
[root@host52 ~]#
[root@host52 ~]# ssh root@192.168.4.53 //可以无密码连接53主机
Last login: Fri Jun 21 09:01:15 2019 from 192.168.4.254
[root@host53 ~]# exit//断开连接
登出
Connection to 192.168.4.53 closed.
[root@host52 ~]#
3)配置数据库服务器192.168.4.53
[root@host53 ~]# ssh-keygen //创建秘钥对
Generating public/private rsa key pair.
Enter file in which to save the key (/root/.ssh/id_rsa): //回车
Enter passphrase (empty for no passphrase): //回车
Enter same passphrase again:
Your identification has been saved in /root/.ssh/id_rsa.
Your public key has been saved in /root/.ssh/id_rsa.pub.
The key fingerprint is:
SHA256:qb7EZByHad3Jadr+zkiEbo7ZKGmCNlctgp+Wfp3Yad0 root@pxcnode71
The key's randomart image is:
+---[RSA 2048]----+
| |
| + o o |
| = o * |
| o o * |
| . = S o |
| . . * + o |
| .. =.O * + |
|.o.*+= & o E |
|. =+..B.o ..+ |
+----[SHA256]-----+
[root@host53 ~]#
[root@host53 ~]# ssh-copy-id root@192.168.4.51 //传递公钥给host51主机
/usr/bin/ssh-copy-id: INFO: Source of key(s) to be installed: "/root/.ssh/id_rsa.pub"
/usr/bin/ssh-copy-id: INFO: attempting to log in with the new key(s), to filter out any that are already installed
/usr/bin/ssh-copy-id: INFO: 1 key(s) remain to be installed -- if you are prompted now it is to install the new keys
root@192.168.4.51's password: //输入host51主机系统管理员root用户密码
Number of key(s) added: 1
Now try logging into the machine, with: "ssh 'root@192.168.4.51'"
and check to make sure that only the key(s) you wanted were added.
[root@host53 ~]#
[root@host53 ~]# ssh-copy-id root@192.168.4.52 //传递公钥给host52主机
/usr/bin/ssh-copy-id: INFO: Source of key(s) to be installed: "/root/.ssh/id_rsa.pub"
/usr/bin/ssh-copy-id: INFO: attempting to log in with the new key(s), to filter out any that are already installed
/usr/bin/ssh-copy-id: INFO: 1 key(s) remain to be installed -- if you are prompted now it is to install the new keys
root@192.168.4.52's password: //输入host52主机系统管理员root用户密码
Number of key(s) added: 1
Now try logging into the machine, with: "ssh 'root@192.168.4.52'"
and check to make sure that only the key(s) you wanted were added.
[root@host53 ~]#
[root@host53 ~]# ssh root@192.168.4.51 //可以无密码连接51主机
Last login: Fri Jun 21 13:21:39 2019 from 192.168.4.254
[root@host51 ~]#
[root@host51 ~]# exit //断开连接
登出
Connection to 192.168.4.51 closed.
[root@host53 ~]#
[root@host53 ~]# ssh root@192.168.4.52 //可以无密码连接52主机
Last login: Fri Jun 21 09:01:15 2019 from 192.168.4.254
[root@host52 ~]# exit//断开连接
登出
Connection to 192.168.4.52 closed.
[root@host53 ~]#
4)配置管理服务器192.168.4.57
[root@mgm57 ~]# ssh-keygen //创建秘钥对
Generating public/private rsa key pair.
Enter file in which to save the key (/root/.ssh/id_rsa): //回车
Enter passphrase (empty for no passphrase): //回车
Enter same passphrase again:
Your identification has been saved in /root/.ssh/id_rsa.
Your public key has been saved in /root/.ssh/id_rsa.pub.
The key fingerprint is:
SHA256:qb7EZByHad3Jadr+zkiEbo7ZKGmCNlctgp+Wfp3Yad0 root@pxcnode71
The key's randomart image is:
+---[RSA 2048]----+
| |
| + o o |
| = o * |
| o o * |
| . = S o |
| . . * + o |
| .. =.O * + |
|.o.*+= & o E |
|. =+..B.o ..+ |
+----[SHA256]-----+
[root@mgm57 ~]#
[root@mgm57 ~]# ssh-copy-id root@192.168.4.51 //传递公钥给host51主机
/usr/bin/ssh-copy-id: INFO: Source of key(s) to be installed: "/root/.ssh/id_rsa.pub"
/usr/bin/ssh-copy-id: INFO: attempting to log in with the new key(s), to filter out any that are already installed
/usr/bin/ssh-copy-id: INFO: 1 key(s) remain to be installed -- if you are prompted now it is to install the new keys
root@192.168.4.51's password: //输入host51主机系统管理员root用户密码
Number of key(s) added: 1
Now try logging into the machine, with: "ssh 'root@192.168.4.51'"
and check to make sure that only the key(s) you wanted were added.
[root@mgm57 ~]#
[root@mgm57 ~]# ssh-copy-id root@192.168.4.52 //传递公钥给host52主机
/usr/bin/ssh-copy-id: INFO: Source of key(s) to be installed: "/root/.ssh/id_rsa.pub"
/usr/bin/ssh-copy-id: INFO: attempting to log in with the new key(s), to filter out any that are already installed
/usr/bin/ssh-copy-id: INFO: 1 key(s) remain to be installed -- if you are prompted now it is to install the new keys
root@192.168.4.52's password: //输入host52主机系统管理员root用户密码
Number of key(s) added: 1
Now try logging into the machine, with: "ssh 'root@192.168.4.52'"
and check to make sure that only the key(s) you wanted were added.
[root@mgm57 ~]#
[root@mgm57 ~]# ssh-copy-id root@192.168.4.53 //传递公钥给host52主机
/usr/bin/ssh-copy-id: INFO: Source of key(s) to be installed: "/root/.ssh/id_rsa.pub"
/usr/bin/ssh-copy-id: INFO: attempting to log in with the new key(s), to filter out any that are already installed
/usr/bin/ssh-copy-id: INFO: 1 key(s) remain to be installed -- if you are prompted now it is to install the new keys
root@192.168.4.53's password: //输入host53主机系统管理员root用户密码
Number of key(s) added: 1
Now try logging into the machine, with: "ssh 'root@192.168.4.53'"
and check to make sure that only the key(s) you wanted were added.
[root@mgm57 ~]
[root@mgm57 ~]# ssh root@192.168.4.51 //可以无密码连接51主机
Last login: Fri Jun 21 13:21:39 2019 from 192.168.4.254
[root@host51 ~]#
[root@host51 ~]# exit //断开连接
登出
Connection to 192.168.4.51 closed.
[root@mgm57 ~]#
[root@mgm57 ~]# ssh root@192.168.4.52 //可以无密码连接52主机
Last login: Fri Jun 21 09:01:15 2019 from 192.168.4.254
[root@host52 ~]# exit//断开连接
登出
Connection to 192.168.4.52 closed.
[root@mgm57 ~]# ssh root@192.168.4.53 //可以无密码连接53主机
Last login: Fri Jun 21 09:01:15 2019 from 192.168.4.254
[root@host53 ~]# exit//断开连接
登出
Connection to 192.168.4.53 closed.
[root@mgm57 ~]#
步骤三: 安装依赖包
1)配置数据库服务器192.168.4.51
[root@host51 ~]# yum -y install perl-ExtUtils-* perl-CPAN* //安装系统自带的perl软件包
[root@host51 ~]# cd mha
[root@host51 ~]# yum –y install perl-*.rpm //安装共享的perl软件包
2)配置数据库服务器192.168.4.52
- [root@host52 ~]# yum -y install perl-ExtUtils-* perl-CPAN* //安装系统自带的perl软件包
- [root@host52 ~]# cd mha
- [root@host52 ~]# yum –y install perl-*.rpm //安装共享的perl软件包[root@localhost
3)配置数据库服务器192.168.4.53
[root@host53 ~]# yum -y install perl-ExtUtils-* perl-CPAN* //安装系统自带的perl软件包
[root@host53 ~]# cd mha
[root@host53 ~]# yum –y install perl-*.rpm //安装共享的perl软件包
4)配置管理服务器192.168.4.57
[root@mgm57 ~]# yum -y install perl-ExtUtils-* perl-CPAN* //安装系统自带的perl软件包
[root@mgm57 ~]# cd mha
[root@mgm57 ~]# yum –y install perl-*.rpm //安装共享的perl软件包
步骤四: 配置MySQL一主多从结构
1)配置主服务器192.168.4.51
- [root@host51 ~]# mysql -uroot -p123qqq…A
- mysql> show master status; //查看日志信息
- mysql: [Warning] Using a password on the command line interface can be insecure.
- +-----------------+----------+--------------+------------------+-------------------+
- | File | Position | Binlog_Do_DB | Binlog_Ignore_DB | Executed_Gtid_Set |
- +-----------------+----------+--------------+------------------+-------------------+
- | master51.000001 | 720 | | | |
- +-----------------+----------+--------------+------------------+-------------------+
- [root@host51 ~]#
2)配置从服务器192.168.4.52
[root@host52 ~]# mysql -uroot –p123qqq…A //数据库管理员登录
mysql> change master to //指定主服务器信息
master_host="192.168.4.51", //IP地址
master_user="repluser", //授权用户
master_password="123qqq...A", //授权用户密码
master_log_file="master51.000001", //binlog日志
master_log_pos=720; //偏移量
mysql> start slave; //启动slave进程
mysql> exit ; //断开连接
[root@host52 ~]# mysql -uroot –p123qqq…A –e “show slave status\G” | grep 192.168.4.51
Master_Host: 192.168.4.51 //主服务器Ip地址
[root@host52 ~]# mysql -uroot –p123qqq…A –e “show slave status\G” | grep –i yes
Slave_IO_Running: Yes //I0线程正常
Slave_SQL_Running: Yes //SQL线程正常
3)配置从服务器192.168.4.53
[root@host53 ~]# mysql -uroot –p123qqq…A //数据库管理员登录
mysql> change master to //指定主服务器信息
master_host="192.168.4.51", //IP地址
master_user="repluser", //授权用户
master_password="123qqq...A", //授权用户密码
master_log_file="master51.000001", //binlog日志
master_log_pos=720; //偏移量
mysql> start slave; //启动slave进程
mysql> exit ; //断开连接
[root@host53 ~]# mysql -uroot –p123qqq…A –e “show slave status\G” | grep 192.168.4.51
Master_Host: 192.168.4.51 //主服务器Ip地址
[root@host53 ~]# mysql -uroot –p123qqq…A –e “show slave status\G” | grep –i yes
Slave_IO_Running: Yes //I0线程正常
Slave_SQL_Running: Yes //SQL线程正常
2 案例2:部署MHA集群
2.1 问题
- 配置管理节点
- 配置数据节点
2.2 步骤
实现此案例需要按照如下步骤进行。
步骤一:配置管理节点
1)安装软件
- [root@mgm57 ~]# cd mha
- [root@mgm57 mha]#
- [root@mgm57 mha]# yum –y install mha4mysql-node-0.56-0.el6.noarch.rpm//安装mha-node软件包
- 准备中... ################################# [100%]
- 正在升级/安装...
- 1:mha4mysql-node-0.56-0.el6 ################################# [100%]
- [root@mgm57 mha]#
- [root@mgm57 mha-soft-student]# rpm -qa | grep mha //查看是否安装成功
- mha4mysql-node-0.56-0.el6.noarch
- [root@mgm57 mha-soft-student]#
- [root@mgm57 mha]# tar -zxvf mha4mysql-manager-0.56.tar.gz //解压mha-manager软件包
- mha4mysql-manager-0.56/
- mha4mysql-manager-0.56/debian/
- mha4mysql-manager-0.56/debian/control
- mha4mysql-manager-0.56/debian/copyright
- ……
- ……
- [root@mgm57 mha]# ls
- app1.cnf mha4mysql-manager-0.56
- mha4mysql-node-0.56-0.el6.noarch.rpm
- master_ip_failover mha4mysql-manager-0.56.tar.gz
- [root@mgm57 mha ]# cd mha4mysql-manager-0.56 //进入源码目录
- [root@mgm57 mha4mysql-manager-0.56]# ls //查看文件列表
- AUTHORS COPYING inc Makefile.PL META.yml rpm t
- bin debian lib MANIFEST README samples tests
- [root@mgm57 mha4mysql-manager-0.56]#
- [root@mgm57 mha4mysql-manager-0.56]# perl Makefile.PL //配置
- *** Module::AutoInstall version 1.03
- *** Checking for Perl dependencies...
- [Core Features]
- - DBI ...loaded. (1.627)
- - DBD::mysql ...loaded. (4.023)
- - Time::HiRes ...loaded. (1.9725)
- - Config::Tiny ...loaded. (2.14)
- - Log::Dispatch ...loaded. (2.41)
- - Parallel::ForkManager ...loaded. (1.18)
- - MHA::NodeConst ...loaded. (0.56)
- *** Module::AutoInstall configuration finished.
- Checking if your kit is complete...
- Looks good
- Writing Makefile for mha4mysql::manager
- Writing MYMETA.yml and MYMETA.json
- [root@mgm57 mha4mysql-manager-0.56]# make //编译
- [root@mgm57 mha4mysql-manager-0.56]# make install //安装
- [root@mgm57 mha4mysql-manager-0.56]# materha_ //tab键 显示安装命令
- masterha_check_repl masterha_conf_host masterha_master_switch
- masterha_check_ssh masterha_manager masterha_secondary_check
- masterha_check_status masterha_master_monitor masterha_stop
2)编辑主配置文件
- [root@mgm57 ~ ]# mkdir /etc/mha //创建工作目录
- [root@mgm57 ~ ]# cp mha4mysql-manager-0.56/sample/conf/app1.cnf /etc/mha/ //拷贝模板文件
- [root@mgm57 ~ ]# vim /etc/mha/app1.cnf //编辑主配置文件
- [server default] //管理服务默认配置
- manager_workdir=/etc/mha //工作目录
- manager_log=/etc/mha/manager.log //日志文件
- master_ip_failover_script=/etc/mha/master_ip_failover //故障切换脚本
- ssh_user=root //访问ssh服务用户
- ssh_port=22 //ssh服务端口
- repl_user=repluser //主服务器数据同步授权用户
- repl_password=123qqq…A //密码
- user=plj //监控用户
- password=123qqq…A //密码
- [server1] //指定第1台数据库服务器
- hostname=192.168.4.51 //服务器ip地址
- port=3306 //服务端口
- candidate_master=1 //竞选主服务器
- [server2] //指定第2台数据库服务器
- hostname=192.168.4.52
- port=3306
- candidate_master=1
- [server3] //指定第3台数据库服务器
- hostname=192.168.4.53
- port=3306
- candidate_master=1
- :wq
3)创建故障切换脚本
- [root@mgm57 ~]# cp mha-soft-student/master_ip_failover /etc/mha/
- [root@mgm57 ~]# vim +35 /etc/mha/master_ip_failover
- my $vip = '192.168.4.100/24'; # Virtual IP //定义VIP地址
- my $key = "1"; //定义变量$key
- my $ssh_start_vip = "/sbin/ifconfig ens33:$key $vip"; //部署vip地址命令
- my $ssh_stop_vip = "/sbin/ifconfig ens33:$key down"; //释放vip地址命令
- :wq
- [root@mgm57 ~]# chmod +x /etc/mha/master_ip_failover //给脚本加执行权限
4)在当前主服务器部署vip地址
- [root@host51 ~]# ifconfig ens33:1 //部署之前查看
- ens33:1: flags=4163<UP,BROADCAST,RUNNING,MULTICAST> mtu 1500
- ether 52:54:00:d8:10:d7 txqueuelen 1000 (Ethernet)
- [root@host51 ~]# ifconfig ens33:1 192.168.4.100 //部署vip地址
- [root@host51 ~]# ifconfig ens33:1 //部署后查看
- Ens33:1: flags=4163<UP,BROADCAST,RUNNING,MULTICAST> mtu 1500
- inet 192.168.4.100 netmask 255.255.255.0 broadcast 192.168.4.255
- ether 52:54:00:d8:10:d7 txqueuelen 1000 (Ethernet)
步骤二:配置数据节点
1)在所有数据库服务器上,安装mha-node软件包
- ]# cd mha
- ]# rpm -ivh mha4mysql-node-0.56-0.el6.noarch.rpm
- 准备中... ################################# [100%]
- 正在升级/安装...
- 1:mha4mysql-node-0.56-0.el6 ################################# [100%]
2)在所有数据服务器上添加监控用户
可以只在host51主机执行授权命令,host52和host53 会自动同步授权
- ]# mysql –uroot –p密码
- mysql> grant all on *.* to plj@"%" identified by "123qqq...A";
- mysql> exit;
3)在从服务器查看
- [root@host52 ~]# mysql -uroot -p123qqq...A -e 'show grants for plj@"%"'
- mysql: [Warning] Using a password on the command line interface can be insecure.
- +------------------------------------------------------+
- | Grants for plj@% |
- +------------------------------------------------------+
- | GRANT ALL PRIVILEGES ON *.* TO 'plj'@'%' |
- +------------------------------------------------------+
- [root@host52 ~]#
- [root@host53 mha]# mysql -uroot -p123qqq...A -e 'show grants for plj@"%"'
- mysql: [Warning] Using a password on the command line interface can be insecure.
- +------------------------------------------+
- | Grants for plj@% |
- +------------------------------------------+
- | GRANT ALL PRIVILEGES ON *.* TO 'plj'@'%' |
- +------------------------------------------+
- [root@host53 mha]#
3 案例3:测试配置
3.1 问题
- 测试集群环境
- 访问集群
- 测试高可用
- 修复故障服务器
3.2 步骤
实现此案例需要按照如下步骤进行。
步骤一:测试集群环境
1)在管理主机,测试ssh配置
- [root@mgm57 ~]# masterha_check_ssh --conf=/etc/mha/app1.cnf //执行测试命令
- Thu Jun 20 15:33:48 2019 - [warning] Global configuration file /etc/masterha_default.cnf not found. Skipping.
- Thu Jun 20 15:33:48 2019 - [info] Reading application default configuration from /etc/mha/app1.cnf..
- Thu Jun 20 15:33:48 2019 - [info] Reading server configuration from /etc/mha/app1.cnf..
- Thu Jun 20 15:33:48 2019 - [info] Starting SSH connection tests..
- Thu Jun 20 15:33:49 2019 - [debug]
- Thu Jun 20 15:33:48 2019 - [debug] Connecting via SSH from root@192.168.4.51(192.168.4.51:22) to root@192.168.4.52(192.168.4.52:22)..
- Thu Jun 20 15:33:49 2019 - [debug] ok.
- Thu Jun 20 15:33:49 2019 - [debug] Connecting via SSH from root@192.168.4.51(192.168.4.51:22) to root@192.168.4.53(192.168.4.53:22)..
- Thu Jun 20 15:33:49 2019 - [debug] ok.
- Thu Jun 20 15:33:50 2019 - [debug]
- Thu Jun 20 15:33:49 2019 - [debug] Connecting via SSH from root@192.168.4.52(192.168.4.52:22) to root@192.168.4.51(192.168.4.51:22)..
- Thu Jun 20 15:33:49 2019 - [debug] ok.
- Thu Jun 20 15:33:49 2019 - [debug] Connecting via SSH from root@192.168.4.52(192.168.4.52:22) to root@192.168.4.53(192.168.4.53:22)..
- Thu Jun 20 15:33:49 2019 - [debug] ok.
- Thu Jun 20 15:33:50 2019 - [debug] ok.
- Thu Jun 20 15:33:50 2019 - [debug] Connecting via SSH from root@192.168.4.53(192.168.4.53:22) to root@192.168.4.52(192.168.4.52:22)..
- Thu Jun 20 15:33:50 2019 - [debug] ok.
- Thu Jun 20 15:33:51 2019 - [info] All SSH connection tests passed successfully.//测试成功提示
2)在管理主机,测试主从同步
- [root@host57 ~]# masterha_check_repl --conf=/etc/mha/app1.cnf //执行测试命令
- Thu Jun 20 15:37:46 2019 - [info] Reading server configuration from /etc/mha/app1.cnf..
- Thu Jun 20 15:37:46 2019 - [info] MHA::MasterMonitor version 0.56.
- Thu Jun 20 15:37:47 2019 - [info] GTID failover mode = 0
- Thu Jun 20 15:37:47 2019 - [info] Dead Servers: //没有停止的mysql服务器
- Thu Jun 20 15:37:47 2019 - [info] Alive Servers://运行mysql服务主机列表
- Thu Jun 20 15:37:47 2019 - [info] 192.168.4.51(192.168.4.51:3306)
- Thu Jun 20 15:37:47 2019 - [info] 192.168.4.52(192.168.4.52:3306)
- Thu Jun 20 15:37:47 2019 - [info] 192.168.4.53(192.168.4.53:3306)
- Thu Jun 20 15:37:47 2019 - [info] Alive Slaves:
- Thu Jun 20 15:37:47 2019 - [info] Primary candidate for the new Master (candidate_master is set)
- Thu Jun 20 15:37:47 2019 - [info] 192.168.4.53(192.168.4.53:3306) Version=5.7.17-log (oldest major version between slaves) log-bin:enabled
- Thu Jun 20 15:37:47 2019 - [info] Replicating from 192.168.4.51(192.168.4.51:3306)
- Thu Jun 20 15:37:47 2019 - [info] Primary candidate for the new Master (candidate_master is set)
- Thu Jun 20 15:37:47 2019 - [info] Current Alive Master: 192.168.4.51(192.168.4.51:3306)
- Thu Jun 20 15:37:47 2019 - [info] Checking slave configurations..
- Thu Jun 20 15:37:47 2019 - [info] read_only=1 is not set on slave 192.168.4.52(192.168.4.52:3306).
- Thu Jun 20 15:37:47 2019 - [info] read_only=1 is not set on slave 192.168.4.53(192.168.4.53:3306).
- Thu Jun 20 15:37:47 2019 - [info] Checking replication filtering settings..
- Thu Jun 20 15:37:47 2019 - [info] binlog_do_db= , binlog_ignore_db=
- Thu Jun 20 15:37:47 2019 - [info] Replication filtering check ok.
- Thu Jun 20 15:37:47 2019 - [info] GTID (with auto-pos) is not supported
- Thu Jun 20 15:37:47 2019 - [info] Starting SSH connection tests..
- Thu Jun 20 15:37:49 2019 - [info] All SSH connection tests passed successfully.
- Thu Jun 20 15:37:49 2019 - [info] Checking MHA Node version..
- Thu Jun 20 15:37:50 2019 - [info] Version check ok.
- Thu Jun 20 15:37:50 2019 - [info] Checking SSH publickey authentication settings on the current master..
- Thu Jun 20 15:37:50 2019 - [info] HealthCheck: SSH to 192.168.4.51 is reachable.
- Thu Jun 20 15:37:50 2019 - [info] Master MHA Node version is 0.56.
- Thu Jun 20 15:37:50 2019 - [info] Checking recovery script configurations on 192.168.4.51(192.168.4.51:3306)..
- Thu Jun 20 15:37:50 2019 - [info] Connecting to root@192.168.4.51(192.168.4.51:22)..
- Creating /var/tmp if not exists.. ok.
- Checking output directory is accessible or not..
- ok.
- Binlog found at /var/lib/mysql, up to master51.000002
- Thu Jun 20 15:37:50 2019 - [info] Binlog setting check done.
- Thu Jun 20 15:37:50 2019 - [info] Checking SSH publickey authentication and checking recovery script configurations on all alive slave servers..
- Thu Jun 20 15:37:50 2019 - [info] Connecting to root@192.168.4.52(192.168.4.52:22)..
- Checking slave recovery environment settings..
- Opening /var/lib/mysql/relay-log.info ... ok.
- Relay log found at /var/lib/mysql, up to host52-relay-bin.000006
- Temporary relay log file is /var/lib/mysql/host52-relay-bin.000006
- Testing mysql connection and privileges..mysql: [Warning] Using a password on the command line interface can be insecure.
- done.
- Testing mysqlbinlog output.. done.
- Cleaning up test file(s).. done.
- Thu Jun 20 15:37:51 2019 - [info] Executing command : apply_diff_relay_logs --command=test --slave_user='root' --slave_host=192.168.4.53 --slave_ip=192.168.4.53 --slave_port=3306 --workdir=/var/tmp --target_version=5.7.17-log --manager_version=0.56 --relay_log_info=/var/lib/mysql/relay-log.info --relay_dir=/var/lib/mysql/ --slave_pass=xxx
- Thu Jun 20 15:37:51 2019 - [info] Connecting to root@192.168.4.53(192.168.4.53:22)..
- Checking slave recovery environment settings..
- Opening /var/lib/mysql/relay-log.info ... ok.
- Relay log found at /var/lib/mysql, up to host53-relay-bin.000006
- Temporary relay log file is /var/lib/mysql/host53-relay-bin.000006
- Testing mysql connection and privileges..mysql: [Warning] Using a password on the command line interface can be insecure.
- done.
- Testing mysqlbinlog output.. done.
- Cleaning up test file(s).. done.
- Thu Jun 20 15:37:52 2019 - [info] Slaves settings check done.
- Thu Jun 20 15:37:52 2019 - [info]
- 192.168.4.51(192.168.4.51:3306) (current master)
- +--192.168.4.52(192.168.4.52:3306)
- +--192.168.4.53(192.168.4.53:3306)
- Thu Jun 20 15:37:52 2019 - [info] Checking replication health on 192.168.4.52..
- Thu Jun 20 15:37:52 2019 - [info] ok.
- Thu Jun 20 15:37:52 2019 - [info] Checking replication health on 192.168.4.53..
- Thu Jun 20 15:37:52 2019 - [info] ok.
- Thu Jun 20 15:37:52 2019 - [info] Checking master_ip_failover_script status:
- Thu Jun 20 15:37:52 2019 - [info] /etc/mha/master_ip_failover --command=status --ssh_user=root --orig_master_host=192.168.4.51 --orig_master_ip=192.168.4.51 --orig_master_port=3306
- Thu Jun 20 15:37:52 2019 - [info] OK.
- Thu Jun 20 15:37:52 2019 - [warning] shutdown_script is not defined.
- Thu Jun 20 15:37:52 2019 - [info] Got exit code 0 (Not master dead).
- MySQL Replication Health is OK.//测试成功提示信息
3)启动管理服务
- [root@mgm57 ~]# masterha_manager --conf=/etc/mha/app1.cnf --remove_dead_master_conf \
- --ignore_last_failover //执行启动命令
- Thu Jun 20 17:05:58 2019 - [warning] Global configuration file /etc/masterha_default.cnf not found. Skipping.
- Thu Jun 20 17:05:58 2019 - [info] Reading application default configuration from /etc/mha/app1.cnf..
- Thu Jun 20 17:05:58 2019 - [info] Reading server configuration from /etc/mha/app1.cnf..
4)查看服务状态
- [root@mgm57 ~]# masterha_check_status --conf=/etc/mha/app1.cnf//执行命令
- app1 (pid:15806) is running(0:PING_OK), master:192.168.4.51 //服务运行,监视主服务器192.168.4.51
- [root@mgm57 ~]# ls /etc/mha/ //查看工作目录文件列表
- app1.cnf app1.master_status.health manager.log master_ip_failover
步骤二:访问集群
1)在主服务器51 添加访问数据的连接用户
- ]# mysql -uroot -p123qqq...A
- mysql> create database db9;
- Query OK, 1 row affected (0.05 sec)
- mysql> create table db9.a (id int);
- Query OK, 0 rows affected (0.63 sec)
- mysql> grant select,insert on db9.* to yaya55@"%" identified by "123qqq...A";
- Query OK, 0 rows affected, 1 warning (0.08 sec)
- mysql>exit
2)客户端50 连接vip地址访问集群
- host50~]# mysql -h192.168.4.100 -uyaya55 -p123qqq...A
- mysql> select * from db9.a;
- mysql> insert into db9.a values(100);
- mysql> select * from db9.a;
- +------+
- | id |
- +------+
- | 100 |
- +------+
- 1 row in set (0.00 sec)
- mysql>exit
3)在从服务器host52 查看数据
- [root@host52 ~]# mysql -uroot -p123qqq...A -e "select * from db9.a"
- mysql: [Warning] Using a password on the command line interface can be insecure.
- +------+
- | id |
- +------+
- | 100 |
- +------+
4)在从服务器host53 查看数据
- [root@host53 ~]# mysql -uroot -p123qqq...A -e "select * from db9.a"
- mysql: [Warning] Using a password on the command line interface can be insecure.
- +------+
- | id |
- +------+
- | 100 |
- +------+
步骤三:测试高可用
1)停止主服务器51的mysql服务
- host51~]# systemctl stop mysqld
2)查看管理服务 ,输出的监控信息
- [root@mgm57~]#masterha_manager --conf=/etc/mha/app1.cnf --remove_dead_master_conf \
- > --ignore_last_failover
- Thu Jun 20 17:05:58 2019 - [warning] Global configuration file /etc/masterha_default.cnf not found. Skipping.
- Thu Jun 20 17:05:58 2019 - [info] Reading application default configuration from /etc/mha/app1.cnf..
- Thu Jun 20 17:05:58 2019 - [info] Reading server configuration from /etc/mha/app1.cnf..
- Creating /var/tmp if not exists.. ok.
- Checking output directory is accessible or not..
- ok.
- Binlog found at /var/lib/mysql, up to master51.000002
- Thu Jun 20 17:35:59 2019 - [warning] Global configuration file /etc/masterha_default.cnf not found. Skipping.
- Thu Jun 20 17:35:59 2019 - [info] Reading application default configuration from /etc/mha/app1.cnf..
- Thu Jun 20 17:35:59 2019 - [info] Reading server configuration from /etc/mha/app1.cnf..
- [root@host57 ~]#
- [root@mgm57 ~]# masterha_check_status --conf=/etc/mha/app1.cnf
- app1 is stopped(2:NOT_RUNNING). //监控到主服务器宕机 管理服务自动停止
- [root@mgm57 ~]#
3)客户端依然连接vip地址,可以访问到数据
- client50]# ping -c 2 192.168.4.100 //能够ping通vip地址
- PING 192.168.4.100 (192.168.4.100) 56(84) bytes of data.
- 64 bytes from 192.168.4.100: icmp_seq=1 ttl=255 time=0.222 ms
- 64 bytes from 192.168.4.100: icmp_seq=2 ttl=255 time=0.121 ms
- --- 192.168.4.71 ping statistics ---
- 2 packets transmitted, 2 received, 0% packet loss, time 999ms
- rtt min/avg/max/mdev = 0.121/0.171/0.222/0.052 ms
- client50]# mysql -h192.168.4.100 -uyaya55 -p123qqq...A //连接vip地址
- mysql> insert into db9.a values(200); //插入记录
- mysql> select * from db9.a;//查询记录
- +------+
- | id |
- +------+
- | 100 |
- | 200 |
- +------+
4)查看vip地址
在host52主机查看到vip地址,说明host52 主机被选举为主服务器
- [root@host52 ~]# ifconfig eth0:1
- eth0:1: flags=4163<UP,BROADCAST,RUNNING,MULTICAST> mtu 1500
- inet 192.168.4.100 netmask 255.255.255.0 broadcast 192.168.4.255
- ether 52:54:00:f5:c4:6a txqueuelen 1000 (Ethernet)
在host53主机未查看到vip地址,说明host53主机是当前host52的从服务器
- [root@host53 ~]# ifconfig eth0:1 //未查到vip地址
- eth0:1: flags=4163<UP,BROADCAST,RUNNING,MULTICAST> mtu 1500
- ether 52:54:00:28:22:2e txqueuelen 1000 (Ethernet)
- [root@host53 ~]# mysql -uroot -p123qqq...A -e "show slave status\G" | grep -i 192
- mysql: [Warning] Using a password on the command line interface can be insecure.
- Master_Host: 192.168.4.52 //主服务器Ip地址
- [root@host53 ~]#
- [root@host53 ~]# mysql -uroot -p123qqq...A -e "show slave status\G" | grep -i yes
- mysql: [Warning] Using a password on the command line interface can be insecure.
- Slave_IO_Running: Yes //IO线程正常
- Slave_SQL_Running: Yes //SQL线程正常
- [root@host53 ~]# mysql -uroot -p123qqq...A -e "select * from db9.a" //自动同步数据
- mysql: [Warning] Using a password on the command line interface can be insecure.
- +------+
- | id |
- +------+
- | 100 |
- | 200 |
- +------+
步骤四:修复故障服务器
1)配置数据库服务器
启动host51主机的数据库服务
- host51~]# systemctl start mysqld
与主服务器数据一致
- [root@host52 ~]# mysqldump -uroot -p123qqq...A --master-data db9 > db9.sql //在主服务器host52 做完全备份
- mysqldump: [Warning] Using a password on the command line interface can be insecure.
- [root@host52 ~]#
- [root@host52 ~]# scp db9.sql root@192.168.4.51:/root/ //拷贝备份文件给host51主机
- db9.sql 100% 1918 3.1MB/s 00:00
- [root@host52 ~]#
- host51 ~]# mysql -uroot -p123qqq...A db9 < /root/db9.sql//host51 主机使用备份文件恢复数据
- mysql: [Warning] Using a password on the command line interface can be insecure.
指定主服务器信息
- [root@host51 ~]# grep master52 /root/db9.sql //查看日志名及偏移量
- CHANGE MASTER TO MASTER_LOG_FILE='master52.000001', MASTER_LOG_POS=895;
- [root@host51 ~]# mysql -uroot -p123qqq...A
- mysql>change master to master_host="192.168.4.52",master_user="repluser",master_password="123qqq...A",master_log_file="master52.000001",master_log_pos=895;
- Query OK, 0 rows affected, 2 warnings (0.14 sec)
启动slave进程
- mysql> start slave;
- Query OK, 0 rows affected (0.01 sec)
- Mysql> exit ;
查看状态信息
- [root@host51 ~]# mysql -uroot -p123qqq...A -e "show slave status\G" |grep 192.168.4.52
- mysql: [Warning] Using a password on the command line interface can be insecure.
- Master_Host: 192.168.4.52 //主服务器ip地址
- [root@host51 ~]#
- [root@host51 ~]# mysql -uroot -p123qqq...A -e "show slave status\G" |grep -i yes
- mysql: [Warning] Using a password on the command line interface can be insecure.
- Slave_IO_Running: Yes //IO线程状态正常
- Slave_SQL_Running: Yes //SQL线程状态正常
- [root@host51 ~]#
2)配置管理服务器
修改配置文件,添加数据库服务器host51
- ]# vim /etc/mha/app1.cnf
- [server1 ]
- hostname=192.168.4.51
- port=3306
- candidate_master=1
- :wq
测试集群环境
- [root@mgm57 ~]# masterha_check_ssh --conf=/etc/mha/app1.cnf //测试SSH
- Thu Jun 20 15:33:48 2019 - [warning] Global configuration file /etc/masterha_default.cnf not found. Skipping.
- Thu Jun 20 15:33:48 2019 - [info] Reading application default configuration from /etc/mha/app1.cnf..
- Thu Jun 20 15:33:48 2019 - [info] Reading server configuration from /etc/mha/app1.cnf..
- Thu Jun 20 15:33:48 2019 - [info] Starting SSH connection tests..
- Thu Jun 20 15:33:49 2019 - [debug]
- Thu Jun 20 15:33:48 2019 - [debug] Connecting via SSH from root@192.168.4.51(192.168.4.51:22) to root@192.168.4.52(192.168.4.52:22)..
- Thu Jun 20 15:33:49 2019 - [debug] ok.
- Thu Jun 20 15:33:49 2019 - [debug] Connecting via SSH from root@192.168.4.51(192.168.4.51:22) to root@192.168.4.53(192.168.4.53:22)..
- Thu Jun 20 15:33:49 2019 - [debug] ok.
- Thu Jun 20 15:33:50 2019 - [debug]
- Thu Jun 20 15:33:49 2019 - [debug] Connecting via SSH from root@192.168.4.52(192.168.4.52:22) to root@192.168.4.51(192.168.4.51:22)..
- Thu Jun 20 15:33:49 2019 - [debug] ok.
- Thu Jun 20 15:33:49 2019 - [debug] Connecting via SSH from root@192.168.4.52(192.168.4.52:22) to root@192.168.4.53(192.168.4.53:22)..
- Thu Jun 20 15:33:49 2019 - [debug] ok.
- Thu Jun 20 15:33:50 2019 - [debug] ok.
- Thu Jun 20 15:33:50 2019 - [debug] Connecting via SSH from root@192.168.4.53(192.168.4.53:22) to root@192.168.4.52(192.168.4.52:22)..
- Thu Jun 20 15:33:50 2019 - [debug] ok.
- Thu Jun 20 15:33:51 2019 - [info] All SSH connection tests passed successfully.//成功
- [root@mgm57 ~]# masterha_check_repl --conf=/etc/mha/app1.cnf//测试主从同步
- Thu Jun 20 15:37:46 2019 - [info] Reading server configuration from /etc/mha/app1.cnf..
- Thu Jun 20 15:37:46 2019 - [info] MHA::MasterMonitor version 0.56.
- Thu Jun 20 15:37:47 2019 - [info] GTID failover mode = 0
- Thu Jun 20 15:37:47 2019 - [info] Dead Servers:
- Thu Jun 20 15:37:47 2019 - [info] Alive Servers:
- Thu Jun 20 15:37:47 2019 - [info] 192.168.4.51(192.168.4.51:3306)
- Thu Jun 20 15:37:47 2019 - [info] 192.168.4.52(192.168.4.52:3306)
- Thu Jun 20 15:37:47 2019 - [info] 192.168.4.53(192.168.4.53:3306)
- Thu Jun 20 15:37:47 2019 - [info] Alive Slaves:
- Thu Jun 20 15:37:47 2019 - [info] Primary candidate for the new Master (candidate_master is set)
- Thu Jun 20 15:37:47 2019 - [info] 192.168.4.53(192.168.4.53:3306) Version=5.7.17-log (oldest major version between slaves) log-bin:enabled
- Thu Jun 20 15:37:47 2019 - [info] Replicating from 192.168.4.51(192.168.4.51:3306)
- Thu Jun 20 15:37:47 2019 - [info] Primary candidate for the new Master (candidate_master is set)
- Thu Jun 20 15:37:47 2019 - [info] Current Alive Master: 192.168.4.51(192.168.4.51:3306)
- Thu Jun 20 15:37:47 2019 - [info] Checking slave configurations..
- Thu Jun 20 15:37:47 2019 - [info] read_only=1 is not set on slave 192.168.4.52(192.168.4.52:3306).
- Thu Jun 20 15:37:47 2019 - [info] read_only=1 is not set on slave 192.168.4.53(192.168.4.53:3306).
- Thu Jun 20 15:37:47 2019 - [info] Checking replication filtering settings..
- Thu Jun 20 15:37:47 2019 - [info] binlog_do_db= , binlog_ignore_db=
- Thu Jun 20 15:37:47 2019 - [info] Replication filtering check ok.
- Thu Jun 20 15:37:47 2019 - [info] GTID (with auto-pos) is not supported
- Thu Jun 20 15:37:47 2019 - [info] Starting SSH connection tests..
- Thu Jun 20 15:37:49 2019 - [info] All SSH connection tests passed successfully.
- Thu Jun 20 15:37:49 2019 - [info] Checking MHA Node version..
- Thu Jun 20 15:37:50 2019 - [info] Version check ok.
- Thu Jun 20 15:37:50 2019 - [info] Checking SSH publickey authentication settings on the current master..
- Thu Jun 20 15:37:50 2019 - [info] HealthCheck: SSH to 192.168.4.51 is reachable.
- Thu Jun 20 15:37:50 2019 - [info] Master MHA Node version is 0.56.
- Thu Jun 20 15:37:50 2019 - [info] Checking recovery script configurations on 192.168.4.51(192.168.4.51:3306)..
- Thu Jun 20 15:37:50 2019 - [info] Connecting to root@192.168.4.51(192.168.4.51:22)..
- Creating /var/tmp if not exists.. ok.
- Checking output directory is accessible or not..
- ok.
- Binlog found at /var/lib/mysql, up to master51.000002
- Thu Jun 20 15:37:50 2019 - [info] Binlog setting check done.
- Thu Jun 20 15:37:50 2019 - [info] Checking SSH publickey authentication and checking recovery script configurations on all alive slave servers..
- Thu Jun 20 15:37:50 2019 - [info] Connecting to root@192.168.4.52(192.168.4.52:22)..
- Checking slave recovery environment settings..
- Opening /var/lib/mysql/relay-log.info ... ok.
- Relay log found at /var/lib/mysql, up to host52-relay-bin.000006
- Temporary relay log file is /var/lib/mysql/host52-relay-bin.000006
- Testing mysql connection and privileges..mysql: [Warning] Using a password on the command line interface can be insecure.
- done.
- Testing mysqlbinlog output.. done.
- Cleaning up test file(s).. done.
- Thu Jun 20 15:37:51 2019 - [info] Connecting to root@192.168.4.53(192.168.4.53:22)..
- Checking slave recovery environment settings..
- Opening /var/lib/mysql/relay-log.info ... ok.
- Relay log found at /var/lib/mysql, up to host53-relay-bin.000006
- Temporary relay log file is /var/lib/mysql/host53-relay-bin.000006
- Testing mysql connection and privileges..mysql: [Warning] Using a password on the command line interface can be insecure.
- done.
- Testing mysqlbinlog output.. done.
- Cleaning up test file(s).. done.
- Thu Jun 20 15:37:52 2019 - [info] Slaves settings check done.
- Thu Jun 20 15:37:52 2019 - [info]
- 192.168.4.51(192.168.4.51:3306) (current master)
- +--192.168.4.52(192.168.4.52:3306)
- +--192.168.4.53(192.168.4.53:3306)
- Thu Jun 20 15:37:52 2019 - [info] Checking replication health on 192.168.4.52..
- Thu Jun 20 15:37:52 2019 - [info] ok.
- Thu Jun 20 15:37:52 2019 - [info] Checking replication health on 192.168.4.53..
- Thu Jun 20 15:37:52 2019 - [info] ok.
- Thu Jun 20 15:37:52 2019 - [info] Checking master_ip_failover_script status:
- Thu Jun 20 15:37:52 2019 - [info] /etc/mha/master_ip_failover --command=status --ssh_user=root --orig_master_host=192.168.4.51 --orig_master_ip=192.168.4.51 --orig_master_port=3306
- Thu Jun 20 15:37:52 2019 - [info] OK.
- Thu Jun 20 15:37:52 2019 - [warning] shutdown_script is not defined.
- Thu Jun 20 15:37:52 2019 - [info] Got exit code 0 (Not master dead).
- MySQL Replication Health is OK. //成功
重启管理服务
- ]# masterha_stop --conf=/etc/mha/app1.cnf //停止管理服务
- Stopped app1 successfully.
- ]# masterha_manager --conf=/etc/mha/app1.cnf --remove_dead_master_conf \
- --ignore_last_failover //启动管理服务
- Thu Jun 20 17:05:58 2019 - [warning] Global configuration file /etc/masterha_default.cnf not found. Skipping.
- Thu Jun 20 17:05:58 2019 - [info] Reading application default configuration from /etc/mha/app1.cnf..
- Thu Jun 20 17:05:58 2019 - [info] Reading server configuration from /etc/mha/app1.cnf..
查看状态
- mgm57 ~]# masterha_check_status --conf=/etc/mha/app1.cnf
- app1 (pid:15806) is running(0:PING_OK), master:192.168.4.52 //服务运行,监视服务器52
- [root@mgm57 ~]#