NSD RDBMS2 DAY05
1 案例1:安装软件
1.1 问题
- 环境准备
- 安装软件包
1.2 方案
准备3台虚拟主机,配置ip地址和主机名。具体如图-1所示:(不需要安装任何MySQL服务软件)
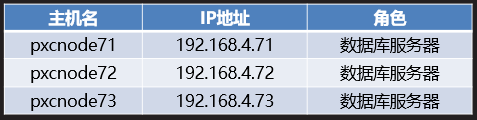
图-1
1.3 步骤
实现此案例需要按照如下步骤进行。
步骤一:环境准备
配置主机名与ip地址绑定
配置服务器192.168.4.71
- ]# vim /etc/hosts
- 192.168.4.71 pxcnode71
- 192.168.4.72 pxcnode72
- 192.168.4.73 pxcnode73
- :wq
- ]#hostname pxcnode71
配置服务器192.168.4.72
- ]# vim /etc/hosts
- 192.168.4.71 pxcnode71
- 192.168.4.72 pxcnode72
- 192.168.4.73 pxcnode73
- :wq
- ]#hostname pxcnode72
配置服务器192.168.4.73
- ]# vim /etc/hosts
- 192.168.4.71 pxcnode71
- 192.168.4.72 pxcnode72
- 192.168.4.73 pxcnode73
- :wq
- ]#hostname pxcnode73
在任意一台服务器上ping 对方的主机名,ping通为配置成功。
- [root@host71 ~]# ping -c 2 pxcnode71 //成功
- PING pxcnode71 (192.168.4.71) 56(84) bytes of data.
- 64 bytes from pxcnode71 (192.168.4.71): icmp_seq=1 ttl=255 time=0.011 ms
- 64 bytes from pxcnode71 (192.168.4.71): icmp_seq=2 ttl=255 time=0.020 ms
- --- pxcnode71 ping statistics ---
- 2 packets transmitted, 2 received, 0% packet loss, time 999ms
- rtt min/avg/max/mdev = 0.011/0.015/0.020/0.006 ms
- [root@host71 ~]#
- [root@host71 ~]#
- [root@host71 ~]# ping -c 2 pxcnode72 //成功
- PING pxcnode72 (192.168.4.72) 56(84) bytes of data.
- 64 bytes from pxcnode72 (192.168.4.72): icmp_seq=1 ttl=255 time=0.113 ms
- 64 bytes from pxcnode72 (192.168.4.72): icmp_seq=2 ttl=255 time=0.170 ms
- --- pxcnode72 ping statistics ---
- 2 packets transmitted, 2 received, 0% packet loss, time 1000ms
- rtt min/avg/max/mdev = 0.113/0.141/0.170/0.030 ms
- [root@host71 ~]#
- [root@host71 ~]#
- [root@host71 ~]# ping -c 2 pxcnode73 //成功
- PING pxcnode73 (192.168.4.73) 56(84) bytes of data.
- 64 bytes from pxcnode73 (192.168.4.73): icmp_seq=1 ttl=255 time=0.198 ms
- 64 bytes from pxcnode73 (192.168.4.73): icmp_seq=2 ttl=255 time=0.155 ms
- --- pxcnode73 ping statistics ---
- 2 packets transmitted, 2 received, 0% packet loss, time 1000ms
- rtt min/avg/max/mdev = 0.155/0.176/0.198/0.025 ms
- [root@host71 ~]#
步骤二:安装软件包
1)在192.168.4.71 服务器安装软件包
软件包之间有依赖注意软件包安装顺序
- ]# rpm -ivh libev-4.15-1.el6.rf.x86_64.rpm //安装依赖
- ]# yum -y install percona-xtrabackup-24-2.4.13-1.el7.x86_64.rpm
- ]# rpm -ivh qpress-1.1-14.11.x86_64.rpm //安装依赖
- ]# tar -xvf Percona-XtraDB-Cluster-5.7.25-31.35-r463-el7-x86_64-bundle.tar
- ]# yum -y install Percona-XtraDB-Cluster-*.rpm
2)在192.168.4.72 服务器安装软件包
- ]# rpm -ivh libev-4.15-1.el6.rf.x86_64.rpm //安装依赖
- ]# yum -y install percona-xtrabackup-24-2.4.13-1.el7.x86_64.rpm
- ]# rpm -ivh qpress-1.1-14.11.x86_64.rpm //安装依赖
- ]# tar -xvf Percona-XtraDB-Cluster-5.7.25-31.35-r463-el7-x86_64-bundle.tar
- ]# yum -y install Percona-XtraDB-Cluster-*.rpm
3)在192.168.4.73 服务器安装软件包
- ]# rpm -ivh libev-4.15-1.el6.rf.x86_64.rpm //安装依赖
- ]# yum -y install percona-xtrabackup-24-2.4.13-1.el7.x86_64.rpm
- ]# rpm -ivh qpress-1.1-14.11.x86_64.rpm //安装依赖
- ]# tar -xvf Percona-XtraDB-Cluster-5.7.25-31.35-r463-el7-x86_64-bundle.tar
- ]# yum -y install Percona-XtraDB-Cluster-*.rpm
2 案例2:配置服务
2.1 问题
- 修改mysqld.cnf文件
- 修改mysqld_safe.cnf文件
- 修改wsrap.cnf文件
- 启动服务
2.2 步骤
实现此案例需要按照如下步骤进行。
步骤一:修改mysqld.cnf文件
- [root@pxcnode71 ~]# vim /etc/percona-xtradb-cluster.conf.d/mysqld.cnf
- [mysqld]
- server-id=71 //server-id 不允许重复
- datadir=/var/lib/mysql //数据库目录
- socket=/var/lib/mysql/mysql.sock //socket文件
- log-error=/var/log/mysqld.log //日志文件
- pid-file=/var/run/mysqld/mysqld.pid //pid文件
- log-bin //启用binlog日志
- log_slave_updates //启用链式复制
- expire_logs_days=7 //日志文件保留天数
- :wq
修改服务器192.168.4.72
- [root@pxcnode72 ~]# vim /etc/percona-xtradb-cluster.conf.d/mysqld.cnf
- [mysqld]
- server-id=72 //server-id 不允许重复
- datadir=/var/lib/mysql //数据库目录
- socket=/var/lib/mysql/mysql.sock //socket文件
- log-error=/var/log/mysqld.log //日志文件
- pid-file=/var/run/mysqld/mysqld.pid //pid文件
- log-bin //启用binlog日志
- log_slave_updates //启用链式复制
- expire_logs_days=7 //日志文件保留天数
- :wq
修改服务器192.168.4.73
- [root@pxcnode73 ~]# vim /etc/percona-xtradb-cluster.conf.d/mysqld.cnf
- [mysqld]
- server-id=73 //server-id 不允许重复
- datadir=/var/lib/mysql //数据库目录
- socket=/var/lib/mysql/mysql.sock //socket文件
- log-error=/var/log/mysqld.log //日志文件
- pid-file=/var/run/mysqld/mysqld.pid //pid文件
- log-bin //启用binlog日志
- log_slave_updates //启用链式复制
- expire_logs_days=7 //日志文件保留天数
- :wq
步骤二:修改mysqld_safe.cnf文件
1)分别修改3台服务器的mysqld_safe.cnf (使用默认配置即可)
- [root@pxcnode71 ~]# vim /etc/percona-xtradb-cluster.conf.d/mysqld_safe.cnf
- [mysqld_safe]
- pid-file = /var/run/mysqld/mysqld.pid
- socket = /var/lib/mysql/mysql.sock
- nice = 0
- :wq
修改服务器192.168.4.72
- [root@pxcnode72 ~]# vim /etc/percona-xtradb-cluster.conf.d/mysqld_safe.cnf
- [mysqld_safe]
- pid-file = /var/run/mysqld/mysqld.pid
- socket = /var/lib/mysql/mysql.sock
- nice = 0
- :wq
修改服务器192.168.4.73
- [root@pxcnode73 ~]# vim /etc/percona-xtradb-cluster.conf.d/mysqld_safe.cnf
- [mysqld_safe]
- pid-file = /var/run/mysqld/mysqld.pid
- socket = /var/lib/mysql/mysql.sock
- nice = 0
- :wq
步骤三:修改wsrep.cnf文件
1)分别修改3台服务器的wsrep.cnf
- [root@pxcnode71 ~]# vim /etc/percona-xtradb-cluster.conf.d/wsrep.cnf
- wsrep_cluster_address=gcomm://192.168.4.71,192.168.4.72,192.168.4.73//成员列表
- wsrep_node_address=192.168.4.71 //本机ip
- wsrep_cluster_name=pxc-cluster //集群名
- wsrep_node_name=pxcnode71 //本机主机名
- wsrep_sst_auth="sstuser:123qqq...A" //SST数据同步授权用户及密码
- :wq
修改服务器192.168.4.72
- [root@pxcnode72 ~]# vim /etc/percona-xtradb-cluster.conf.d/wsrep.cnf
- wsrep_cluster_address=gcomm://192.168.4.71,192.168.4.72,192.168.4.73//成员列表
- wsrep_node_address=192.168.4.72 //本机ip
- wsrep_cluster_name=pxc-cluster //集群名
- wsrep_node_name=pxcnode72 //本机主机名
- wsrep_sst_auth="sstuser:123qqq...A" //SST数据同步授权用户及密码
- :wq
修改服务器192.168.4.73
- [root@pxcnode73 ~]# vim /etc/percona-xtradb-cluster.conf.d/wsrep.cnf
- wsrep_cluster_address=gcomm://192.168.4.71,192.168.4.72,192.168.4.73//成员列表
- wsrep_node_address=192.168.4.73 //本机ip
- wsrep_cluster_name=pxc-cluster //集群名
- wsrep_node_name=pxcnode73 //本机主机名
- wsrep_sst_auth="sstuser:123qqq...A" //SST数据同步授权用户及密码
- :wq
步骤四:启动服务
1)启动集群服务
注意:在1台服务器上执即可(192.168.4.71),首次启动服务时间比较长
- [root@pxcnode71 ~]# ]# systemctl start mysql@bootstrap.service //启动集群服务
- [root@pxcnode71 ~]# grep pass /var/log/mysqld.log //查看数据库管理员初始登录密码
- 2019-06-20T12:29:42.489377Z 1 [Note] A temporary password is generated for root@localhost: W.HiOb8(ok)_
- [root@pxcnode71 ~]#mysql –uroot –p’ W.HiOb8(ok)_’ //使用初始密码登录
- Mysql> alter user root@”localhost” identified by “123456”;//修改登录密码
- MySQL> exit;
- [root@pxcnode71 ~]#mysql –uroot –p123456 //使用修改后的密码登录
- Mysql> garnt reload, lock tables,replication client,process on *.* to
- sstuser@"localhost” identified by “123qqq…A”; //添加授权用户
2)启动数据库服务
启动主机pxcnode72的数据库服务,会自动同步pxcnode71主机的root初始密码和授权用户sstuser
- [root@pxcnode72 ~]# systemctl start mysql //启动数据库服务
- [root@pxcnode72 ~]#
- [root@pxcnode72 ~]# netstat -utnlp | grep :3306
- tcp6 0 0 :::3306 :::* LISTEN 12794/mysqld
- [root@pxcnode72 ~]# netstat -utnlp | grep :4567
- tcp 0 0 0.0.0.0:4567 0.0.0.0:* LISTEN 12794/mysqld
- [root@host72 ~]#
启动主机pxcnode73的数据库服务,会自动同步pxcnode71主机的root初始密码和授权用户sstuser
- [root@pxcnode73 ~]# systemctl start mysql //启动数据库服务
- [root@pxcnode73 ~]#
- [root@pxcnode73 ~]# netstat -utnlp | grep :3306
- tcp6 0 0 :::3306 :::* LISTEN 12794/mysqld
- [root@pxcnode73 ~]# netstat -utnlp | grep :4567
- tcp 0 0 0.0.0.0:4567 0.0.0.0:* LISTEN 12794/mysqld
- [root@host73 ~]#
3 案例3:测试配置
3.1 问题
- 查看集群信息
- 访问集群,存取数据
- 测试故障自动恢复
3.2 步骤
实现此案例需要按照如下步骤进行。
步骤一:查看集群信息
1)启动数据库服务
在任意一台数据查看都可以。
- [root@pxcnode71 ~]# mysql -uroot -p123456
- wsrep_incoming_addresses 192.168.4.71:3306,192.168.4.72:3306,192.168.4.73:3306 //集群成员列表
- wsrep_cluster_size 3 //集群服务器台数
- wsrep_cluster_status Primary //主机状态
- wsrep_connected ON //连接状态
- wsrep_ready ON //服务状态
步骤二:访问集群,存取数据
1)添加访问数据的连接用户 (在任意一台服务器上添加都可以,另外的2台服务器会自动同步授权用户)
- [root@pxcnode72 ~]# mysql -uroot -p123456
- mysql> grant all on gamedb.* to yaya@"%" identified by "123456"; //添加授权用户
- Query OK, 0 rows affected, 1 warning (0.18 sec)
- [root@pxcnode71 ~]# mysql -uroot -p123456 -e 'show grants for yaya@"%" ' //查看
- mysql: [Warning] Using a password on the command line interface can be insecure.
- +--------------------------------------------------+
- | Grants for yaya@% |
- +--------------------------------------------------+
- | GRANT USAGE ON *.* TO 'yaya'@'%' |
- | GRANT ALL PRIVILEGES ON `gamedb`.* TO 'yaya'@'%' |
- +--------------------------------------------------+
- [root@pxcnode71 ~]#
- [root@pxcnode73 ~]# mysql -uroot -p123456 -e 'show grants for yaya@"%" ' //查看
- mysql: [Warning] Using a password on the command line interface can be insecure.
- +--------------------------------------------------+
- | Grants for yaya@% |
- +--------------------------------------------------+
- | GRANT USAGE ON *.* TO 'yaya'@'%' |
- | GRANT ALL PRIVILEGES ON `gamedb`.* TO 'yaya'@'%' |
- +--------------------------------------------------+
- [root@pxcnode73 ~]#
2)客户端连接集群存取数据 (连接任意一台数据库服务器的ip地址都可以)
连接数据服务器主机73
- client50 ~]# mysql -h192.168.4.73 -uyaya -p123456 //连接服务器73
- mysql>
- mysql> create database gamedb; //建库
- Query OK, 1 row affected (0.19 sec)
- mysql> create table gamedb.a(id int primary key auto_increment,name char(10));//建表
- Query OK, 0 rows affected (1.02 sec)
- mysql> insert into gamedb.a(name)values("bob"),("tom"); //插入记录
- Query OK, 2 rows affected (0.20 sec)
- Records: 2 Duplicates: 0 Warnings: 0
3)在另外2台数据库服务器查看数据,客户端连接数据库服务器71主机查看数据。
- client50 ~]# mysql -h192.168.4.71 -uyaya -p123456 //连接服务器71
- mysql> select * from gamedb.a; //查看记录
- +----+-------+
- | id | name |
- +----+-------+
- | 2 | bob |
- | 5 | tom |
4)客户端连接数据库服务器73主机查看数据
- client50 ~]# mysql -h192.168.4.73 -uyaya -p123456 //连接服务器73
- mysql> select * from gamedb.a; //查看记录
- +----+-------+
- | id | name |
- +----+-------+
- | 2 | bob |
- | 5 | tom |
步骤三:测试故障自动恢复
1)停止数据库服务
停止3台服务器的任意一台主机的数据库服务都不会影响数据的存取。
- [root@pxcnode71 ~]# systemctl stop mysql //停止71主机的数据库服务
- Client50 ~]# client50 ~]# mysql -h192.168.4.72 -uyaya -p123456 //连接服务器72
- mysql> insert into gamedb.a(name)values("bob2"),("tom2");
- mysql> insert into gamedb.a(name)values("jerry"),("jack");
- Query OK, 2 rows affected (0.20 sec)
- Records: 2 Duplicates: 0 Warnings: 0
客户端50,连接数据库主机73,查看数据
- client50 ~]# mysql -h192.168.4.73 -uyaya -p123456 //连接服务器73
- mysql> select * from gamedb.a;
- +----+-------+
- | id | name |
- +----+-------+
- | 2 | bob |
- | 5 | tom |
- | 7 | bob2 |
- | 9 | tom2 |
- | 11 | jerry |
- | 13 | jack |
- +----+-------+
- 6 rows in set (0.00 sec)
3)启动71主机的数据库服务
数据库服务运行后,会自动同步宕机期间的数据。
- client50 ~]# mysql -h192.168.4.71 -uyaya -p123456 //连接服务器71
- mysql> select * from gamedb.a;
- +----+-------+
- | id | name |
- +----+-------+
- | 2 | bob |
- | 5 | tom |
- | 7 | bob2 |
- | 9 | tom2 |
- | 11 | jerry |
- | 13 | jack |
- +----+-------+
- rows in set (0.00 sec)
4 案例4:MySQL存储引擎的配置
4.1 问题
本案例要求MySQL数据存储引擎的使用,完成以下任务操作:
- 查看服务支持的存储引擎
- 修改服务默认使用的存储引擎
- 查看表使用的存储引擎
- 设置表使用的存储引擎
- 修改表存储引擎
4.2 步骤
实现此案例需要按照如下步骤进行。
步骤一:查看服务支持的存储引擎
登入MySQL服务器,查看当前支持哪些存储引擎。
使用mysql命令连接,以root用户登入:
- [root@dbsvr1 ~]# mysql -u root –p
- Enter password:
- Welcome to the MySQL monitor. Commands end with ; or \g.
- Your MySQL connection id is 9
- Server version: 5.7.17 MySQL Community Server (GPL)
- Copyright (c) 2000, 2016, Oracle and/or its affiliates. All rights reserved.
- Oracle is a registered trademark of Oracle Corporation and/or its
- affiliates. Other names may be trademarks of their respective
- owners.
- Type 'help;' or '\h' for help. Type '\c' to clear the current input statement.
- mysql>
执行SHOW ENGINES\G指令可列表查看,MySQL 5.6可用的存储引擎有9种(除最后的FEDERATED以外,其他8种都支持),其中默认采用的存储引擎为InnoDB:
- mysql> SHOW ENGINES\G
- *************************** 1. row ***************************
- Engine: InnoDB
- Support: DEFAULT //此存储引擎为默认
- Comment: Supports transactions, row-level locking, and foreign keys
- Transactions: YES
- XA: YES
- Savepoints: YES
- *************************** 2. row ***************************
- Engine: MRG_MYISAM
- Support: YES
- Comment: Collection of identical MyISAM tables
- Transactions: NO
- XA: NO
- Savepoints: NO
- *************************** 3. row ***************************
- Engine: MEMORY
- Support: YES
- Comment: Hash based, stored in memory, useful for temporary tables
- Transactions: NO
- XA: NO
- Savepoints: NO
- *************************** 4. row ***************************
- Engine: BLACKHOLE
- Support: YES
- Comment: /dev/null storage engine (anything you write to it disappears)
- Transactions: NO
- XA: NO
- Savepoints: NO
- *************************** 5. row ***************************
- Engine: MyISAM
- Support: YES
- Comment: MyISAM storage engine
- Transactions: NO
- XA: NO
- Savepoints: NO
- *************************** 6. row ***************************
- Engine: CSV
- Support: YES
- Comment: CSV storage engine
- Transactions: NO
- XA: NO
- Savepoints: NO
- *************************** 7. row ***************************
- Engine: ARCHIVE
- Support: YES
- Comment: Archive storage engine
- Transactions: NO
- XA: NO
- Savepoints: NO
- *************************** 8. row ***************************
- Engine: PERFORMANCE_SCHEMA
- Support: YES
- Comment: Performance Schema
- Transactions: NO
- XA: NO
- Savepoints: NO
- *************************** 9. row ***************************
- Engine: FEDERATED
- Support: NO //此引擎不被支持
- Comment: Federated MySQL storage engine
- Transactions: NULL
- XA: NULL
- Savepoints: NULL
- 9 rows in set (0.01 sec)
步骤二:修改服务默认使用的存储引擎
在 mysql> 环境中,可以直接通过SET指令更改默认的存储引擎(只在本次连接会话过程中有效,退出重进即失效) 。比如临时修改为MyISAM,可执行下列操作:
- mysql> SET default_storage_engine=MyISAM; //改用MyISAM引擎
- Query OK, 0 rows affected (0.00 sec)
- mysql> SHOW VARIABLES LIKE 'default_storage_engine'; //确认结果
- +------------------------+--------+
- | Variable_name | Value |
- +------------------------+--------+
- | default_storage_engine | MyISAM |
- +------------------------+--------+
- 1 row in set (0.00 sec)
若希望直接修改MySQL服务程序所采用的默认存储引擎,应将相关设置写入配置文件/etc/my.cnf,并重启服务后生效。比如:
- [root@dbsvr1 ~]# vim /etc/my.cnf
- [mysqld]
- .. ..
- default_storage_engine=myisam //改用myisam引擎
- [root@dbsvr1 ~]# systemctl restart mysqld.service //重启服务
重新登入 mysql> 确认修改结果:
- [root@dbsvr1 ~]# mysql -u root -p
- Enter password:
- Welcome to the MySQL monitor. Commands end with ; or \g.
- Your MySQL connection id is 3
- Server version: 5.7.17 MySQL Community Server (GPL)
- Copyright (c) 2000, 2016, Oracle and/or its affiliates. All rights reserved.
- Oracle is a registered trademark of Oracle Corporation and/or its
- affiliates. Other names may be trademarks of their respective
- owners.
- Type 'help;' or '\h' for help. Type '\c' to clear the current input statement.
- mysql> SHOW VARIABLES LIKE 'default_storage_engine';
- +------------------------+--------+
- | Variable_name | Value |
- +------------------------+--------+
- | default_storage_engine | MYISAM | //默认引擎已修改
- +------------------------+--------+
- 1 row in set (0.00 sec)
- mysql> exit
- Bye
步骤三:查看表使用的存储引擎
登入MySQL服务器查看。
- mysql> show create table user \G; //查看建表命令
- *************************** 1. row ***************************
- Table: user
- Create Table: CREATE TABLE `user` (
- `id` int(11) NOT NULL AUTO_INCREMENT,
- `name` char(50) DEFAULT NULL,
- `age` tinyint(3) unsigned DEFAULT '19',
- `password` char(1) DEFAULT NULL,
- `uid` int(11) DEFAULT NULL,
- `gid` int(11) DEFAULT NULL,
- `comment` char(150) DEFAULT NULL,
- `homedir` char(50) DEFAULT NULL,
- `shell` char(50) DEFAULT NULL,
- PRIMARY KEY (`id`)
- ) ENGINE=InnoDB AUTO_INCREMENT=46 DEFAULT CHARSET=latin1 //存储引擎是InnoDB
- 1 row in set (0.00 sec)
- ERROR:
- No query specified
- mysql>
步骤四:设置表使用的存储引擎
登入MySQL服务器设置。
- mysql> create table stuinfo( name char(10), age int )engine=memory;//设置
- Query OK, 0 rows affected (0.12 sec)
- mysql>
- mysql> show create table stuinfo\G; //查看
- *************************** 1. row ***************************
- Table: stuinfo
- Create Table: CREATE TABLE `stuinfo` (
- `name` char(10) DEFAULT NULL,
- `age` int(11) DEFAULT NULL
- ) ENGINE=MEMORY DEFAULT CHARSET=latin1 //存储引擎名
- 1 row in set (0.00 sec)
- ERROR:
- No query specified
- mysql>
步骤五:修改表存储引擎
登入MySQL服务器修改。
- mysql> alter table stuinfo engine=innodb; //修改
- Query OK, 0 rows affected (0.54 sec)
- Records: 0 Duplicates: 0 Warnings: 0
- mysql>
- mysql> show create table stuinfo\G; //查看
- *************************** 1. row ***************************
- Table: stuinfo
- Create Table: CREATE TABLE `stuinfo` (
- `name` char(10) DEFAULT NULL,
- `age` int(11) DEFAULT NULL
- ) ENGINE=InnoDB DEFAULT CHARSET=latin1 //当前存储引擎名
- 1 row in set (0.00 sec)
- ERROR:
- No query specified
- mysql>
5 案例5:事务特性
5.1 问题
具体操作如下:
- 创建innodb存储引擎的表
- 关闭服务的自动提交功能
- 测试事务特性
5.2 步骤
实现此案例需要按照如下步骤进行。
步骤一:创建innodb存储引擎的表
1)数据库管理员root登录,创建新库、新表。
- [root@host50 ~]# mysql -uroot -p123456 //访问服务
- mysql> create database db10; //建库
- Query OK, 1 row affected (0.05 sec)
- mysql> use db10; //切换库
- Database changed
- mysql>
- mysql> create table a(id int)engine=innodb; //建表并指定存储引擎
- Query OK, 0 rows affected (0.52 sec)
步骤二:关闭服务的自动提交功能
1)数据库管理员root登录,关闭服务的自动提交功能。
- mysql> show variables like "%commit%"; //查看所有包涵commit 字样的变量
- +-----------------------------------------+-------+
- | Variable_name | Value |
- +-----------------------------------------+-------+
- | autocommit | ON | //自动提交功能开启
- | binlog_group_commit_sync_delay | 0 |
- | binlog_group_commit_sync_no_delay_count | 0 |
- | binlog_order_commits | ON |
- | innodb_api_bk_commit_interval | 5 |
- | innodb_commit_concurrency | 0 |
- | innodb_flush_log_at_trx_commit | 1 |
- | slave_preserve_commit_order | OFF |
- +-----------------------------------------+-------+
- 8 rows in set (0.01 sec)
- mysql> set autocommit=off ; 关闭自动提交
- Query OK, 0 rows affected (0.00 sec)
- mysql> show variables like "autocommit"; //查看
- +---------------+-------+
- | Variable_name | Value |
- +---------------+-------+
- | autocommit | OFF | //已处于关闭状态
- +---------------+-------+
- 1 row in set (0.00 sec)
- mysql>
步骤三:测试事务特性
1)插入新记录,不执行提交命令commit
- mysql> insert into db10.a values(101); //插入记录
- Query OK, 1 row affected (0.00 sec)
- mysql> select * from db10.a ;//查看记录
- +------+
- | id |
- +------+
- | 101 |
- +------+
- 1 row in set (0.00 sec)
- mysql>
2)打开新终端访问数据服务,查看不到插入的数据
注:此处打开的终端称为终端2 , 此处之前终端被称为终端1
- [root@host50 ~]# mysql -uroot -p123456
- mysql> select * from db10.a; //没有记录
- Empty set (0.00 sec)
- mysql>
3)终端1 执行提交命令commit
- mysql> select * from db10.a ;
- +------+
- | id |
- +------+
- | 101 |
- +------+
- 1 row in set (0.00 sec)
- mysql> commit ; 执行提交命令
- Query OK, 0 rows affected (0.08 sec)
4)第终端2执行查看命令
- mysql> select * from db10.a;
- Empty set (0.00 sec)
- mysql> select * from db10.a; //查看到数据
- +------+
- | id |
- +------+
- | 101 |
- +------+
- 1 row in set (0.00 sec)
- mysql>
5)在终端1删除记录 ,不执行提交命令commit
将/etc/passwd文件复制到/var/lib/mysql-files/目录下,
- mysql> select * from db10.a ; //删除前查看
- +------+
- | id |
- +------+
- | 101 |
- +------+
- 1 row in set (0.00 sec)
- mysql> delete from db10.a ;//删除表记录
- Query OK, 1 row affected (0.00 sec)
- mysql>
- mysql> select * from db10.a ; //查看不到记录
- Empty set (0.00 sec)
6)在终端2 依然可以查看到记录
- mysql> select * from db10.a;
- +------+
- | id |
- +------+
- | 101 |
- +------+
- 1 row in set (0.00 sec)
- mysql>
7)在终端1,执行回滚命令
- mysql> select * from db10.a ; //回滚前查看
- Empty set (0.00 sec)
- mysql>
- mysql> rollback ; //数据回滚
- Query OK, 0 rows affected (0.03 sec)
- mysql>
- mysql> select * from db10.a ; //回滚后查看
- +------+
- | id |
- +------+
- | 101 |
- +------+
- 1 row in set (0.00 sec)
- mysql>
- mysql> delete from db10.a ; //删除记录
- Query OK, 1 row affected (0.00 sec)
- mysql> commit ; //提交
- Query OK, 0 rows affected (0.08 sec)
- mysql>
- mysql> rollback ; //数据回滚
- Query OK, 0 rows affected (0.00 sec)
- mysql> select * from db10.a ; //查看不到记录
- Empty set (0.00 sec)
- mysql>
8)在终端2 也查看不到记录
- mysql> select * from db10.a;
- Empty set (0.00 sec)