NSD SERVICES DAY06
1 案例1:实验环境准备
1.1 问题
- 配置: 2CPU,2G内存,20G硬盘
- node-0001 主机 IP:192.168.4.30
- 在此机器上安装部署podman服务
1.2 方案
在虚拟机环境练习装机过程——通过菜单组“应用程序”-->“系统工具”-->“虚拟系统管理器”,打开KVM虚拟化的图形管理程序(如图-1所示),添加一台虚拟机,将LINUX系统的ISO镜像文件作为此虚拟机的安装光盘。

图-1
1.3 步骤
步骤一:新建一台LINUX虚拟机
1)启动“新建虚拟机”向导程序
单击虚拟系统管理器左上方的“新建”按钮,即可打开“新建虚拟机”向导窗口;为新建虚拟机指定名称,安装方式选择从本地ISO镜像安装(如图-2所示),单击“前进“。
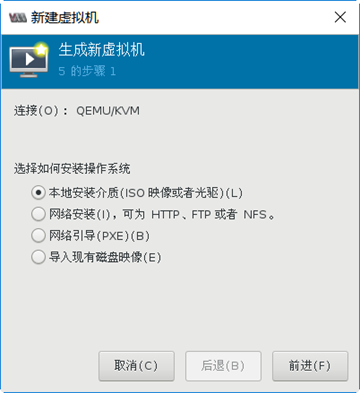
图-2
2)指定ISO文件位置、系统版本
通过“浏览”找到正确的LINUX安装镜像文件的路径(如图-3所示),单击“前进“。
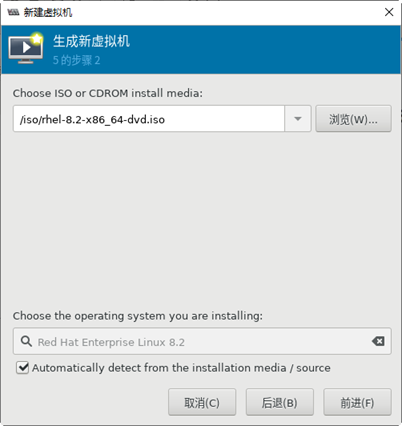
图-3
3)指定虚拟机内存与CPU核心数
内存建议设为2048MB,CPU默认2个即可(如图-4所示),单击“前进”。
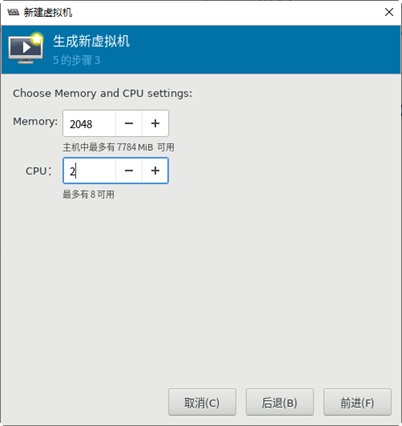
图-4
4)指定虚拟机的磁盘大小
此处建议选择20GB,(如图-5所示),单击“前进”。
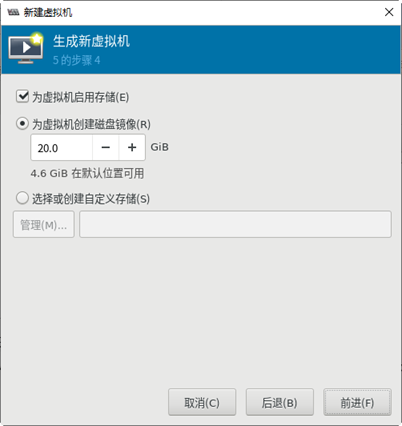
图-5
5)确认并完成创建
查看虚拟机最终配置信息,将虚拟网络选择为“private1”(如图-6所示),单击“完成”后将会自动运行新建的虚拟机。

图-6
步骤二:启动虚拟机电源,安装Linux系统
1)运行Linux安装程序
点击完成后,会自动从光盘引导主机(因为新磁盘没有引导信息,自动找其他启动设备),进入系统的安装选择界面。按上箭头键选择第一项“Install Red Hat Enterprise Linux 8.2”(如图-7所示),然后按Enter键启动安装程序。
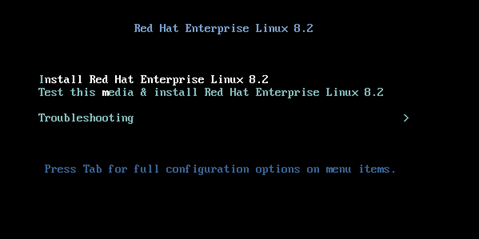
图-7
2)选择语言类型
建议初学者选择“简体中文(中国)”以降低难度(如图-8所示),单击“继续”。
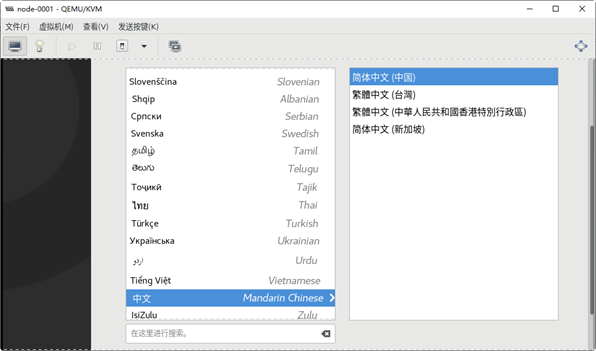
图-8
3)设置时间
点击“时间与日期”(如图-9所示)。
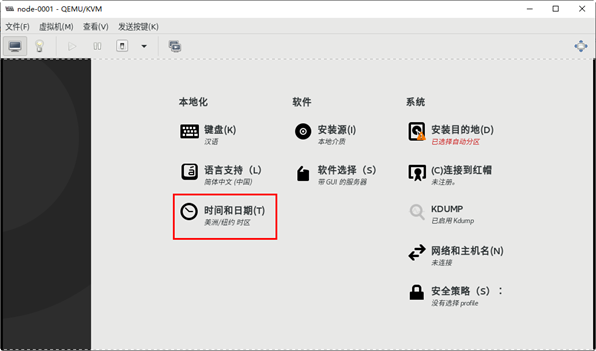
图-9
选择亚洲的上海 (如图-10所示),单击上方的“完成”按钮。

图-10
4)分区配置
选择“安装目的地”(如图-11所示)
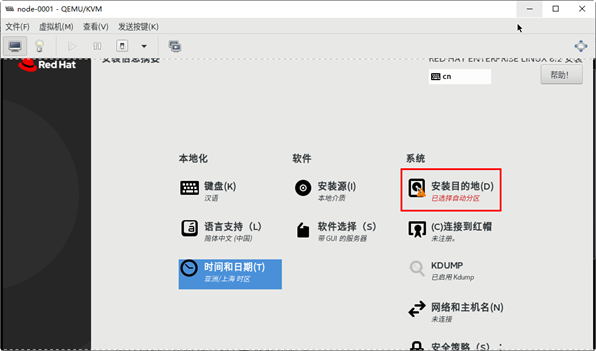
图-11
自动分区选择“完成”即可(如图-12所示)
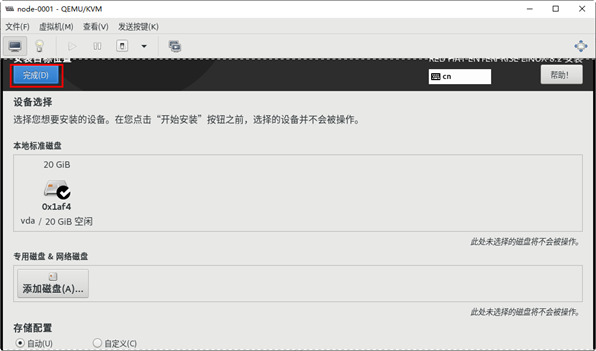
图-12
点击左下角“开始安装”(如图-13所示)
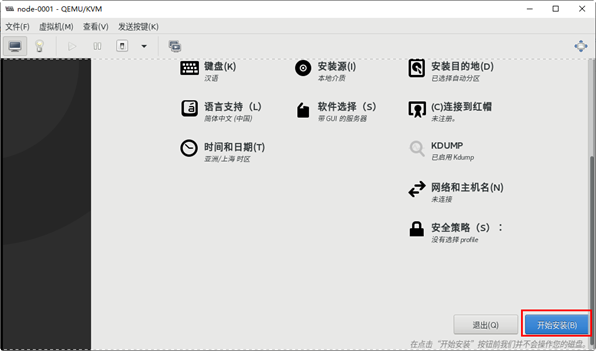
图-13
5)结束安装过程
设置root用户密码,经过一段时间安装系统,会提示重启主机(如图-14所示),根据提示操作即可。
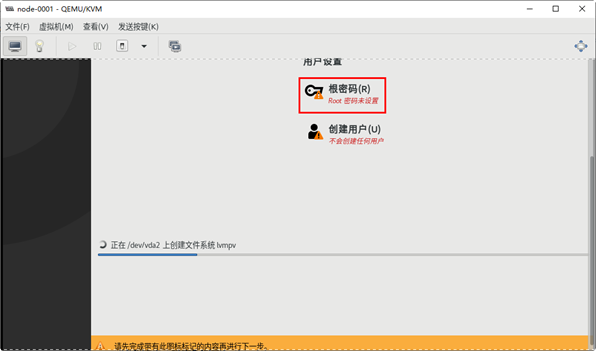
图-14
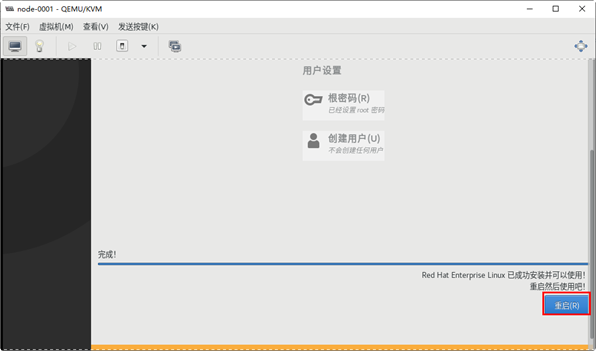
图-15
步骤三:初始化配置
完成LINUX系统的安装过程后,第一次启动时会要求进行初始化设置。
1)确认许可协议,如图-16与图-17所示,点击“完成”
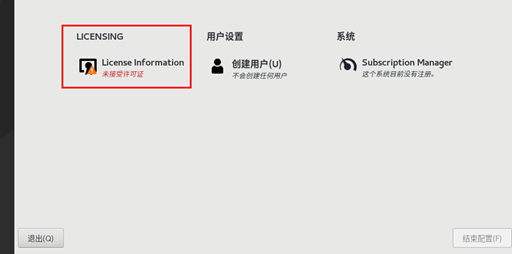
图-16

图-17
2)选择“结束配置”(如图-18所示)。
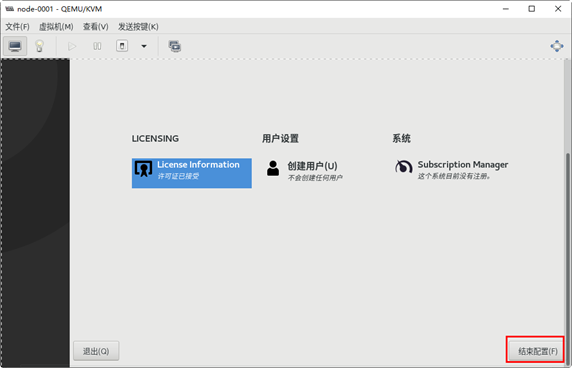
图-18
3)如图-19所示,点击“前进”
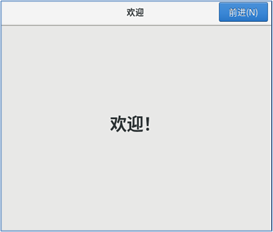
图-19
4)关闭“位置服务”点击前进 (如图-20所示)
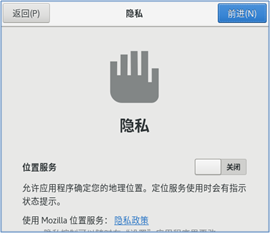
图-20
5)如图-21所示,点击“跳过”
/
图-21
6)如图-22所示,创建普通用户“niuben”点击前进
/
图-22
7)设置密码如图-23所示,点击前进
/
图-23
8)接下来只要单击“开始使用”即可
图-24
点击“未列出”利用root用户自动登入(以后登录时需要提供密码)到桌面环境(如图-25所示)。

图-25
至此,整个LINUX虚拟机系统的安装就完成了。
步骤三:初始化配置
1)配置Yum仓库
- [root@localhost ~]# mkdir /dvd
- [root@localhost ~]# mount /dev/cdrom /dvd
- [root@localhost ~]# vim /etc/yum.repos.d/dvd.repo
- [AppStream]
- name=rhel8.2
- baseurl=file:///dvd/AppStream
- enabled=1
- gpgcheck=0
- [BaseOS]
- name=rhel8.2
- baseurl=file:///dvd/BaseOS
- enabled=1
- gpgcheck=0
- [root@localhost ~]# yum module install container-tools
2)关闭防火墙与SELinux
- [root@localhost ~]# systemctl stop firewalld
- [root@localhost ~]# systemctl disable firewalld
- [root@localhost ~]# setenforce 0
- [root@localhost ~]# getenforce
- Permissive
- [root@localhost ~]# vim /etc/selinux/config
- ……
- SELINUX=permissive
- ……
3)配置IP地址与子网掩码
- [root@localhost ~]# vim /etc/default/grub #grub内核引导程序
- ……..此处省略一万字
- GRUB_CMDLINE_LINUX="…….. quiet net.ifnames=0 biosdevname=0"
- ……..此处省略一万字
- [root@localhost ~]# grub2-mkconfig -o /boot/grub2/grub.cfg #让网卡命名规则生效
- [root@localhost ~]# reboot
- [root@localhost ~]# ifconfig | head -2
- [root@localhost ~]# nmcli connection add type ethernet ifname eth0 con-name eth0
- [root@localhost ~]# nmcli connection modify eth0 ipv4.method manual ipv4.addresses 192.168.4.30/24 connection.autoconnect yes
- [root@localhost ~]# nmcli connection up eth0
2 案例2:镜像管理命令
2.1 问题
本例要求掌握podman命令的基本操作,导入 httpd、myos、nginx 镜像
2.2 方案
真机传递数据到node-0001虚拟机操作:
- scp [...] user@host:远程目录 本地目录
- scp [...] 本地目录 user@host:远程目录
利用podman进行导入:
- podman load -i 备份文件
2.3 步骤
实现此案例需要按照如下步骤进行。
步骤一:rsync同步基本操作
1)将真机目录/linux-soft/1/podman 上传到虚拟机node-0001到根目录下
- [root@localhost ~]# scp -r /linux-soft/1/podman root@192.168.4.30:/
步骤二:导入镜像
- [root@localhost ~]# podman images
- REPOSITORY TAG IMAGE ID CREATED SIZE
- [root@localhost ~]# podman load -i /podman/myos.tar.gz
- Getting image source signatures
- Copying blob 3e66766ae231 done
- Copying blob bcc97fbfc9e1 done
- Copying config 2f57195050 done
- Writing manifest to image destination
- Storing signatures
- Loaded image(s): localhost/myos:latest
- [root@localhost ~]# podman load -i /podman/httpd.tar.gz
- Getting image source signatures
- Copying blob 3e66766ae231 skipped: already exists
- Copying blob bcc97fbfc9e1 skipped: already exists
- Copying config 2f2eb9bd13 done
- Writing manifest to image destination
- Storing signatures
- Loaded image(s): localhost/myos:httpd
- [root@localhost ~]# podman load -i /podman/nginx.tar/gz
- Getting image source signatures
- Copying blob 3e66766ae231 skipped: already exists
- Copying blob bcc97fbfc9e1 skipped: already exists
- Copying config 8a90426645 done
- Writing manifest to image destination
- Storing signatures
- Loaded image(s): localhost/myos:nginx
- [root@localhost ~]# podman images
- REPOSITORY TAG IMAGE ID CREATED SIZE
- localhost/myos nginx 8a9042664597 2 weeks ago 392 MB
- localhost/myos httpd 2f2eb9bd1363 2 weeks ago 392 MB
- localhost/myos latest 2f57195050eb 4 months ago 392 MB
3 案例3:镜像管理命令
3.1 问题
本例要求掌握podman运行容器:
3.2 方案
podman run 命令的参数
- 参数 -i,交互式
- 参数 -t,终端
- 参数 -d,后台运行
- 参数 --name 容器名字
启动 centos 容器,并进入容器
- podman run -it myos:latest /bin/bash
3.3 步骤
实现此案例需要按照如下步骤进行。
步骤一:使用镜像myos:latest启动容器
- [root@localhost ~]# podman run -it localhost/myos:latest /bin/bash
- [root@881fb555f9d1 /]# ls
- bin dev home lib64 mnt proc run srv tmp var
- boot etc lib media opt root sbin sys usr
- [root@881fb555f9d1 /]# exit
- exit
- [root@localhost ~]# podman ps -a
- CONTAINER ID IMAGE COMMAND CREATED STATUS PORTS NAMES
- 881fb555f9d1 localhost/myos:latest /bin/bash About a minute ago Exited (0) 11 seconds ago modest_tesla
- [root@localhost ~]# podman rm 881fb555f9d1 #删除停止的容器
- 881fb555f9d17b278a46355e7f34c819f9c5c47b41029787085301ae5010ce1f
- [root@localhost ~]# podman ps -a
- CONTAINER ID IMAGE COMMAND CREATED STATUS PORTS NAMES
- [root@localhost ~]#
步骤二:启动一个myos:httpd服务容器(后台)
- [root@localhost ~]# podman images
- REPOSITORY TAG IMAGE ID CREATED SIZE
- localhost/myos nginx 8a9042664597 2 weeks ago 392 MB
- localhost/myos httpd 2f2eb9bd1363 2 weeks ago 392 MB
- localhost/myos latest 2f57195050eb 4 months ago 392 MB
- [root@localhost ~]# podman run -itd localhost/myos:httpd
- 173633de0200b4feba2a1cd1a20f392cf7ca923c7ccb4954bee971bf428d6d75
- [root@localhost ~]# podman ps
- CONTAINER ID IMAGE COMMAND CREATED STATUS PORTS NAMES
- 173633de0200 localhost/myos:httpd /usr/sbin/httpd -... 4 seconds ago Up 3 seconds ago great_mahavira
- [root@localhost ~]# podman exec -it 173633de0200 /bin/bash
- [root@173633de0200 html]# ls
- index.html info.html info.php
- [root@173633de0200 html]# pwd
- /var/www/html
- [root@173633de0200 html]# cat index.html
- this is apache
- [root@173633de0200 html]# exit
- exit
- [root@localhost ~]#
4 案例4:容器高级使用
4.1 问题
- 利用myos:httpd镜像,创建一个名为logserver的容器
- 将/container挂载到容器中/var/www/html
- logserver容器以systemd服务的形式运行
- 该服务命名为container-logserver,该服务设置为开机自启动
4.2 方案
发布podman服务
- 我们使用 -p 参数把容器端口和宿主机端口绑定
- 例如:把宿主机变成 apache
- podman run -d -p 80:80 myos:httpd
podman可以映射宿主机文件或目录到容器中
- 目标对象不存在就自动创建
- 目标对象存在就直接覆盖掉
- 多个容器可以映射同一个目标对象来达到数据共享的目的
- 启动容器时,使用 -v 映射参数(可有多个)
- podman run -d -v 宿主机对象:容器内对象 镜像名称:标签
管理员管理容器服务
- 管理员服务文件默认路径
- /usr/lib/systemd/system/
- 生成服务启动配置文件
- --files:生成文件类型
- podman generate systemd --name 容器名 --files
- 重新加载服务启动配置文件
- systemctl daemon-reload
4.3 步骤
实现此案例需要按照如下步骤进行。
步骤一:创建/container目录
1)创建目录
- [root@localhost ~]# mkdir /container
2)建立网页文件
- [root@localhost ~]# echo contaiber test > /container/index.html
- [root@localhost ~]# cat /container/index.html
- contaiber test
步骤二:运行容器
1)运行容器,置入后台
- [root@localhost ~]# podman images
- REPOSITORY TAG IMAGE ID CREATED SIZE
- localhost/myos nginx 8a9042664597 2 weeks ago 392 MB
- localhost/myos httpd 2f2eb9bd1363 2 weeks ago 392 MB
- localhost/myos latest 2f57195050eb 4 months ago 392 MB
- [root@localhost ~]# podman run -itd --name=logserver -v /container/:/var/www/html -p 80:80 localhost/myos:httpd
- 98f582324701460ffd72f0640c13646ecec3669101ac7dc7614c28970a9bf441
- [root@localhost ~]# podman ps
- CONTAINER ID IMAGE COMMAND CREATED STATUS PORTS NAMES
- 98f582324701 localhost/myos:httpd /usr/sbin/httpd -... 21 seconds ago Up 20 seconds ago 0.0.0.0:80->80/tcp logserver
- [root@localhost ~]#
2)测试访问
- [root@localhost ~]# curl http://127.0.0.1
- contaiber test
- [root@localhost /]# podman exec -it logserver /bin/bash
- [root@98f582324701 html]# ls
- index.html
- [root@98f582324701 html]# pwd
- /var/www/html
- [root@98f582324701 html]# cat index.html
- contaiber test
- [root@98f582324701 html]# exit
- exit
- [root@localhost /]#
步骤三:将容器配置成systemd管理的服务
1)建立服务文件
- [root@localhost /]# cd /usr/lib/systemd/system
- [root@localhost system]# podman generate systemd --name logserver --files
- /usr/lib/systemd/system/container-logserver.service
- [root@localhost system]#
2)重新加载服务文件
- [root@localhost system]# systemctl daemon-reload
3)设置开机自启动,重启系统测试
- [root@localhost system]# systemctl enable container-logserver
- Created symlink /etc/systemd/system/multi-user.target.wants/container-logserver.service → /usr/lib/systemd/system/container-logserver.service.
- [root@localhost system]# reboot
4)重新进入系统查看
- [root@localhost ~]# podman ps
- CONTAINER ID IMAGE COMMAND CREATED STATUS PORTS NAMES
- 98f582324701 localhost/myos:httpd /usr/sbin/httpd -... 22 minutes ago Up 11 minutes ago 0.0.0.0:80->80/tcp logserver
- [root@localhost ~]# curl http://127.0.0.1
- contaiber test
- [root@localhost ~]#